Quickstart guide
Follow this guide to install JetBrains Air in IDEs, start your first agent session, provide context, and review the changes suggested by the agent.
1. Install JetBrains Air in IDEs
JetBrains Air in IDEs is a separate plugin that provides the workspace for running coding agents in the IDE. How you set it up depends on the version of your IDE:
The JetBrains Air in IDEs plugin is not bundled with the IDE. Install the plugin from JetBrains Marketplace:
Open settings or press Ctrl+Alt+S in your IDE and then select .
Switch to the Marketplace tab.
Search for Air and click Install.
Restart the IDE if prompted.
The JetBrains Air in IDEs plugin is bundled with the IDE, so you do not need to install it. To make sure that the plugin is enabled:
Open settings or press Ctrl+Alt+S in your IDE and then select .
In the Bundled section, locate the Air plugin in the list and make sure it is enabled.
2. Open a project
Agent sessions work with the files and configuration of the project that is open in the IDE.
Open the project where you want to work with an agent.
3. Select an agent and start a session
JetBrains Air in IDEs starts a session from a preset – an agent configuration that preselects the model, effort, access level, and other session options. A preset is created automatically for every supported agent that JetBrains Air in IDEs detects on your machine or that you install.
In the main toolbar, either click New Session to immediately start a session with the selected agent, or click
 and select a specific agent preset from the list. This opens a new session with the agent in a new editor tab.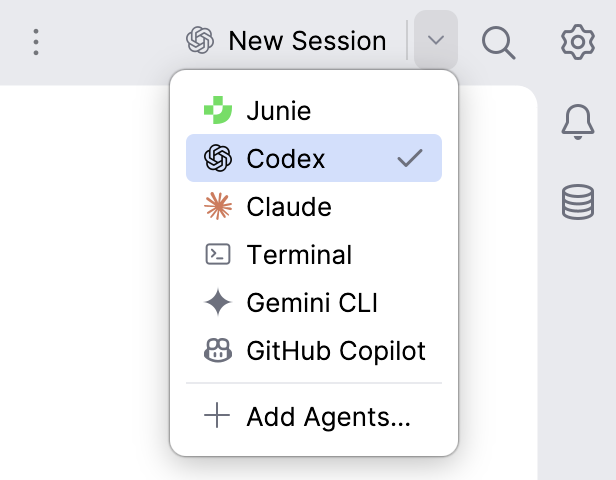
4. Authorize the agent
To work on a task, an agent needs an available authorization source. You can tell whether the agent picked up your existing configuration or you need to configure one after you send the first message in the session:
Type a message in the prompt field and press Enter.
If JetBrains Air in IDEs detects an authorization that the agent already uses on your machine, the agent answers the message, and you can proceed to the next step.
If the agent shows the Choose a sign-in method to continue list instead, click the preferred authorization method or select it with the Up and Down arrow keys, and press Enter.
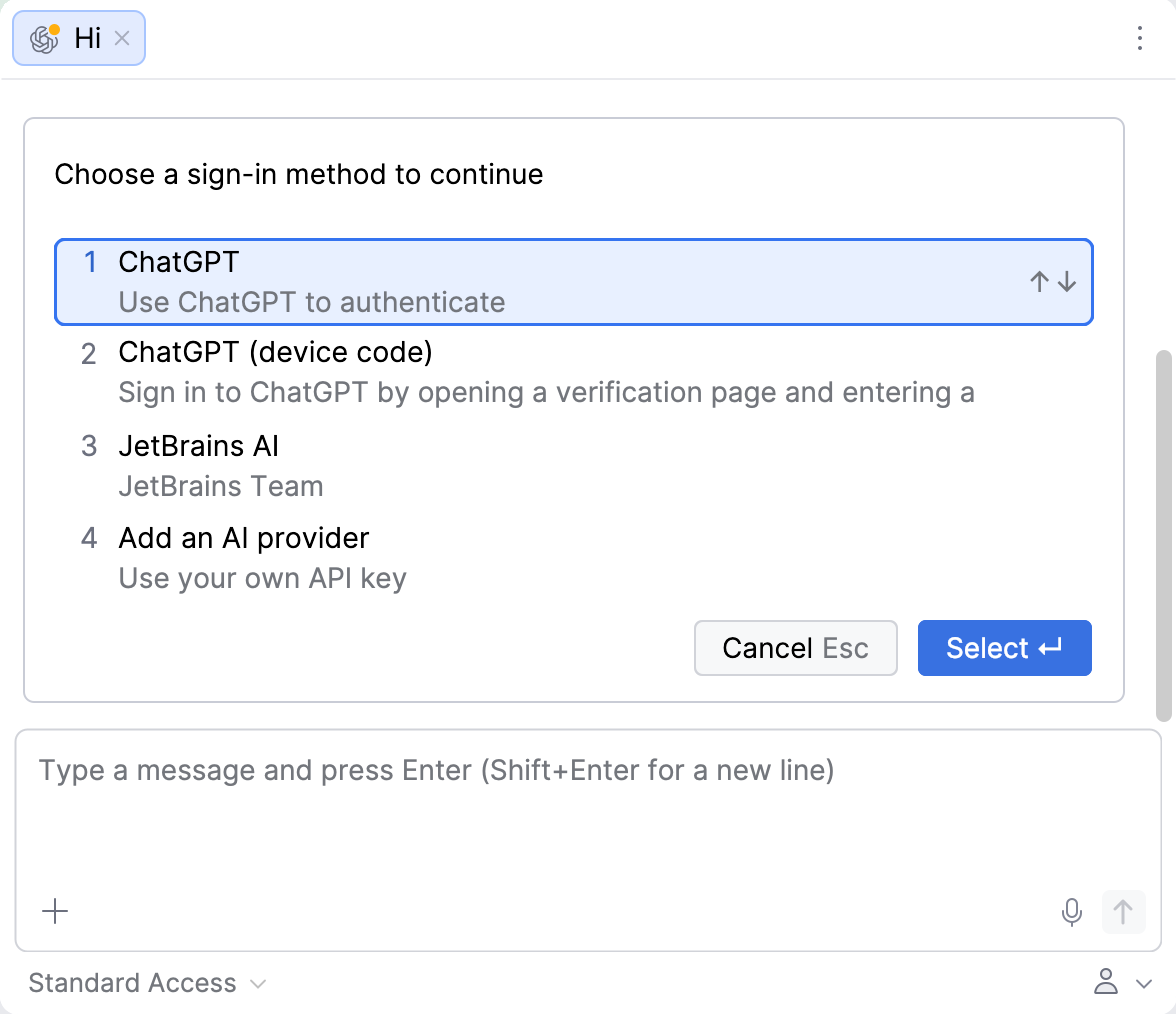
Complete the authorization:
Depending on the agent, you may be prompted to complete the authorization in a browser or terminal.
Provide your login details in the browser or terminal that opens, or follow another authorization flow that the agent provides.
Return to the session.
Agents that support JetBrains AI authorization offer a JetBrains AI entry if you have an eligible license or organization workspace associated with your JetBrains Account.
Select the JetBrains AI entry from the list.
Wait until the connection to the selected agent is established.
Use this option to work through a provider subscription of your own. Selecting the Add an AI provider option opens the settings page:
Click More Providers and select the provider that you want to add.
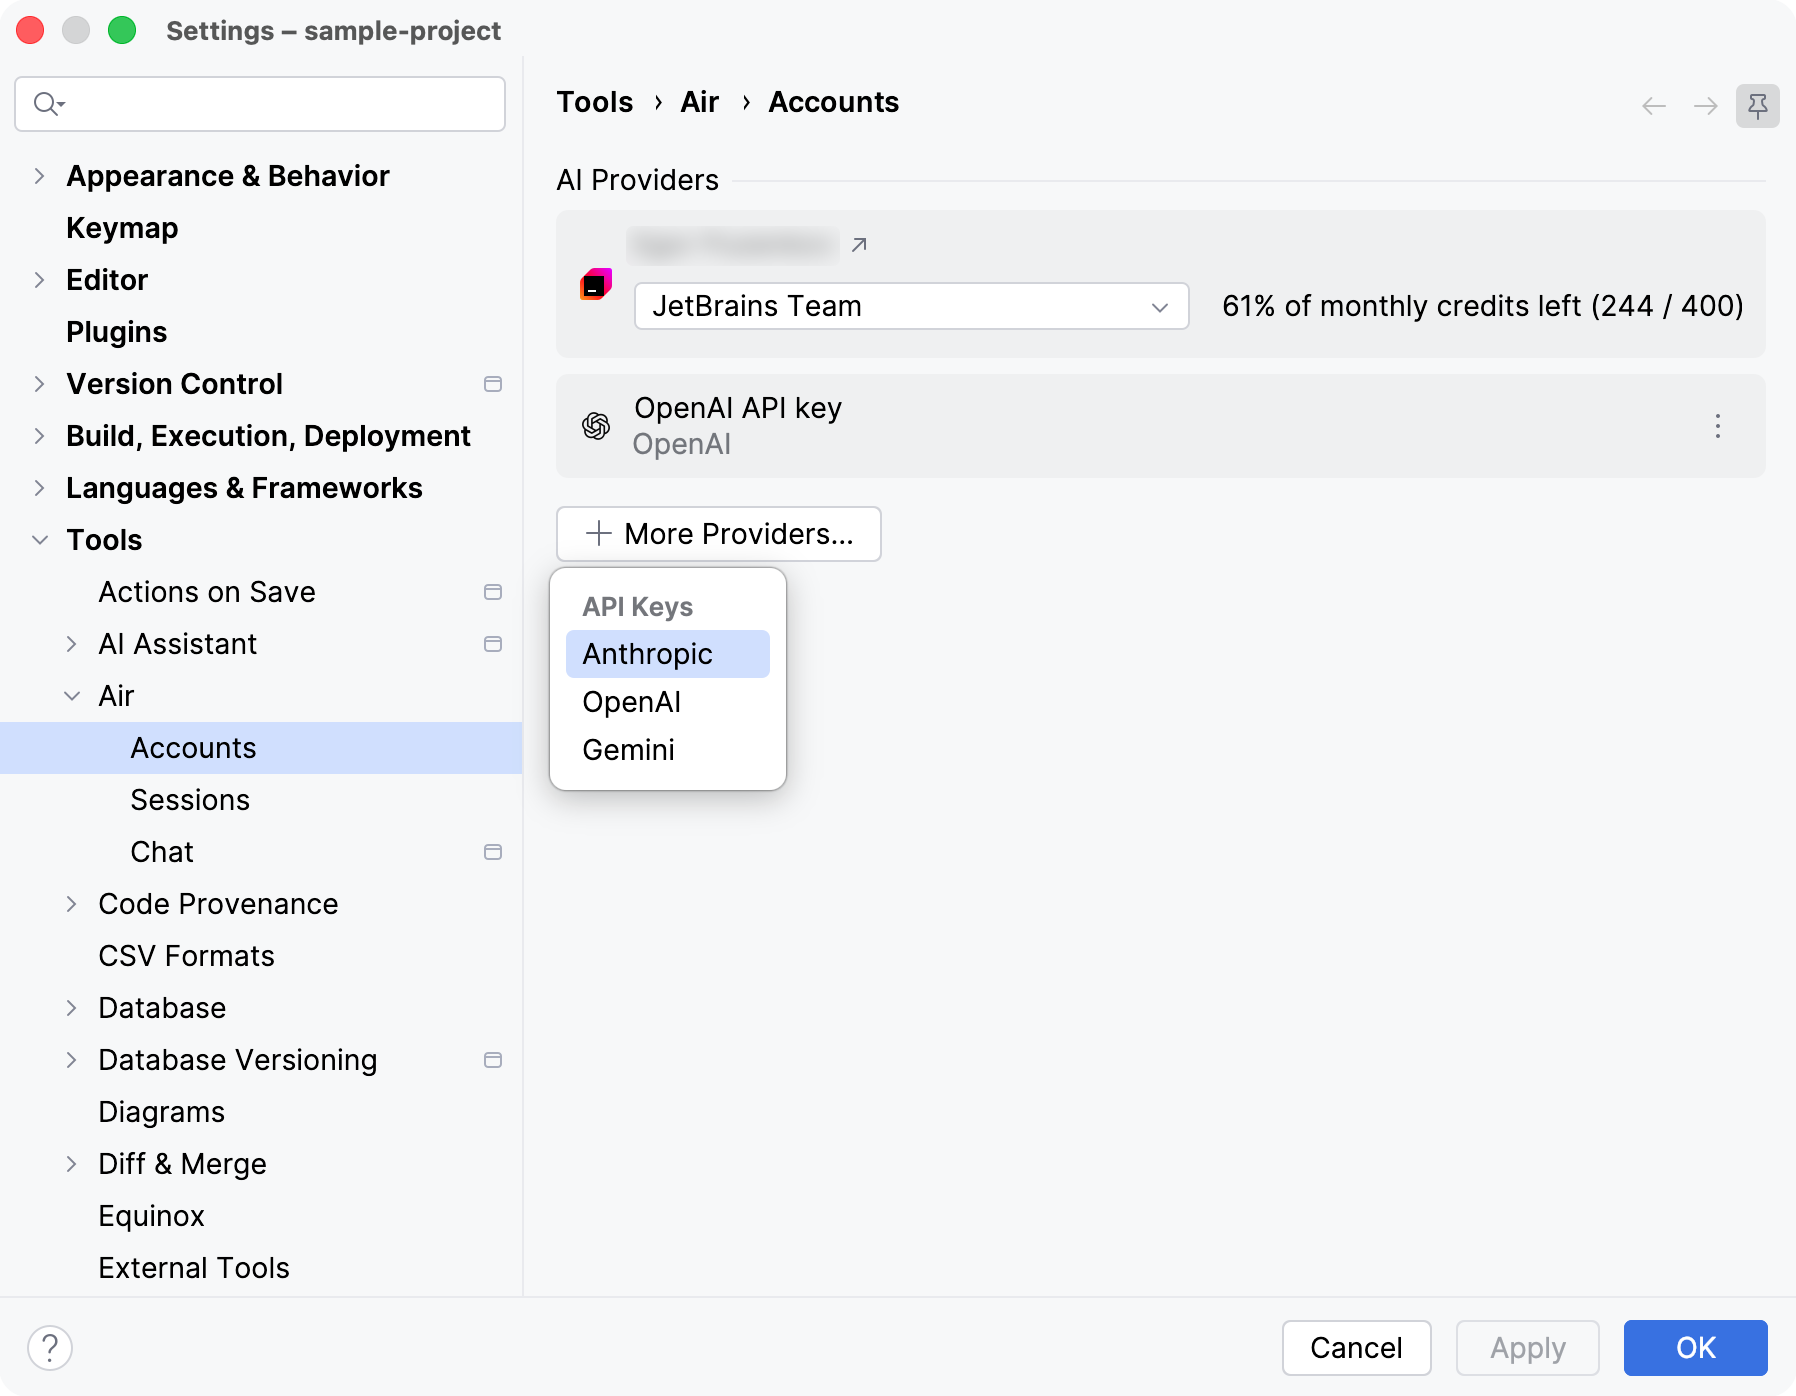
In the dialog that opens, enter the credentials that the provider requires, such as an API key, and configure any additional settings.
Click OK to save the settings.
Return to the session and select the configured provider in the list.
After the authorization completes, the agent is ready to work on the task.
5. Configure the agent
If needed, you can configure the agent before you send your first request for the task. The available options depend on the selected agent, but you usually can:
Select a processing model and the reasoning effort for the task.
Select an access level that determines which actions the agent can perform without asking for confirmation.
Configure any other settings available for the selected agent.
For more information about presets and their settings, refer to Configure and manage presets.
6. Describe the task and add context
Give the agent a specific goal and enough information to complete it. Describe the expected result, mention important constraints, and attach the project items that the agent needs to inspect.
Type your request in the prompt field using natural language.
Click the
 button and attach the files, commits, or skills that the agent needs for the task.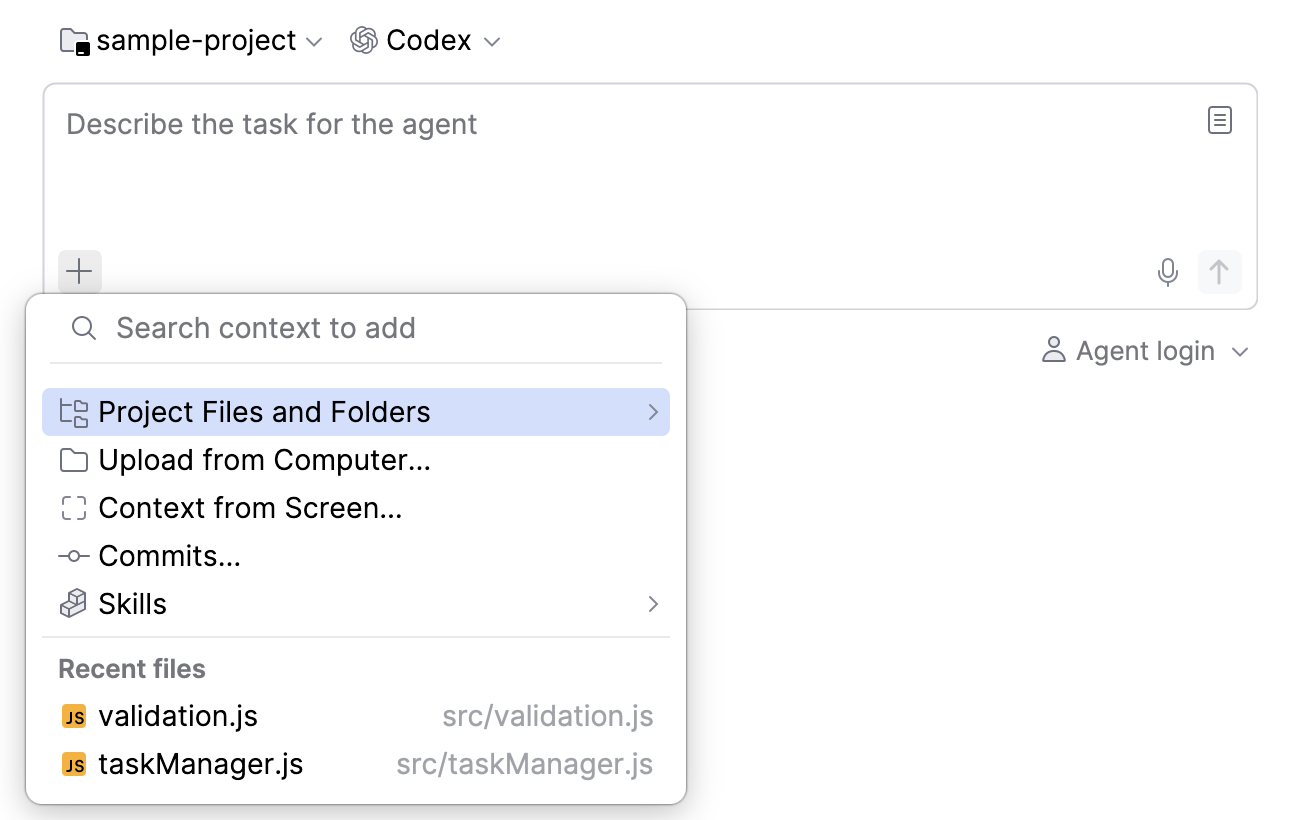
For more ways to provide information to the agent, refer to Attach context.
7. Send the prompt and follow the task
When the prompt contains the task and required context, send it to start the agent. The agent then reports its progress and may ask you questions while it works.
Click
 Send in the bottom-right corner of the prompt field, or press Enter.
Follow the agent's progress and provide any information it requests.
To learn how to continue a conversation, queue prompts, or answer agent questions, refer to Interact with the agent.
8. Review and manage the changes
Review the result before committing the changes. JetBrains Air in IDEs lists the files modified by the agent in the session chat and in the Agent Sessions tool window. The two lists differ in scope: the chat covers the latest iteration, while the tool window covers the whole session.
When the agent finishes working on your message, the session chat shows a list of the files that it modified in this iteration. The list reports how many files changed and how many lines were added and removed in each of them.
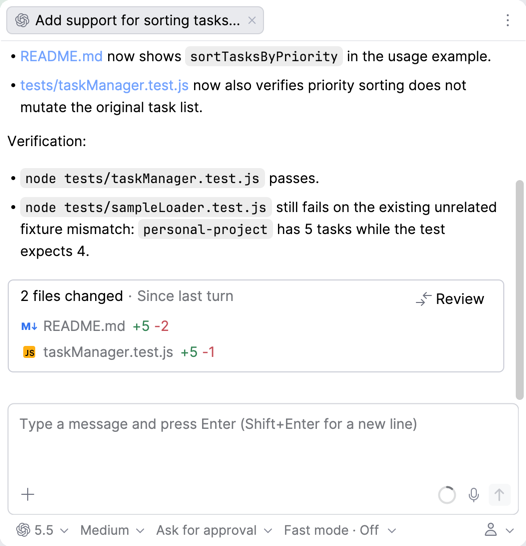
To review the changes:
Click a file in the list to open the diff of that file.
Click
 Review in the top-right corner of the list to start the review from the first file in the list and move through the rest of the files from there.
The list belongs to the message that the agent answered, so it stays in the history of the conversation. The next iteration adds a list of its own with the files that changed in it.
The Agent Sessions tool window collects every file that the agent modified during the session, across all iterations.
Open the Agent Sessions tool window and expand the completed session.
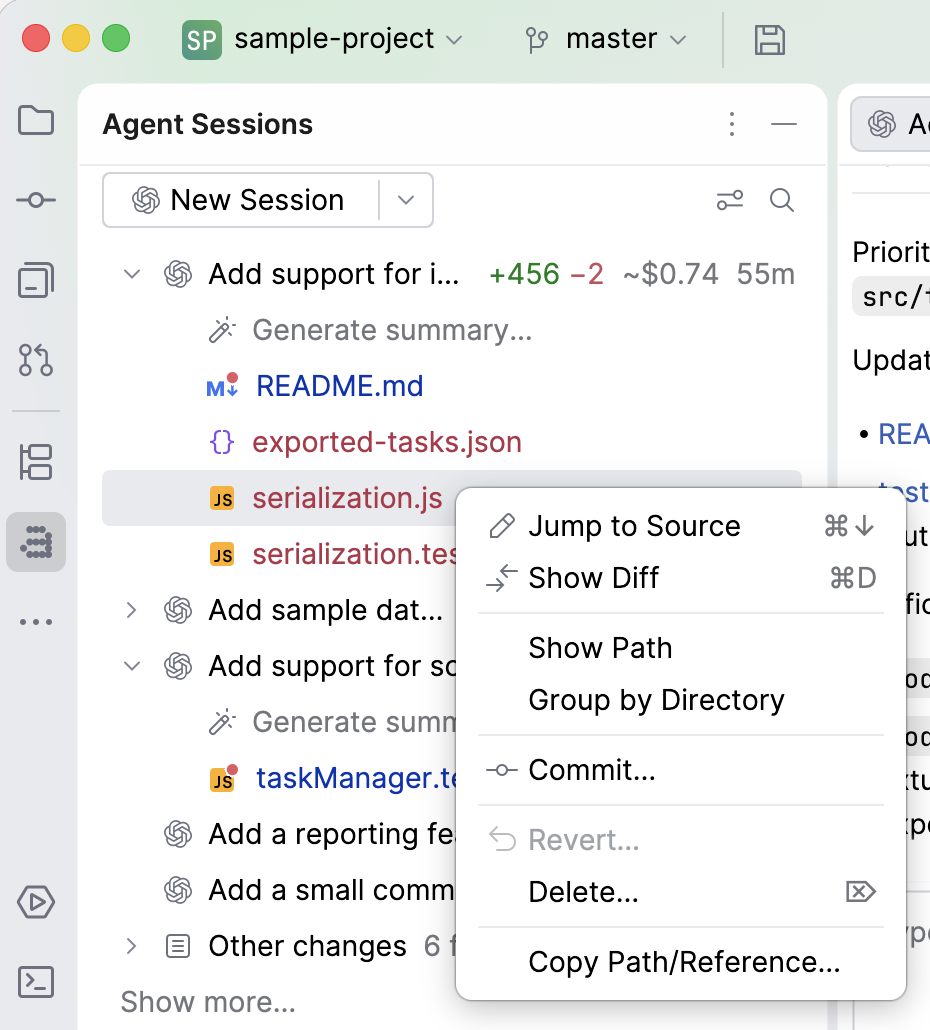
Open a diff for each changed file and verify the result.
Alternatively, double-click
 Generate summary under the session to start a new session where an agent reviews the changes.
Keep, edit, commit, or revert the modified files as needed.
For more information about the changes of a session, refer to Review the files an agent changed. To have an agent summarize the changes, refer to Review changes with AI.
Next steps
Key concepts – learn the terms used in JetBrains Air in IDEs, such as agents, sessions, and presets.
Start, continue, or fork a session – learn more ways to start a session.
Interact with the agent – learn how to describe a task, queue prompts, and answer agent questions.
Browse, install, and update agents – learn how to browse, install, and update agents.
Configure and manage presets – learn to create agent presets with different models and access levels.
Review changes with AI – learn how to summarize changes with AI, leave notes on a diff, and resolve conflicts.