Browse, install, and update agents
The Agents page lists the coding agents that are already installed on your machine, as well as the ones you can install from the curated catalog.
Open the Agents page
Click
 next to the agent widget in the main toolbar.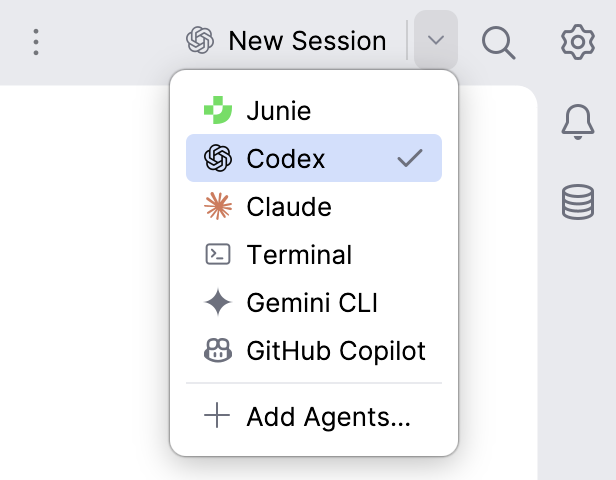
Select Add Agents.
The Agents page opens in an editor tab with agents grouped into two sections:
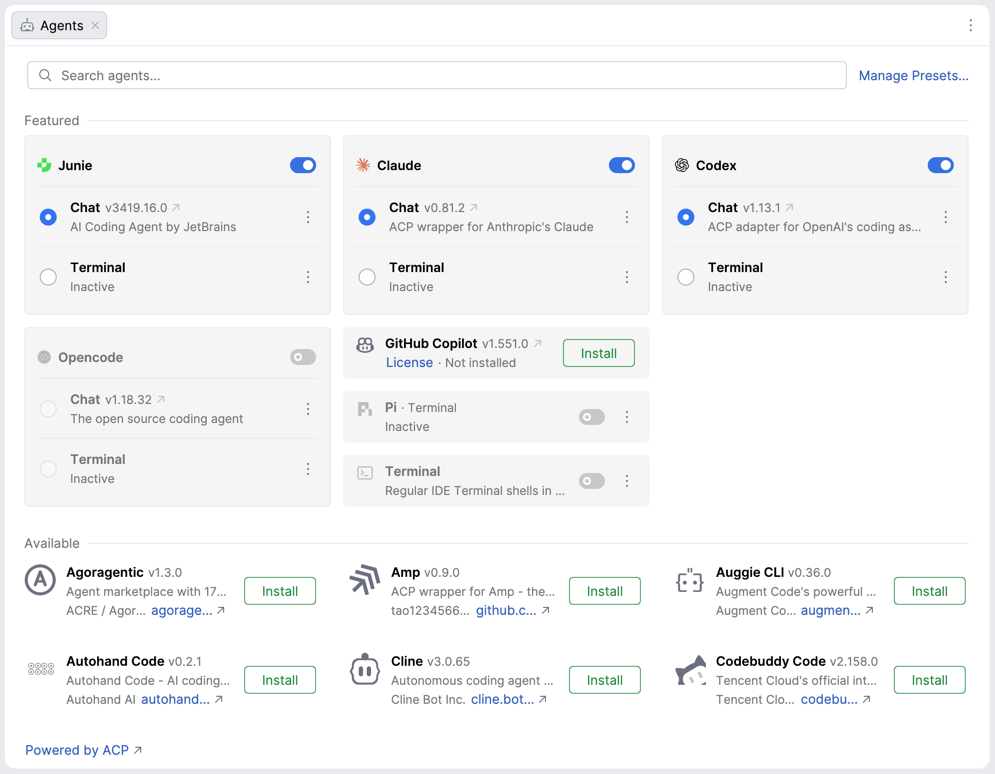
Featured – the agents that JetBrains suggests trying, and all other agents that you installed. JetBrains Air in IDEs does not install the suggested agents in advance: until you install one, its card shows an Install button.
Available – the curated catalog of agents that you can install. Each card shows the name and version of the agent, a short description, its vendor, and a link to its website.
The card of an agent in the Featured section shows the agent name with a toggle that enables or disables the agent, and the ways in which the agent can run: Chat and, for agents that also support the terminal surface, Terminal.
To search for a specific agent in any of the sections, type its name in the search field at the top of the page. To configure the presets that run the agents, click Manage Presets next to the search field.
Install an agent
On the Agents page, find the agent that you want to install.
Click Install on the agent's card.
The agent then appears in the Featured section, and JetBrains Air in IDEs creates a default preset for it, so you can start a session with the agent right away.
Manage an installed agent
To manage an installed agent, click  next to the Chat option on the agent's card, or next to the agent's name if the agent runs only in the chat, and select one of the following options:
Uninstall – remove an agent that you no longer need.
Open Website – open the agent's page on the vendor's website.
View Terms of Service – open the terms that the agent is distributed under.
Edit ACP Arguments – change the command-line arguments that JetBrains Air in IDEs uses to start the agent in a chat.
For an agent that supports the terminal surface, click next to the Terminal option and select Edit Terminal Arguments to change the command-line arguments that JetBrains Air in IDEs uses to start the agent.
Select whether an agent runs in the chat or terminal surface
Some agents can run either in the chat surface or in the terminal surface, which JetBrains Air in IDEs opens as a full-screen editor tab. You select the mode on the card of the agent, and the selection applies to all presets that run this agent: if you select Terminal, every session that you start with any of the presets configured for the agent opens in the terminal surface.
Open the Agents page as described in Open the Agents page.
On the card of the agent in the Featured section, select Chat or Terminal.
The mode is not part of a preset: a preset defines the model, effort, and access mode that the agent starts with, as described in Configure and manage presets.
Enable or disable an agent
To keep an installed agent out of the launch pickers without uninstalling it, turn off the toggle next to the agent's name on its card in the Featured section.
When you disable an agent, JetBrains Air in IDEs removes its default preset from the launch pickers. The custom presets that run the agent stay in the pickers, but you cannot select them. To make the agent and all its presets available again, turn the toggle back on.
Update agents
By default, agents installed from the agent registry are updated automatically. JetBrains Air in IDEs downloads and installs newer versions in the background, silently.
An update does not replace the agent process that an active session uses: the session continues with the version that it started with, and the sessions that you start after the update use the newer version.
If you turn off the Automatically update agents option in the settings, you can update agents manually from the Agents page. When an update is available, the card of the agent shows the installed version and the newer version. Click Update on the card to update one agent, or Update all to install all available updates.
Add a custom ACP agent
To use an ACP agent that is not listed in the catalog, describe it in the acp.json configuration file.
Locate the acp.json file:
C:\Users\<username>\.jetbrains\acp.json
/Users/<username>/.jetbrains/acp.json
/home/<username>/.jetbrains/acp.json
Open the file and add the agent under
agent_servers. If you already have configured agents, merge the new entry with the existing configuration instead of replacing the file, so that other agents stay configured.{ "agent_servers": { "My Agent": { "command": "/absolute/path/to/your-agent", "args": ["acp"], "use_idea_mcp": false, "use_custom_mcp": true } } }My Agent– the name of the agent as it appears in JetBrains Air in IDEs.command– the absolute path to the agent executable.args– the command-line arguments that start the agent in ACP mode over standard input and output. The required arguments depend on the agent: refer to its documentation.use_idea_mcp– whether the agent can use the JetBrains Air in IDEs tools through the integrated MCP server.use_custom_mcp– whether the agent can use the MCP servers that you configured.
Save acp.json and restart the IDE.
Select the custom agent in the agent widget or in any other launch picker, and start a session as described in Start a new session.
WSL example
To run a custom agent inside Windows Subsystem for Linux (WSL), install it in WSL and point JetBrains Air in IDEs to its Linux path.
Install the agent inside your WSL distribution.
Authenticate the agent in WSL as described in its documentation.
Open a WSL shell and find the path to the agent executable:
wsl which <agent-executable>The
whichcommand returns the Linux path to the executable, for example /home/<username>/.local/bin/<agent-executable>.In acp.json, add an entry that uses this Linux path, and set the
typeofexecution_environmenttowsl:{ "agent_servers": { "My Agent (WSL)": { "command": "/home/<username>/.local/bin/<agent-executable>", "args": ["<acp-argument>"], "use_idea_mcp": false, "use_custom_mcp": true, "execution_environment": { "type": "wsl" } } } }In
args, specify the arguments that start the agent in ACP mode:["acp"]– if the agent enables ACP mode with theacpsubcommand.[]– if the executable already runs as an ACP server.Other arguments – if the agent documentation requires them.
Save acp.json and restart the IDE.