使用 matplotlib 可视化数据
在本教程中,您将学习如何使用 Matplotlib 库来可视化数据。 在学习过程中,您将执行以下任务:
找出 2003-2016 年间延误和取消航班比例最高的美国机场。
查看这些比例随时间的变化情况。
突出一些总体趋势。
先决条件
在开始之前,请确保:
您已安装 DataSpell。 本教程是在 DataSpell 2023.3 中创建的。
您的计算机上已安装 Python 3.6 或更新版本。 如果您使用的是 macOS 或 Linux,您的计算机已经安装了 Python。 您可以从 python.org 获取 Python。
准备一个示例
如果您已完成 上一个教程 ,请直接继续到 转换数据。 否则,请下载数据集并按照 将数据附加到工作区 部分的描述将其添加到 DataSpell 工作区。
在本教程中,我们将使用 "2003-2016 年航空延误" 数据集,由 Priank Ravichandar 提供,并根据 CC0 1.0 授权。 此数据集包含 2003-2016 年美国机场航班延误和取消的信息。
您应该有一个包含以下单元格的笔记本:
您还可以下载完整的笔记本并将其添加到您的 DataSpell 工作区: ds_visualize_tutorial.ipynb
转换数据
我们的第一个目标是找到延误和取消航班比例最高的机场。 为此,我们只需要以下列:
Airport.CodeStatistics.Flights.Total(航班总数)Statistics.Flights.Delayed(延误航班数)Statistics.Flights.Cancelled(取消航班数)
让我们从
dataDataFrame 中选择所需的列,并通过在第一个单元格中添加以下代码将它们放入airport_data中:# Select required columns airport_data = data[['Airport.Code', 'Statistics.Flights.Total', 'Statistics.Flights.Delayed', 'Statistics.Flights.Cancelled']] # View DataFrame airport_data运行单元格后,按下 Ctrl+Enter 或点击
,您将在输出中看到以下内容:

向下滚动行。 您会看到每一行都包含一个特定机场一个月的数据。 我们需要整个时期的统计数据,因此让我们按机场代码对数据进行分组并汇总值:
# Group data by airport code and summarize the values airport_data = airport_data.groupby('Airport.Code').sum()以下是单元格的完整代码:
import pandas as pd # Read file data = pd.read_csv('airlines.csv') # Select required columns airport_data = data[['Airport.Code', 'Statistics.Flights.Total', 'Statistics.Flights.Delayed', 'Statistics.Flights.Cancelled']] # Group data by airport code and summarize the values airport_data = airport_data.groupby('Airport.Code').sum() # View DataFrame airport_data... 以及其输出:

在继续之前,让我们创建另一个代码单元格。 点击笔记本工具栏中的 在下方添加代码单元:

我们将通过延误和取消航班的比例来比较机场。 看起来我们应该向 DataFrame 添加一些数据。
让我们创建两个新列:
Ratio Delayed.Total和Ratio.Cancelled Total。 这些列中的数据将通过计算得出。 引入变量是为了提高代码的可读性:# Assign variables delayed = airport_data['Statistics.Flights.Delayed'] cancelled = airport_data['Statistics.Flights.Cancelled'] total = airport_data['Statistics.Flights.Total'] # Create new columns and fill them with values airport_data['Ratio Delayed.Total']= delayed / total airport_data['Ratio Cancelled.Total']= cancelled / total # View DataFrame airport_data运行该单元格以确保已向 DataFrame 添加了两个列。 为此,请按 Ctrl+Enter 或点击
。

可视化数据
让我们开始以柱状图的形式可视化我们新创建的 airport_data DataFrame。
您需要将 import matplotlib.pyplot as plt 添加到第一个代码单元格的开头。 编辑后不要忘记重新运行该单元格,例如,点击 运行单元格并选择下一个 或按下 Shift+Enter。
创建一个柱状图
首先,让我们通过使用 sort_values 方法对
airport_data中的行进行排序,以提高未来图表的可读性:airport_data = airport_data.sort_values(by='Ratio Delayed.Total', ascending=False)现在分配变量:
airport_code = airport_data.index delayed = airport_data['Ratio Delayed.Total'] cancelled = airport_data['Ratio Cancelled.Total']请注意,当我们创建
airport_dataDataFrame 时,Airport.Code列成为了索引列。 这意味着机场代码在此 DataFrame 中用作行地址,您不需要指定列名来读取它们。以下代码创建了一个具有特定宽度和高度(以英寸为单位)的图形,以及一个 Matplotlib Axes。 它们将包含未来柱状图的所有元素。
fig, ax = plt.subplots(figsize=(15,5))要绘制柱状图,请使用 bar() 方法。 它接受 x 和 y 坐标作为前两个位置参数。 标签将用于渲染图例。
ax.bar(airport_code, delayed[airport_code], bottom=cancelled[airport_code], label='Delayed') ax.bar(airport_code, cancelled[airport_code], label='cancelled')在绘制第一个柱状图时,我们使用了一个额外的
bottom参数,将延误柱堆叠在取消柱的顶部。设置轴标签、图表标题,并显示图例:
ax.set_xlabel('Airport codes') ax.set_ylabel('Ratio') ax.set_title('Ratio of delayed and cancelled flights to total flights') ax.legend()最后,使用
plt.show()渲染整个内容。 这是单元格的完整代码:# Sort DataFrame rows airport_data = airport_data.sort_values(by='Ratio Delayed.Total', ascending=False) # Assign variables airport_code = airport_data.index delayed = airport_data['Ratio Delayed.Total'] cancelled = airport_data['Ratio Cancelled.Total'] # Create a figure and set its size to 15x5 in. fig, ax = plt.subplots(figsize=(15,5)) # Plot bar charts ax.bar(airport_code, delayed[airport_code], bottom=cancelled[airport_code], label='Delayed') ax.bar(airport_code, cancelled[airport_code], label='cancelled') # Add axes labels and title ax.set_xlabel('Airport codes') ax.set_ylabel('Ratio') ax.set_title('Ratio of delayed and cancelled flights to total flights') # Show legend ax.legend() # Show plot plt.show()结果如下:
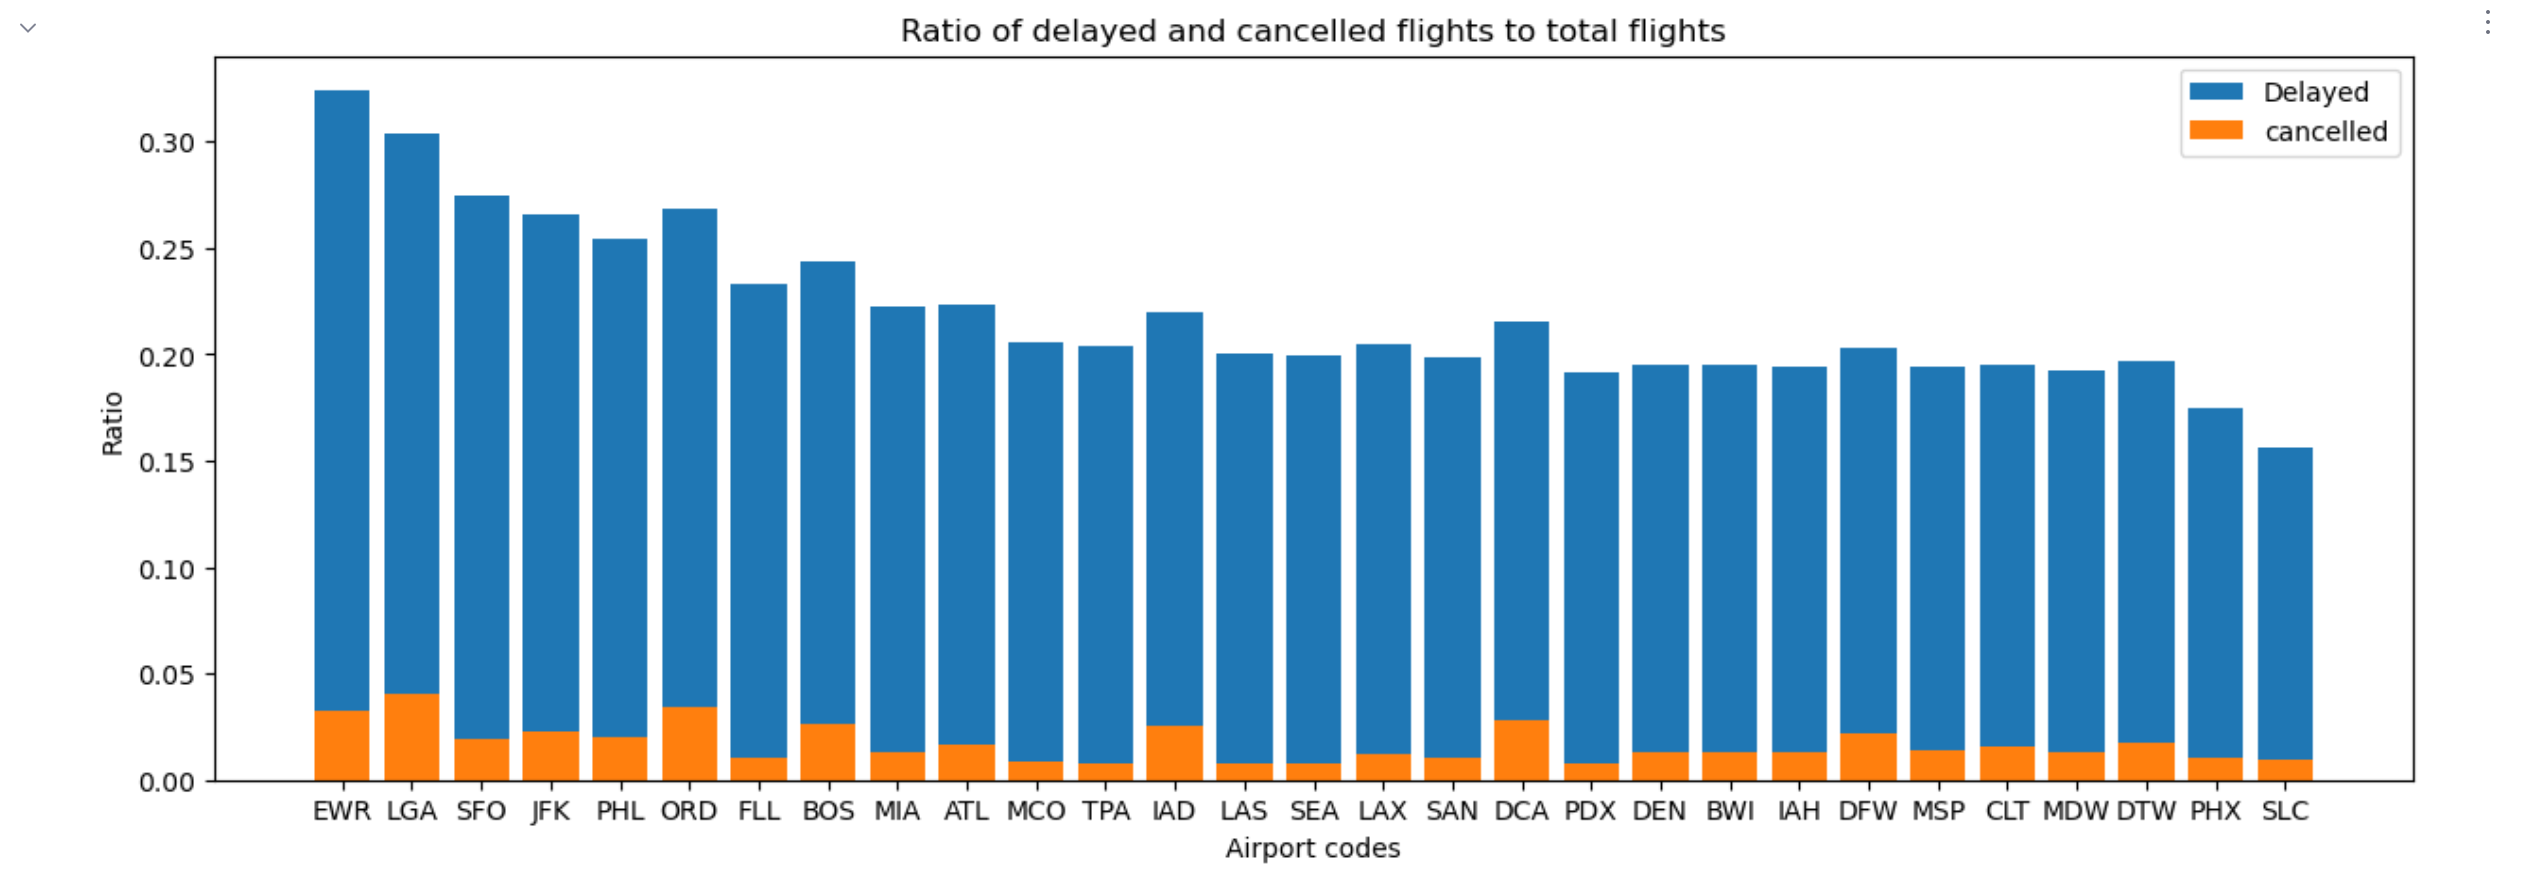
您可以看到延误航班比例最高的是纽瓦克自由国际机场(EWR)。 让我们继续研究该机场的数据。 找出取消和延误航班数量随时间的变化会很有趣。
创建一条折线图
让我们从数据集中选择必要的数据开始:
ewr_data = data[data['Airport.Code']=='EWR']这段代码可以翻译为“从
data中选择在Airport.Code列中具有 EWR 的行,并将它们放入ewr_dataDataFrame”。分配变量:
date = ewr_data['Time.Label'] delayed = ewr_data['Statistics.Flights.Delayed'] cancelled = ewr_data['Statistics.Flights.Cancelled']再次创建一个图形和一个 Axes:
fig, ax = plt.subplots(figsize=(15,5))对于折线图,请使用 plot() 方法:
ax.plot(date, delayed, label='Delays') ax.plot(date, cancelled, label='Cancellations')添加轴标签、标题和图例:
ax.set_xlabel('Year/Month') ax.set_ylabel('Flights (delayed/cancelled)') ax.set_title('Cancellations and delays in EWR 2003-2016') ax.legend()以下是用于复制粘贴的完整代码单元格:
# Select rows with 'EWR' in the first column ewr_data = data[data['Airport.Code']=='EWR'] # Assign variables date = ewr_data['Time.Label'] delayed = ewr_data['Statistics.Flights.Delayed'] cancelled = ewr_data['Statistics.Flights.Cancelled'] # Create a figure and set its size to 15x5 in. fig, ax = plt.subplots(figsize=(15,5)) # Plot line charts ax.plot(date, delayed, label='Delays') ax.plot(date, cancelled, label='Cancellations') # Add axes labels ax.set_xlabel('Year/Month') ax.set_ylabel('Flights (delayed/cancelled)') # Add title and legend ax.set_title('Cancellations and delays in EWR 2003-2016') ax.legend() # Show plot plt.show()输出如下:
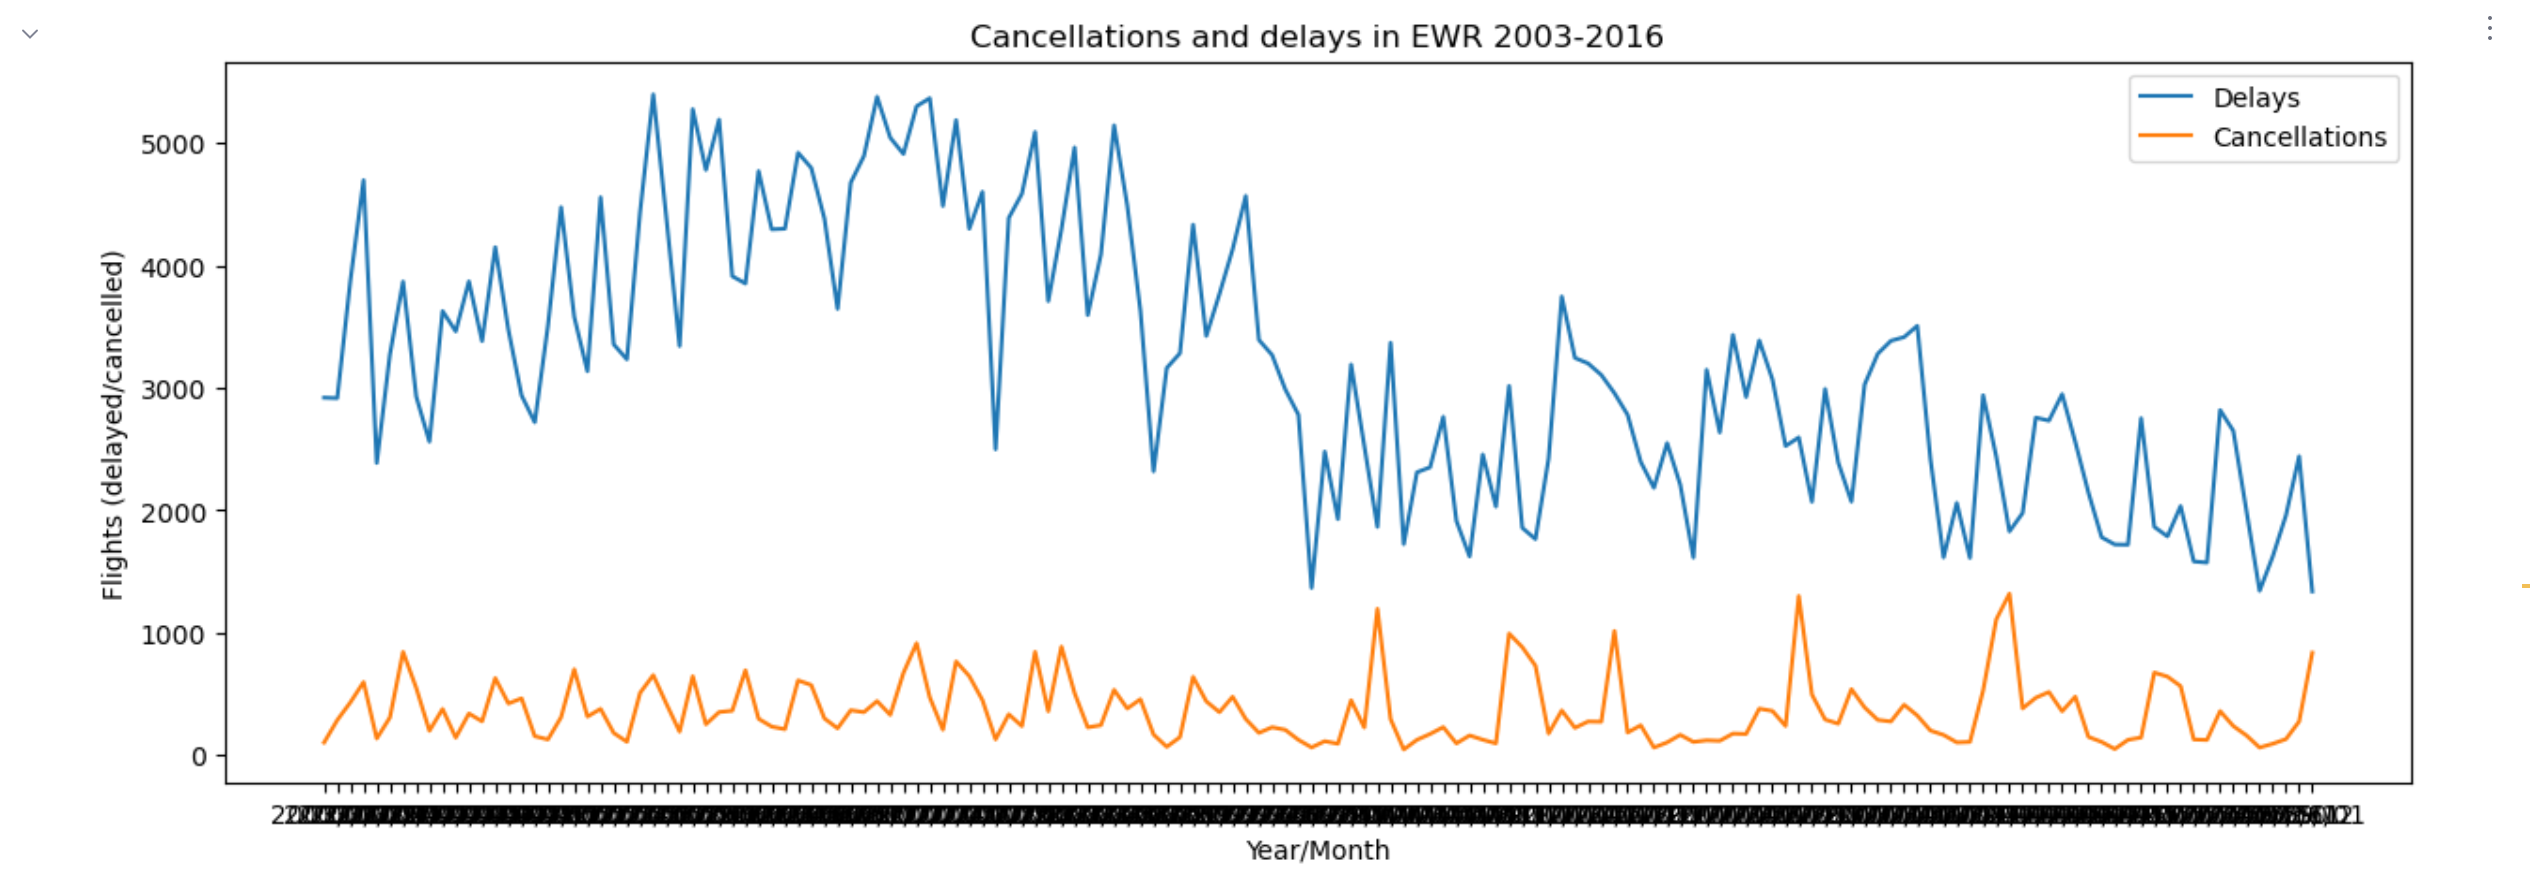
x 轴上的刻度太多。 要仅显示每第 12 个刻度,请在
plt.show()之前添加以下行:ax.set_xticks(date[::12])现在看起来更好了:
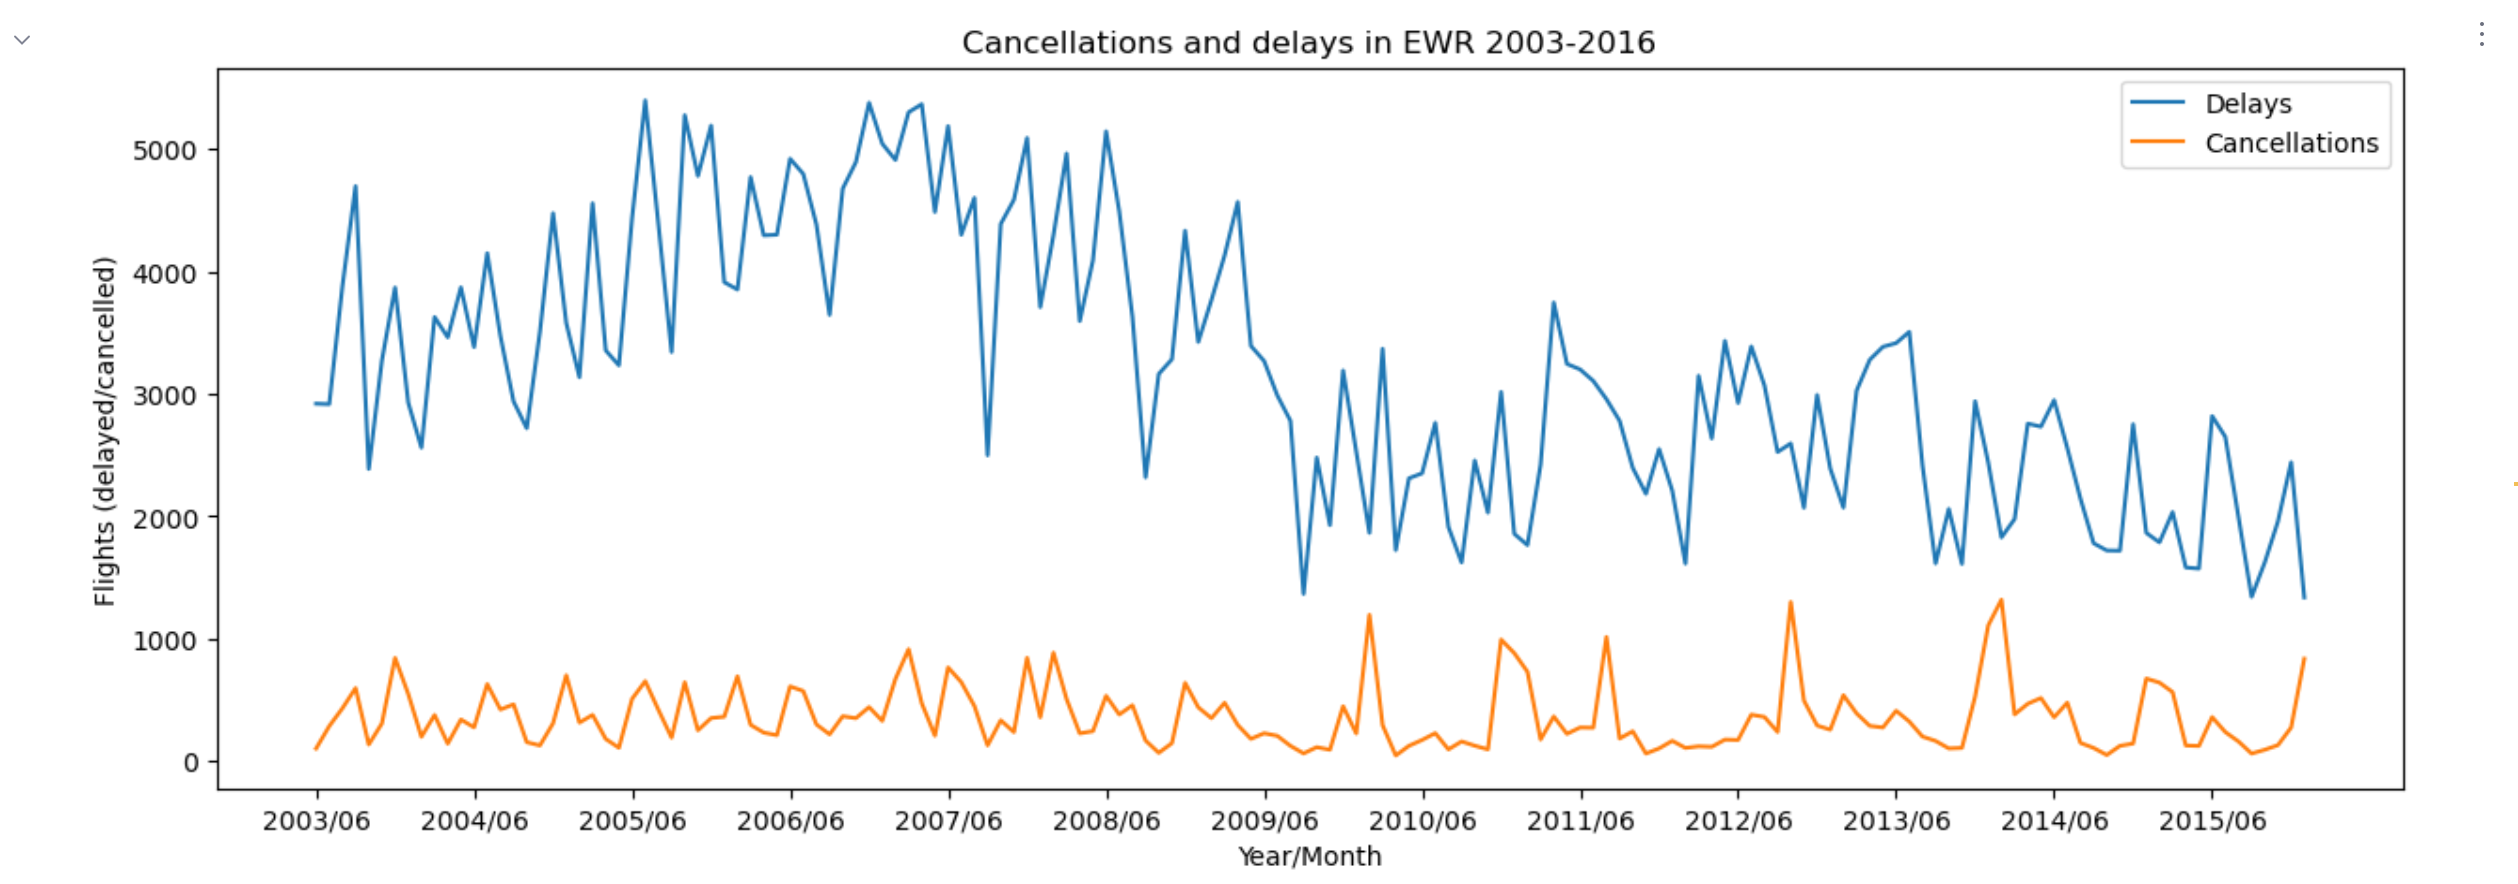
正如您所见,取消航班的数量随时间变化不大。 但在 2009 年底,延误航班的数量明显下降。 他们是否雇用了新经理? 或者这可能与航班总数有关? 让我们检查一下!
显示更多数据
我们将添加另一条显示航班总数的折线图。 但这些数字远大于延误的数量。 解决方案是添加另一个 Axes ,它将共享相同的 x 轴,但有自己的 y 轴。 这可以通过使用 twinx() 方法来完成:
total = ewr_data['Statistics.Flights.Total'] ax2=ax.twinx() ax2.plot(date, total, '--', color='g', label='Total flights') ax2.set_ylabel('Flights (total)') ax2.legend(loc='upper center')注意
plot()方法的第三个位置参数。 虚线将生成一条虚线。 颜色也是可自定义的。 我们还指定了图例的位置,以免与另一个图例冲突。完整代码如下:
# Select rows with 'EWR' in the first column ewr_data = data[data['Airport.Code']=='EWR'] # Assign variables date = ewr_data['Time.Label'] delayed = ewr_data['Statistics.Flights.Delayed'] cancelled = ewr_data['Statistics.Flights.Cancelled'] total = ewr_data['Statistics.Flights.Total'] # Create a figure and set its size to 15x5 in. fig, ax = plt.subplots(figsize=(15,5)) # Plot line charts ax.plot(date, delayed, label='Delays') ax.plot(date, cancelled, label='Cancellations') # Add axes labels ax.set_xlabel('Year/Month') ax.set_ylabel('Flights (delayed/cancelled)') # Add title and legend ax.set_title('Cancellations and delays in EWR 2003-2016') ax.legend() # Decrease the density of ticks on x-axis ax.set_xticks(date[::12]) # Plot another chart with extra y-axis ax2=ax.twinx() ax2.plot(date, total, '--', color='g', label='Total flights') ax2.set_ylabel('Flights (total)') # Add legend in center ax2.legend(loc='upper center') # Show plot plt.show()图表如下:
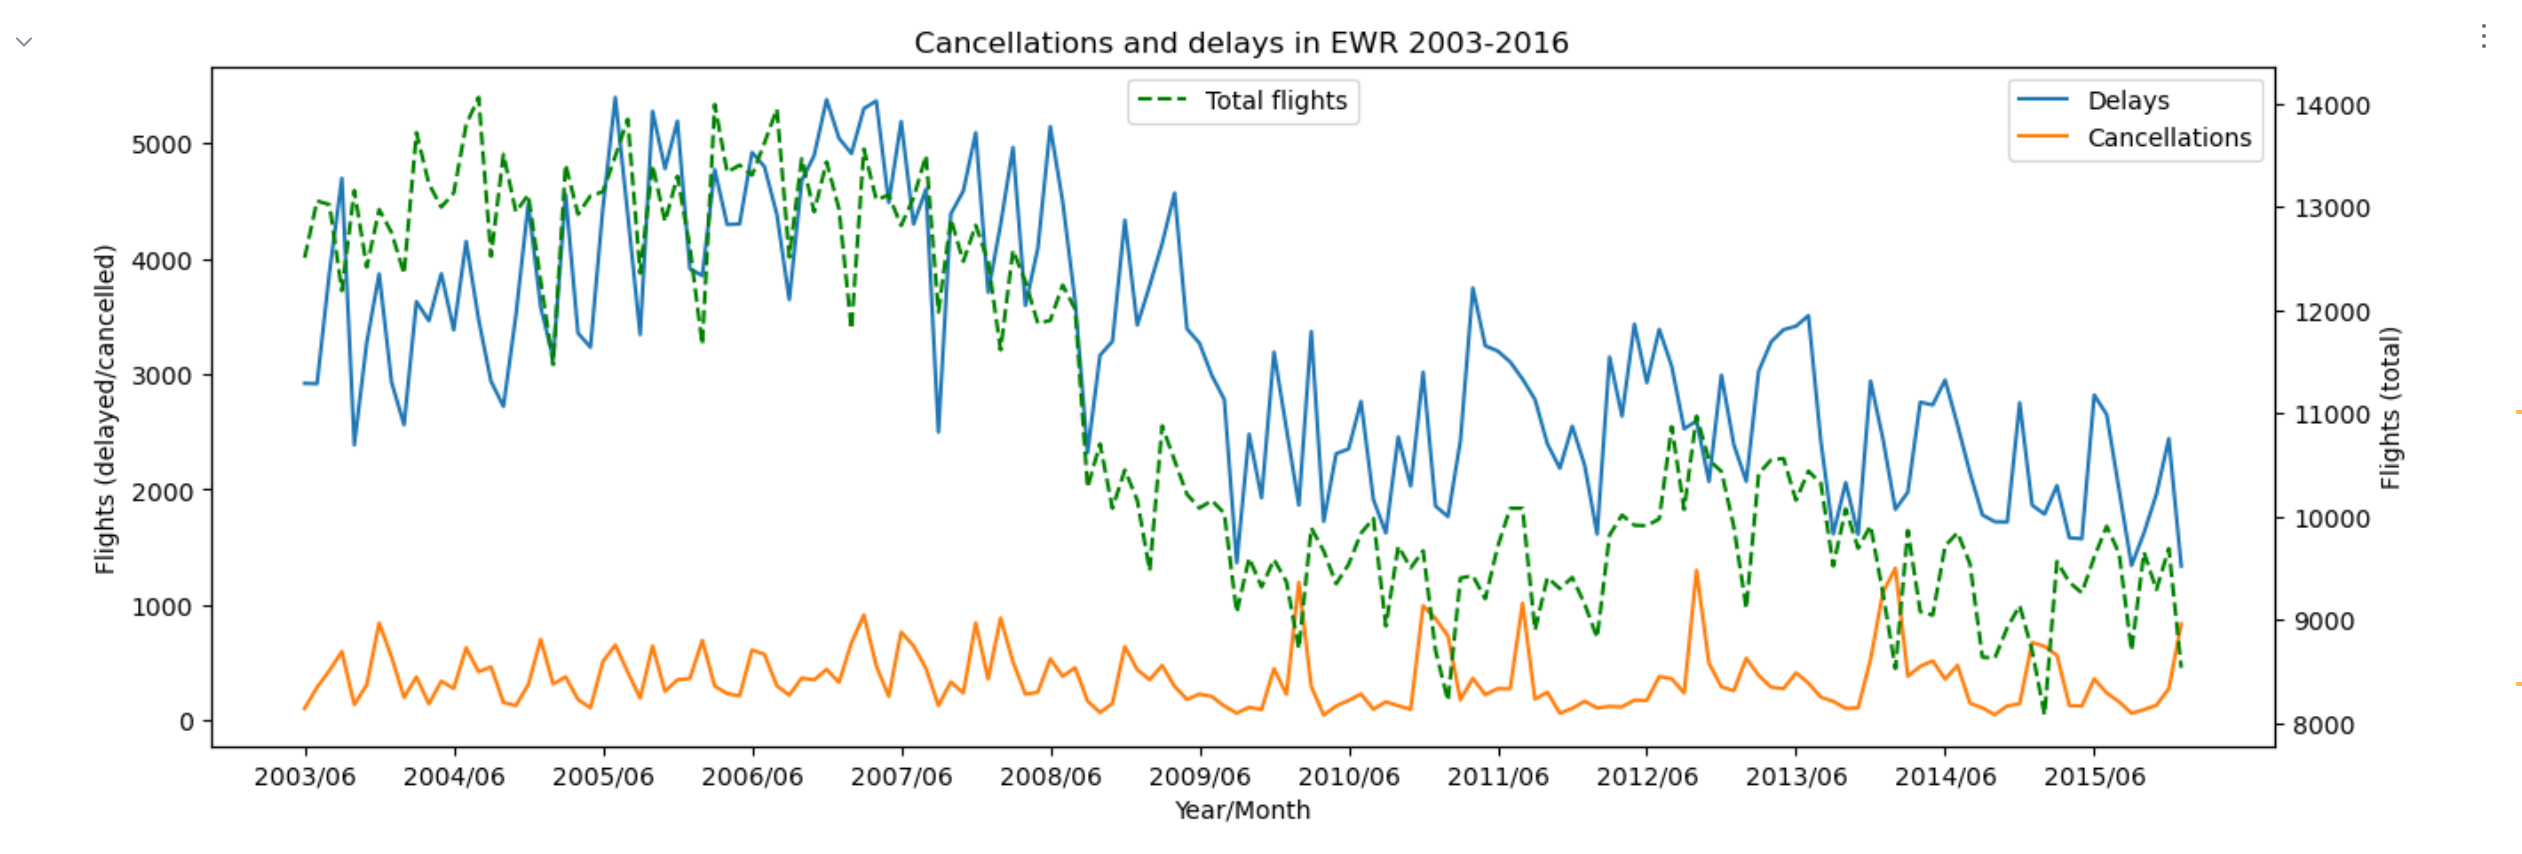
所以,没有什么神奇的。 2008 年中期航班总数显著减少,这自然导致了延误的减少。
继续研究
2008 年发生了什么? 航班数量是否仅在 EWR 减少? 让我们通过分析整个数据集来找出答案。
现在我们只对日期和数字感兴趣。 让我们按时间标签(YYYY/MM 格式)对 data DataFrame 的行进行分组,然后汇总值。 某些列中会有无效值(例如 Time.Month 和 Time.Year ),但我们不会使用它们。 其余部分与之前教程的步骤类似:
是的,美国所有机场的航班总数确实有所下降:
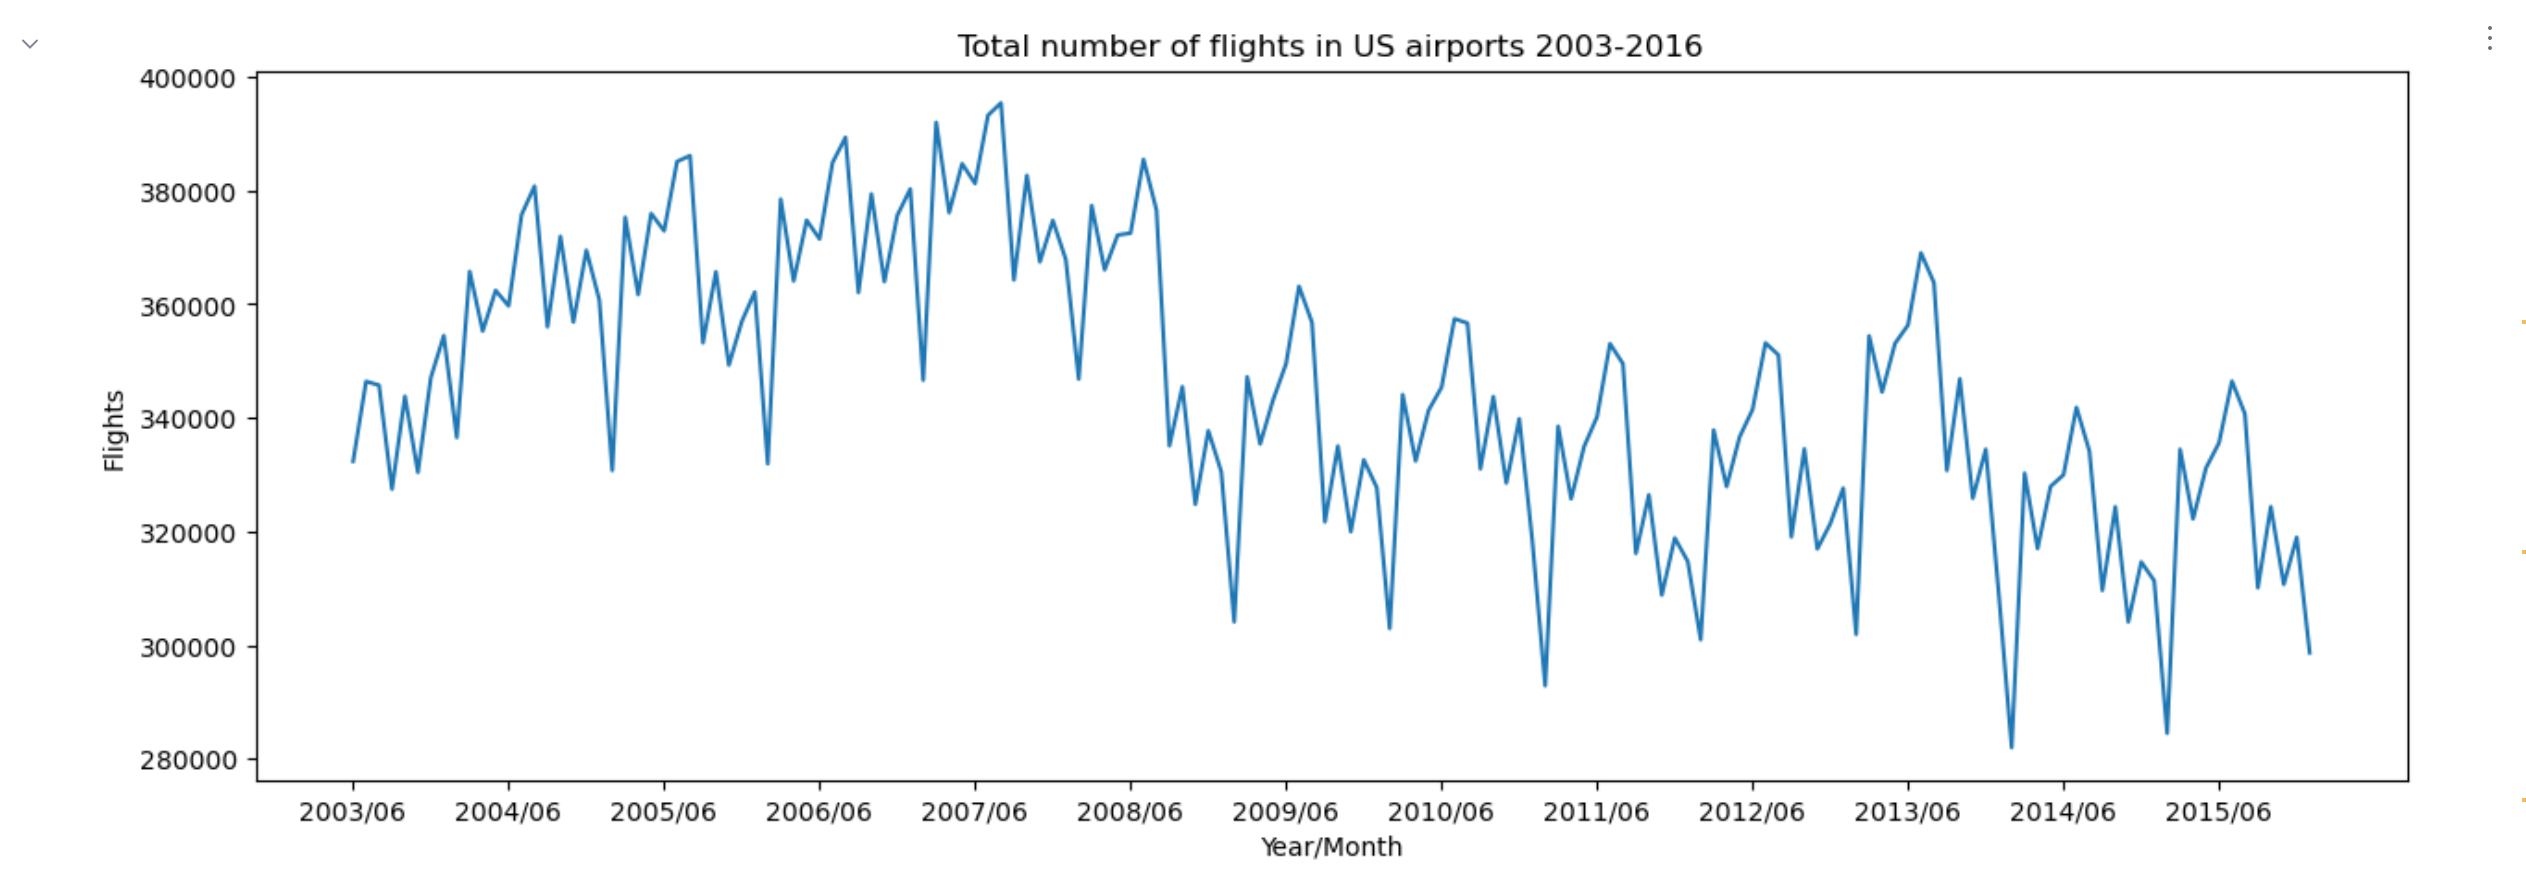
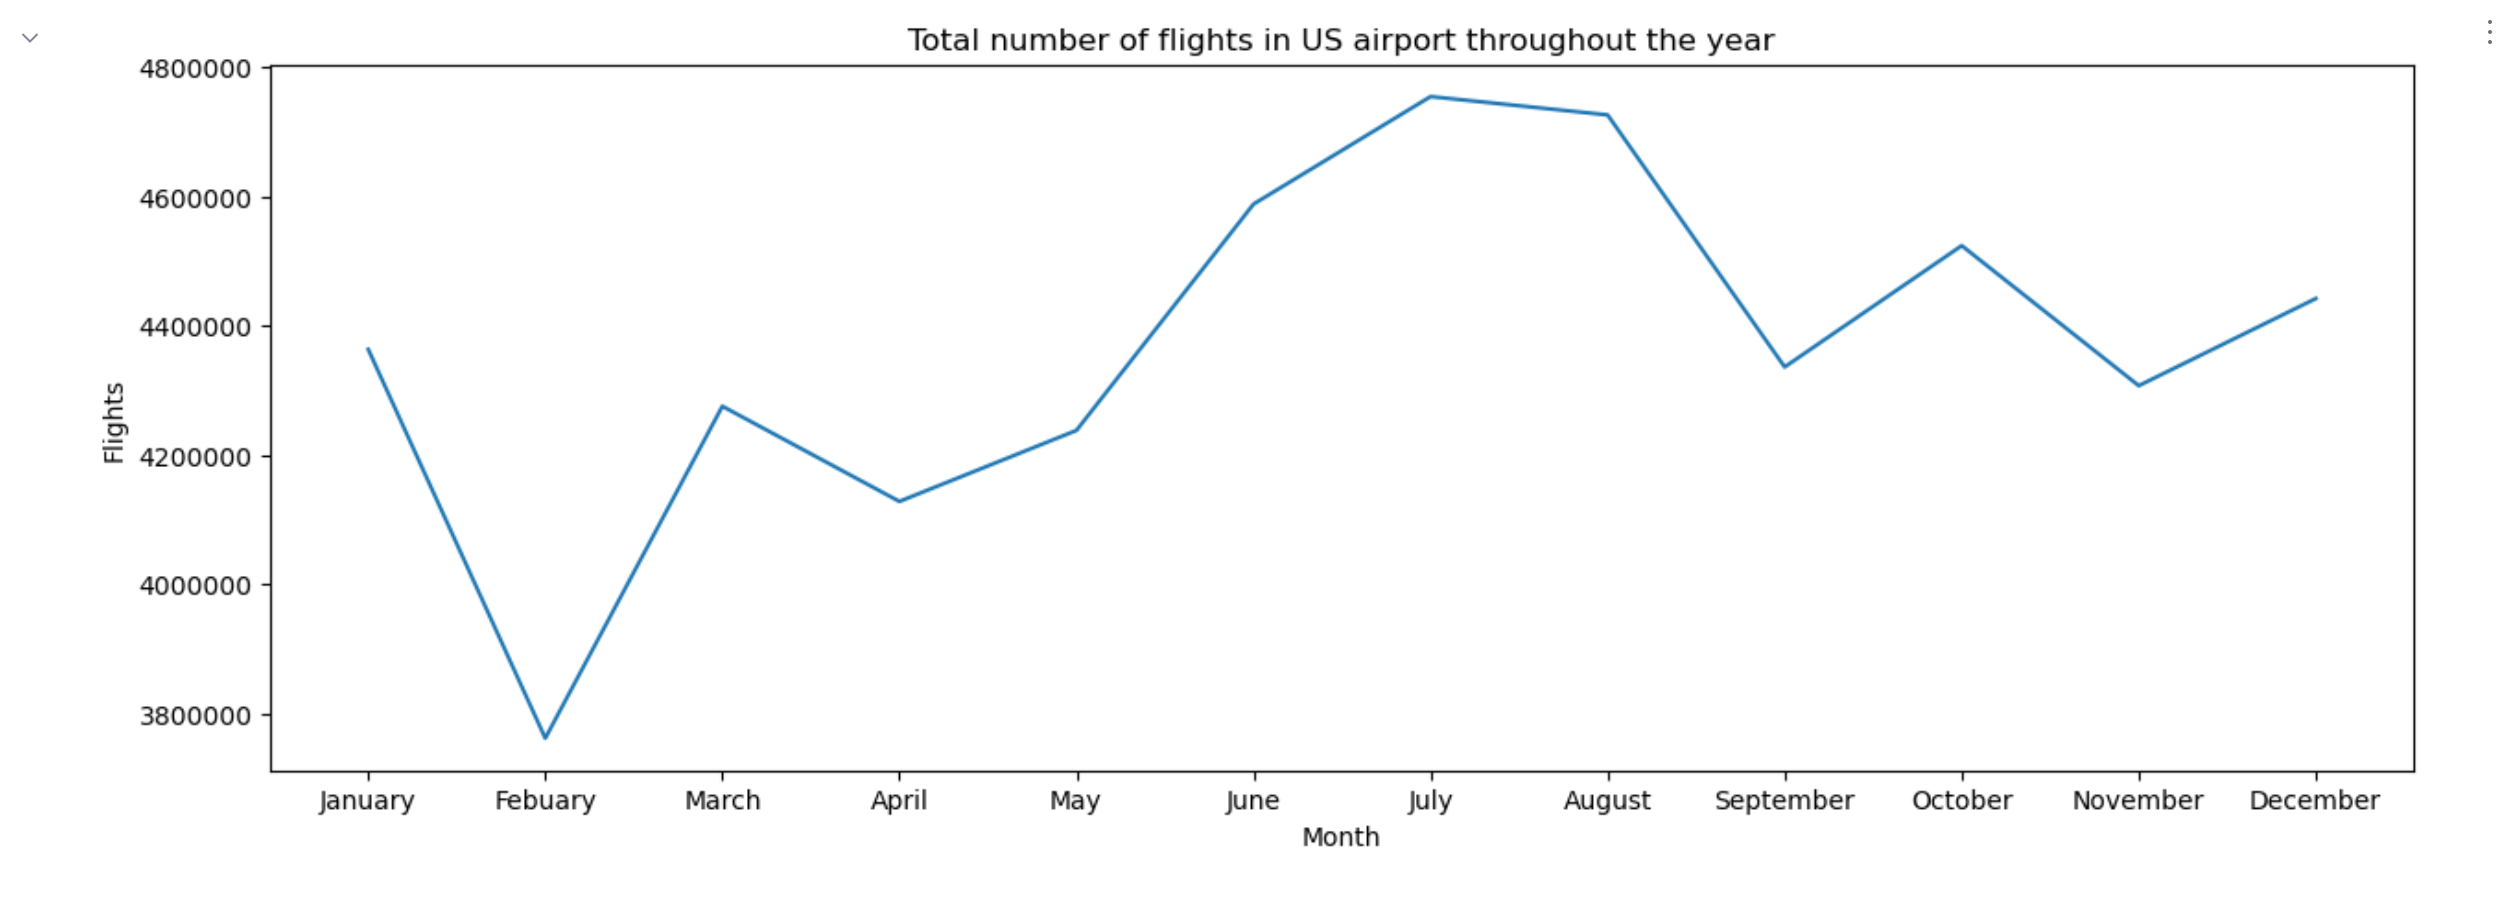
说到下降,您是否注意到图表上那些周期性的负峰值? 似乎它们每年都会重复。 让我们绘制一张图表,看看全年航班总数的变化情况。
这次我们将按月份名称对数据进行分组。 sort_values(by='Time.Month') 部分用于按时间顺序排列月份:
毫无疑问,二月是美国民航的淡季:
创建报告
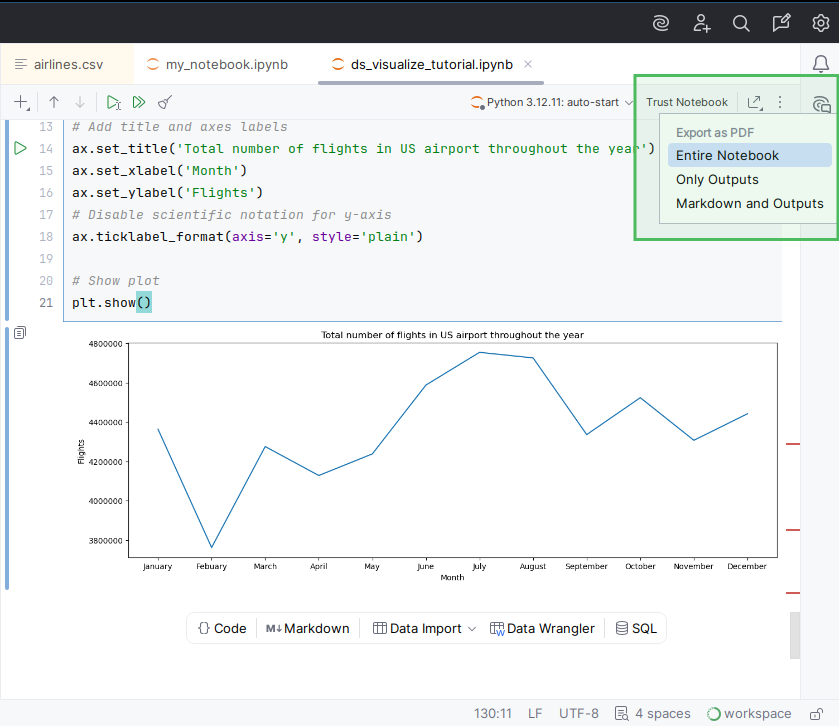
完成后,您可以将笔记本导出为 PDF 报告。 为此,请点击工具栏上的 导出为 PDF ,然后从列表中选择 整个 Notebook。
摘要
您已完成 matplotlib 可视化教程。 以下是您完成的内容:
选择了必要的数据并进行了转换
绘制了柱状图和折线图
发现了统计趋势
已创建报告