Create your Kotlin Multiplatform app
Here you will learn how to create and run your first Kotlin Multiplatform application using IntelliJ IDEA.
Kotlin Multiplatform technology simplifies the development of cross-platform projects. Kotlin Multiplatform applications can work on a variety of platforms like iOS, Android, macOS, Windows, Linux, web, and others.
One of the major Kotlin Multiplatform use cases is sharing code between mobile platforms. You can share application logic between iOS and Android apps and write platform-specific code only when you need to implement a native UI or work with platform APIs.
Create a project
In the quickstart, complete the instructions to set up your environment for Kotlin Multiplatform development.
In IntelliJ IDEA, select File | New | Project.
In the panel on the left, select Kotlin Multiplatform.
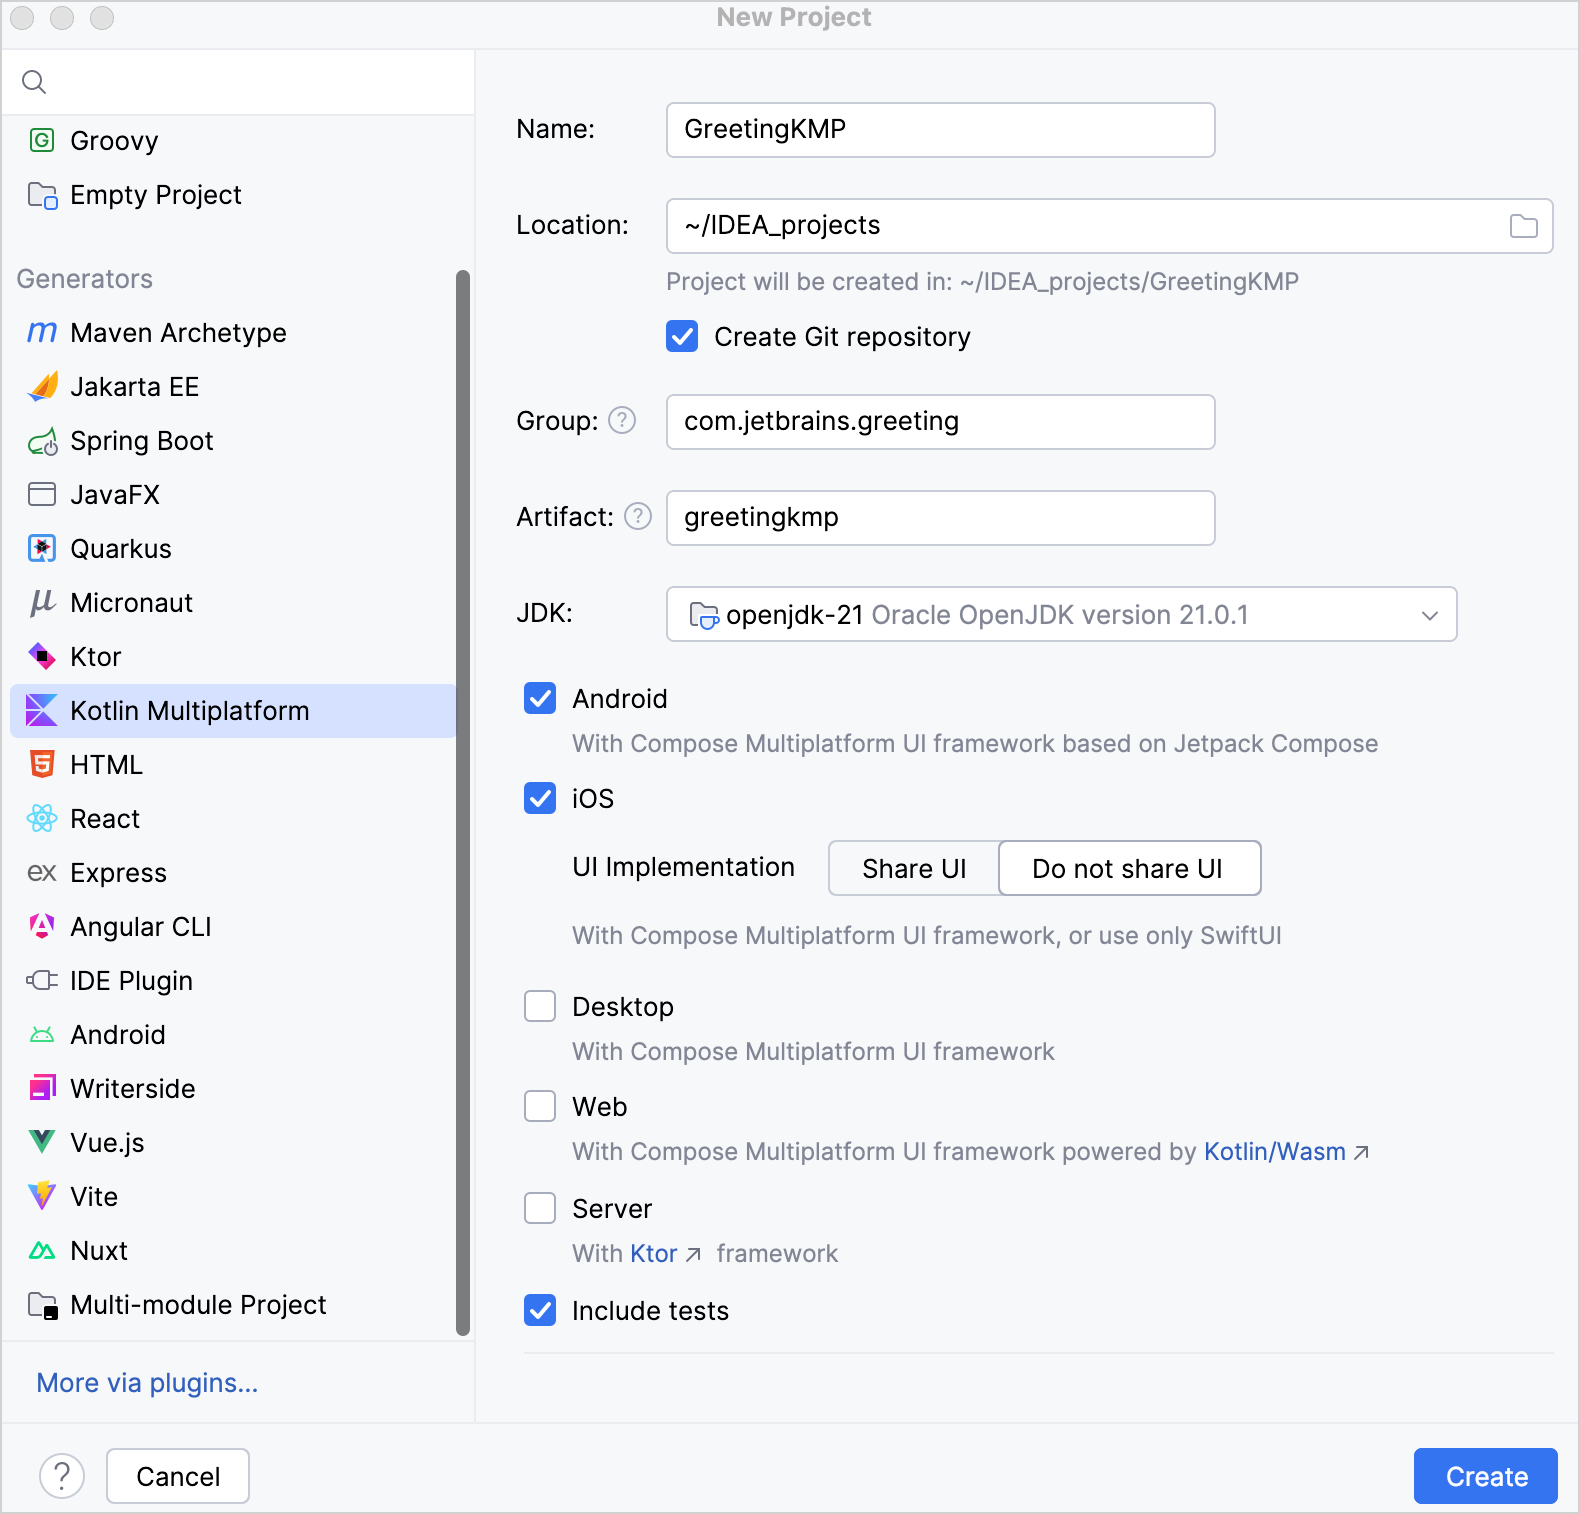
Specify the following fields in the New Project window:
Name: GreetingKMP
Project ID: com.jetbrains.greetingkmp
Select Android and iOS targets.
For iOS, select the Do not share UI option to keep the UI native.
Once you've specified all the fields and targets, click Create.
Examine the project structure
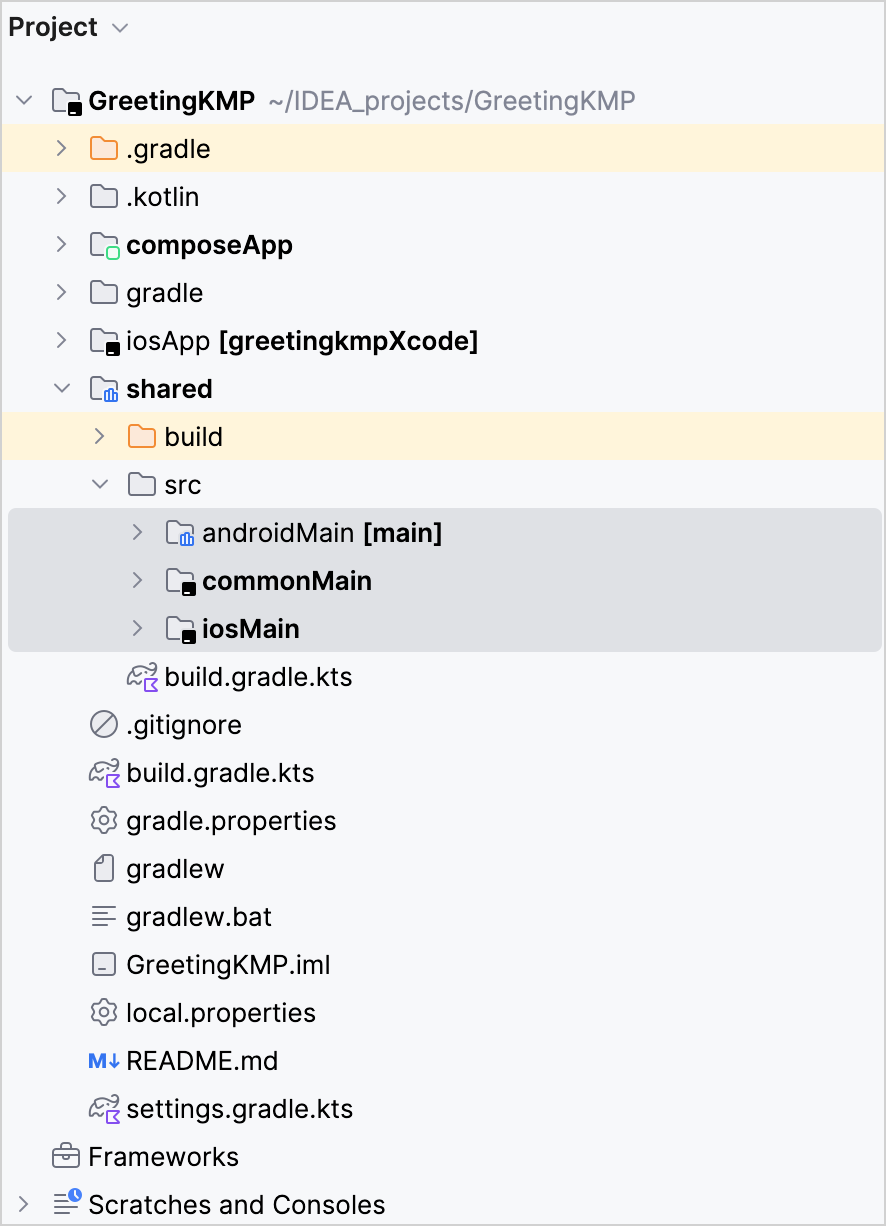
In IntelliJ IDEA, expand the GreetingKMP folder.
This Kotlin Multiplatform project includes the following modules:
androidAppis a Kotlin module that builds into an Android application. It uses Gradle as the build system. TheandroidAppmodule depends on and uses the shared module as a regular Android library.iosAppis an Xcode project that builds into an iOS application. It depends on thesharedLogicmodule, which is exported as an iOS framework. Kotlin Multiplatform projects created using the IDE wizard use the regular framework dependency through direct integration.sharedLogicis the multiplatform module that contains the logic common for both Android and iOS applications.sharedUIis the module with Compose Multiplatform UI code: in this project, it is used only by the Android app, but it is a multiplatform module and can be used by other targets when needed.
Every module except for iosApp uses Gradle as the build system.

Source set is a Gradle concept for a set of files logically grouped together where each set has its own dependencies. In Kotlin Multiplatform, different source sets in a shared module can target different platforms.
The sharedLogic module contains the androidMain, commonMain, and iosMain source sets. The commonMain source set contains shared Kotlin code, while the platform-specific source sets contain code limited to each platform. Kotlin/JVM is used for androidMain and Kotlin/Native for iosMain:
When the shared module is built into an Android library, common Kotlin code is treated as Kotlin/JVM. When it is built into an iOS framework, common Kotlin is treated as Kotlin/Native:

Write common declarations
The common source set contains shared code that can be used across multiple target platforms. It's designed to contain code that is platform-independent. If you try to use platform-specific APIs in the common source set, the IDE will show a warning:
Open the
sharedLogic/src/commonMain/.../Greeting.ktfile where you can find the generatedGreetingclass with agreet()function.Let's add a bit of variety to the greeting. Navigate to the definition of the
sayHello()function in theGreetingUtil.ktfile.Update the shared code with randomization and the
reversed()call from the Kotlin standard library to reverse the received string:fun sayHello(to: String): String { val firstWord = if (Random.nextBoolean()) "Hi!" else "Hello!" return "$firstWord Guess what this is! > ${to.reversed()}!" }Import the
kotlin.random.Randomclass following the IDE's suggestion.
Writing the code only in common Kotlin has obvious limitations because it can't use any platform-specific functionality. Using common interfaces with platform-specific implementations using the expect/actual mechanism solves this.
Check out platform-specific implementations
The common source set can define expected declarations — interfaces, classes, and so on. In each platform source set, in this case androidMain and iosMain, you have to provide actual platform-specific implementations for the expected declarations.
While generating the code for a specific platform, the Kotlin compiler merges expected and actual declarations and generates a single declaration with actual implementations.
When creating a Kotlin Multiplatform project with IntelliJ IDEA, you get a
Platform.ktfile in thesharedLogic/src/commonMainmodule:interface Platform { val name: String }It's a common
Platforminterface supposed to include information about a platform.You can find the platform-specific classes that implement the interface in the
androidMainand theiosMainsource sets:// Platform.android.kt in the androidMain source set import android.os.Build class AndroidPlatform : Platform { override val name: String = "Android ${Build.VERSION.SDK_INT}" }// Platform.ios.kt in the iosMain source set import platform.UIKit.UIDevice class IOSPlatform: Platform { override val name: String = UIDevice.currentDevice.systemName() + " " + UIDevice.currentDevice.systemVersion }The
nameproperty of theAndroidPlatformclass uses the Android-specific code, namely theandroid.os.Buildclass. This code is interpreted as Kotlin/JVM. If you try to access a JVM-specific class, such asjava.util.Randomhere, this code will compile.The
nameproperty of theIOSPlatformclass uses iOS-specific code, namely theplatform.UIKit.UIDeviceclass. This code is interpreted as Kotlin/Native, meaning that you can refer to iOS declarations in Kotlin. The code becomes a part of the iOS framework, which is imported in the Swift code of theiosAppmodule.
Each source set includes a
getPlatform()function. Itsexpectdeclaration doesn't have a body, andactualimplementations are provided in the platform code:// Platform.kt in the commonMain source set expect fun getPlatform(): Platform// Platform.android.kt in the androidMain source set actual fun getPlatform(): Platform = AndroidPlatform()// Platform.ios.kt in the iosMain source set actual fun getPlatform(): Platform = IOSPlatform()
Here, the common source set defines an expected getPlatform() function and has actual implementations, AndroidPlatform() for the Android app and IOSPlatform() for the iOS app, in the platform source sets.
When generating the code for a specific platform, the Kotlin compiler merges expect and actual declarations into a single getPlatform() function with the correct implementation.
That's why expect and actual declarations need to be defined in the same package – they are merged into one declaration in the resulting platform code. Any invocation of the expected getPlatform() function in the generated platform code then refers to the correct actual implementation.
Now you can run the apps and see all of this in action.
Create an expect/actual variable (optional)
The template project uses the expect/actual mechanism for functions, but it also works for most Kotlin declarations, such as properties and classes. Let's implement an expected property:
Open
Platform.ktin thecommonMainmodule and add the following at the end of the file:expect val num: IntThe Kotlin compiler complains that this property has no corresponding actual declarations in the platform modules.
Try to provide the implementation right away with:
expect val num: Int = 42You'll get an error saying "Expected property cannot have an initializer", because
expectdeclarations must not have a body. The implementations must be provided in actual platform modules.Remove the initializer.
Add the Android implementation in the
androidMain/.../Platform.android.ktas follows:actual val num: Int = 1Now provide an actual implementation for
numin theiosMainmodule. Add the following to theiosMain/.../Platform.ios.ktfile:actual val num: Int = 2In the
commonMain/.../GreetingUtil.ktfile, use thenumproperty in the string formed by thesayHello()function:fun sayHello(to: String): String { val firstWord = if (Random.nextBoolean()) "Hi!" else "Hello!" return "$firstWord [$num] Guess what this is! > ${to.reversed()}!" }
Run your application
You can run your multiplatform application for both Android and iOS from IntelliJ IDEA.
If you have created the optional expect/actual property earlier, you should see "[1]" added to the greeting for Android and "[2]" added for iOS.
Run your application on Android
In the list of run configurations, select androidApp.
Choose an Android virtual device next to the list of configurations and click Run.
If you don't have a device in the list, create a new Android virtual device.


Run on a different Android simulated device
Run on a real Android device
Run your application on iOS
If you haven't launched Xcode as part of the initial setup, do that before running the iOS app.
In IntelliJ IDEA, select iosApp in the list of run configurations, select a simulated device next to the run configuration, and click Run.
If you don't have an available iOS configuration in the list, start Xcode to populate the available simulators and restart IntelliJ IDEA.


Run on a real iOS device
You can run your multiplatform application on a real iOS device. Before you start, you'll need to set the Team ID associated with your Apple ID.
Set your Team ID
To set new Team ID for your project for the first time, open the project in Xcode (File | Open Project in Xcode):
In the Project navigator on the left-hand side, select iosApp.
Select iosApp under Targets and switch to the Signing & Capabilities tab.
In the Team list, select your team.
If you haven't set up your team yet, use the Add an Account option in the Team list and follow Xcode instructions.
Make sure that the Bundle Identifier is unique and a Signing Certificate is successfully assigned.
After you set up a team in Xcode, you can set or change the team in IntelliJ IDEA:
Edit the run configuration for iosApp:

Switch to the Options tab and make the necessary changes in the Development team dropdown, then click OK.
Run the app
Connect your iPhone with a cable. If you already have the device registered in Xcode, IntelliJ IDEA should show it in the list of run configurations. Run the corresponding iosApp configuration.
If you haven't registered your iPhone in Xcode yet, follow Apple recommendations. In short, you should:
Connect your iPhone with a cable.
On your iPhone, enable the developer mode in Settings | Privacy & Security.
In Xcode, go to the top menu and choose Window | Devices and Simulators.
If your iPhone is not shown as connected, click the plus sign at the bottom left and select it.
Follow the on-screen instructions to complete the pairing process.
Once you've registered your iPhone in Xcode, it will become available in the list of available devices in IntelliJ IDEA when you select the iosApp run configuration.
Next step
In the next part of the tutorial, you'll learn how to update the UI elements using platform-specific libraries.
See also
See how to create and run multiplatform tests to check that the code works correctly.
Learn more about the project structure.
If you want to convert your existing Android project into a cross-platform app, complete this tutorial to make your Android app cross-platform.
Get help
Kotlin Slack. Get an invite and join the #multiplatform channel.
Kotlin issue tracker. Report a new issue.