Session explorer
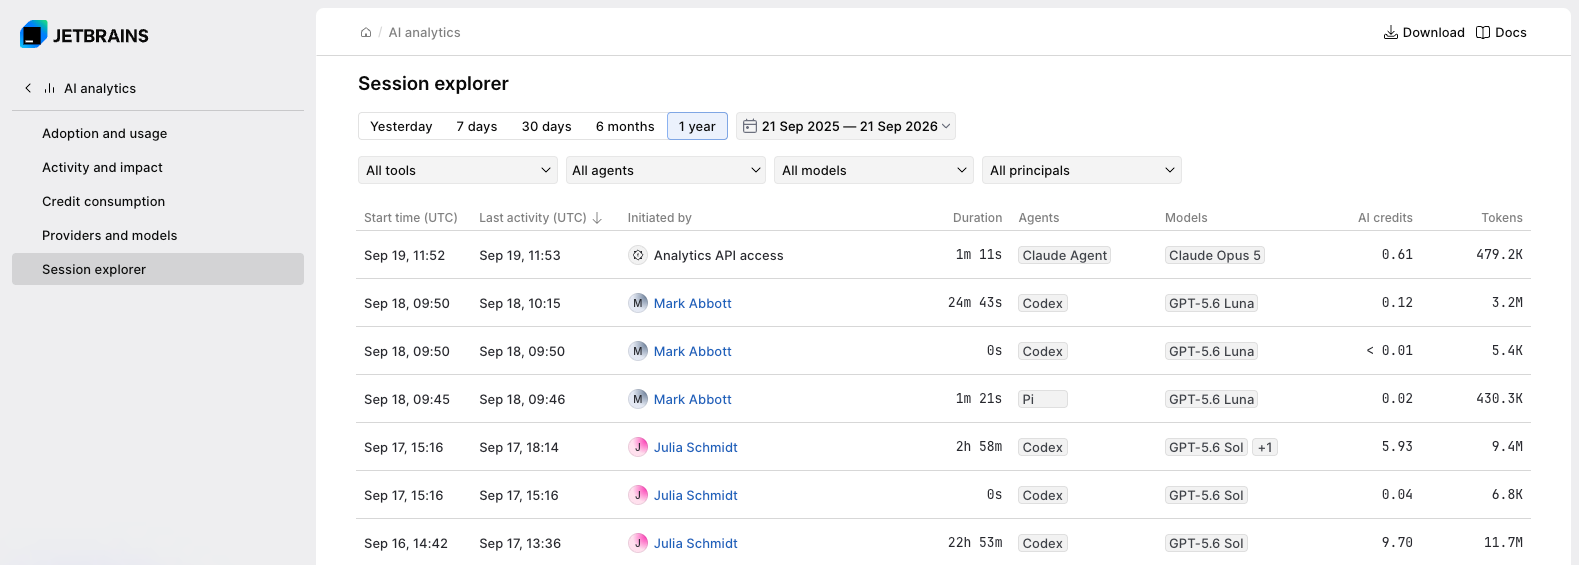
Session explorer gives you a single view of all AI sessions across your organization, including who ran each session, which agents and models were used, how long the session ran, and how many tokens and AI credits it consumed. A session is a single run of an AI agent, reported by the agent with a session ID. Session explorer shows sessions for agents ran through JetBrains IDEs, JetBrains Air, as well as agents connected through Central CLI.
You can filter and sort session data to:
Understand which agents and models your teams use.
Find unusually long or expensive AI sessions.
Investigate sessions that look suspicious or atypical.
Session explorer also lets you email a user from session details to ask about their session. To process the data outside JetBrains Central Console, you can download it as a CSV file.
Given the current coverage, treat Session explorer as a reliable view of sessions that can be attributed to a concrete user, agent, and model. This makes it especially useful for budget owners who want to see which concrete sessions drove spend spikes, or security teams who need an investigation starting point for specific users, agents, or models.
Session explorer data overview
To understand how data is collected and displayed in Session explorer, note the following:
Only attributable data. Session explorer shows only data that can be attributed to an AI agent, and session data is available only for agents that report a session ID. This means that Session explorer shows only attributable data rather than a complete view of AI usage in an organization.
Updates don't happen in real time. Session data is collected in batches, so the table doesn't update in real time.
Session data may not be final for long sessions. As session data arrives in batches, the duration, token count, and AI credit count for long-running sessions can change after the row first appears in the table.
Non-agentic AI Assistant features are not recorded as sessions. Using Chat mode in AI Assistant, as well as features such as quick actions, commit message generation, and code completion isn't an agentic session and isn't included in Session explorer.
No MCP and repository data: Session explorer currently doesn't show MCP tool usage or accessed repositories per session.
Each row in the Session explorer table is one AI session. For every session, you can see:
Start time (UTC): The time when the session started.
Last activity (UTC): The time of the last registered activity in the session. The session table is sorted by this column by default.
Initiated by: The user or service account that started the session.
Duration: How long the session ran.
Agents: The agent that ran the session.
Models: The models that the agent used for the session.
AI credits: The number of AI credits that the session consumed.
Tokens: How many tokens the session consumed. The number shows the total token consumption, which includes all token types (read, write, cache read, etc.).
Data filtering and sorting
You can filter the data by the following criteria:
In the time range filter, select one of the predefined filters that show the last specified period, or select a custom date range. A session is included if its start or its end falls inside the selected period.
In the tool filter, which displays All tools by default, show only the data that originates from the selected tools. In addition to JetBrains IDEs, the dropdown includes the following tools:
JetBrains Air, the agentic development environment (ADE) by JetBrains.
JetBrains Central CLI, which is a local command-line proxy rather than a development environment. Select it to show the data that comes from the coding agents that it routes.
In the agent filter, which displays All agents by default, show sessions run by the selected AI agents.
In the model filter, which displays All models by default, show sessions that used the selected models. The list includes models available through JetBrains AI and models from connected external AI providers.
In the principal filter, which displays All principals by default, search for and select users, service accounts, or groups. Selecting a group includes all of its members and members of its subgroups. Expand a group to select its subgroups.
Filters of different types are combined with a logical AND. For example, data will match both the selected date range and the user the data is attributed to.
Multiple selections of the same filter are combined with a logical OR. For example, selecting a group along with an individual user shows data for that user and all members of the group.
Filter selections are preserved across analytics segments. The filters that you set in one segment are automatically preselected when you switch to another segment.
In addition to filtering, you can sort the table by clicking the header of one of the following columns:
Last activity (UTC): Show sessions with the latest or earliest activity first.
AI credits: Show sessions with the highest or lowest AI credit consumption first.
Tokens: Show sessions with the highest or lowest token consumption first.
Session details
View session details
In the Session explorer table, find the session that you want to inspect. If needed, use filters and sorting to narrow down the session table.
Click on the session you want to inspect.
The detailed information for the session opens. In addition to the information already displayed in the session table, details also include the Provider field that shows the AI provider that the session used.
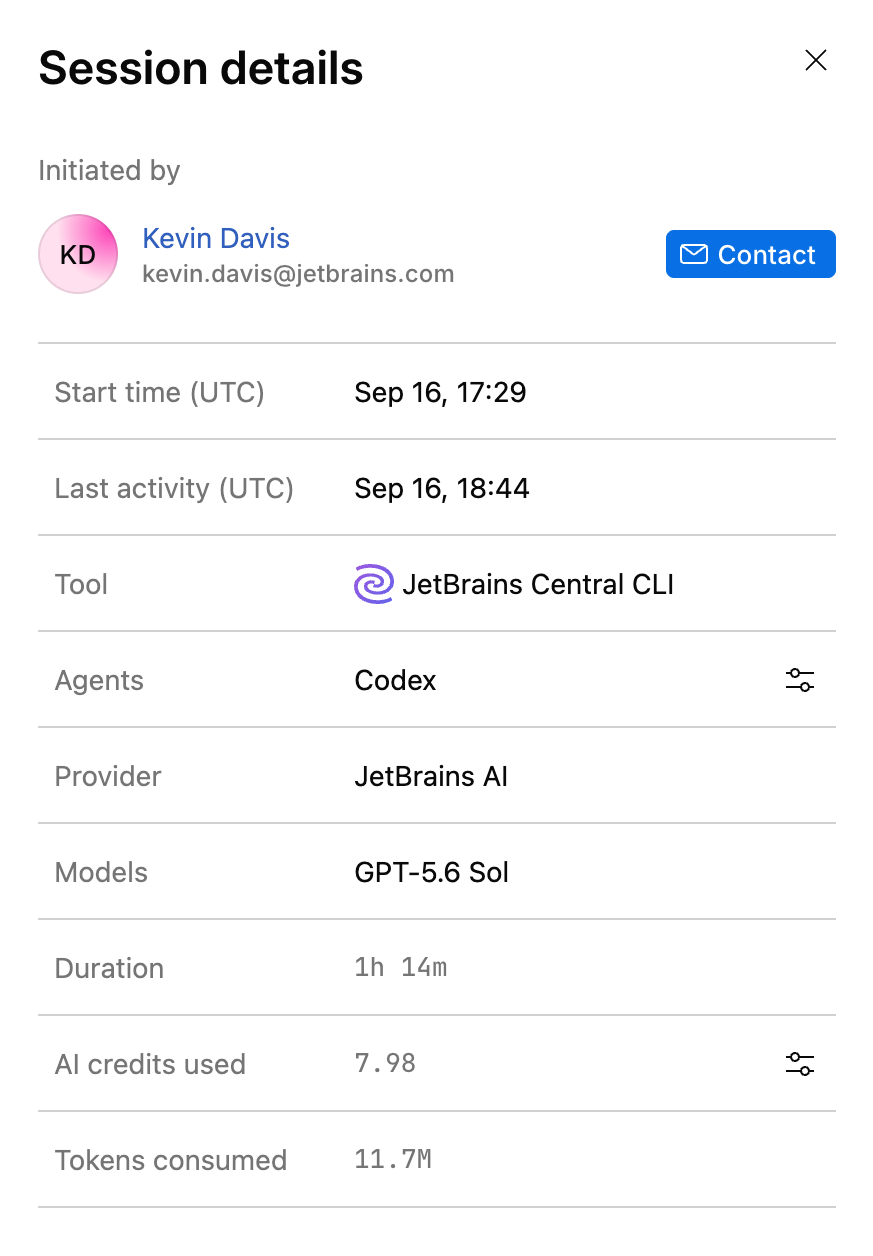
If you have the necessary permissions, the Agents and AI credits used fields have the additional settings
 button that takes you to the corresponding settings page:
Agents: Takes you to the congifuration of available Agents in your organization. This button is available only for paid plans.
AI credits used: Takes you to the AI access and AI credit limit settings for users and service accounts in your organization.
Contact the user who started a session
Open the details of the session that you want to ask about, as described in View session details.
Click Contact. This starts an email addressed to the user who initiated the session or, for sessions initiated by a user-created service account, to the user who created the service account.
Download session data
Session explorer lets you download table data as a CSV file for further processing. The downloaded file includes all sessions that match the filters currently applied to the table. If the table spans multiple pages, the file includes data from all pages.
Download session data as CSV
In Session explorer, apply the filters and sorting so that the table shows the sessions that you want to download.
In the top-right corner of the page, click
 .
. The data is downloaded as a CSV file.
For more information about downloading data from other AI Analytics segments, see Downloading data.