# App Use Case: Simple Timer
If you want to enhance and amplify the functionality of the built-in [time tracking](https://www.jetbrains.com.cn/en-us/help/youtrack/cloud/time-management-tutorial.html) in YouTrack, you can do so with the help of a custom app.
Building on this idea, create an app that adds a simple widget to the issue field panel, letting YouTrack users track time spent on the task with a single click.
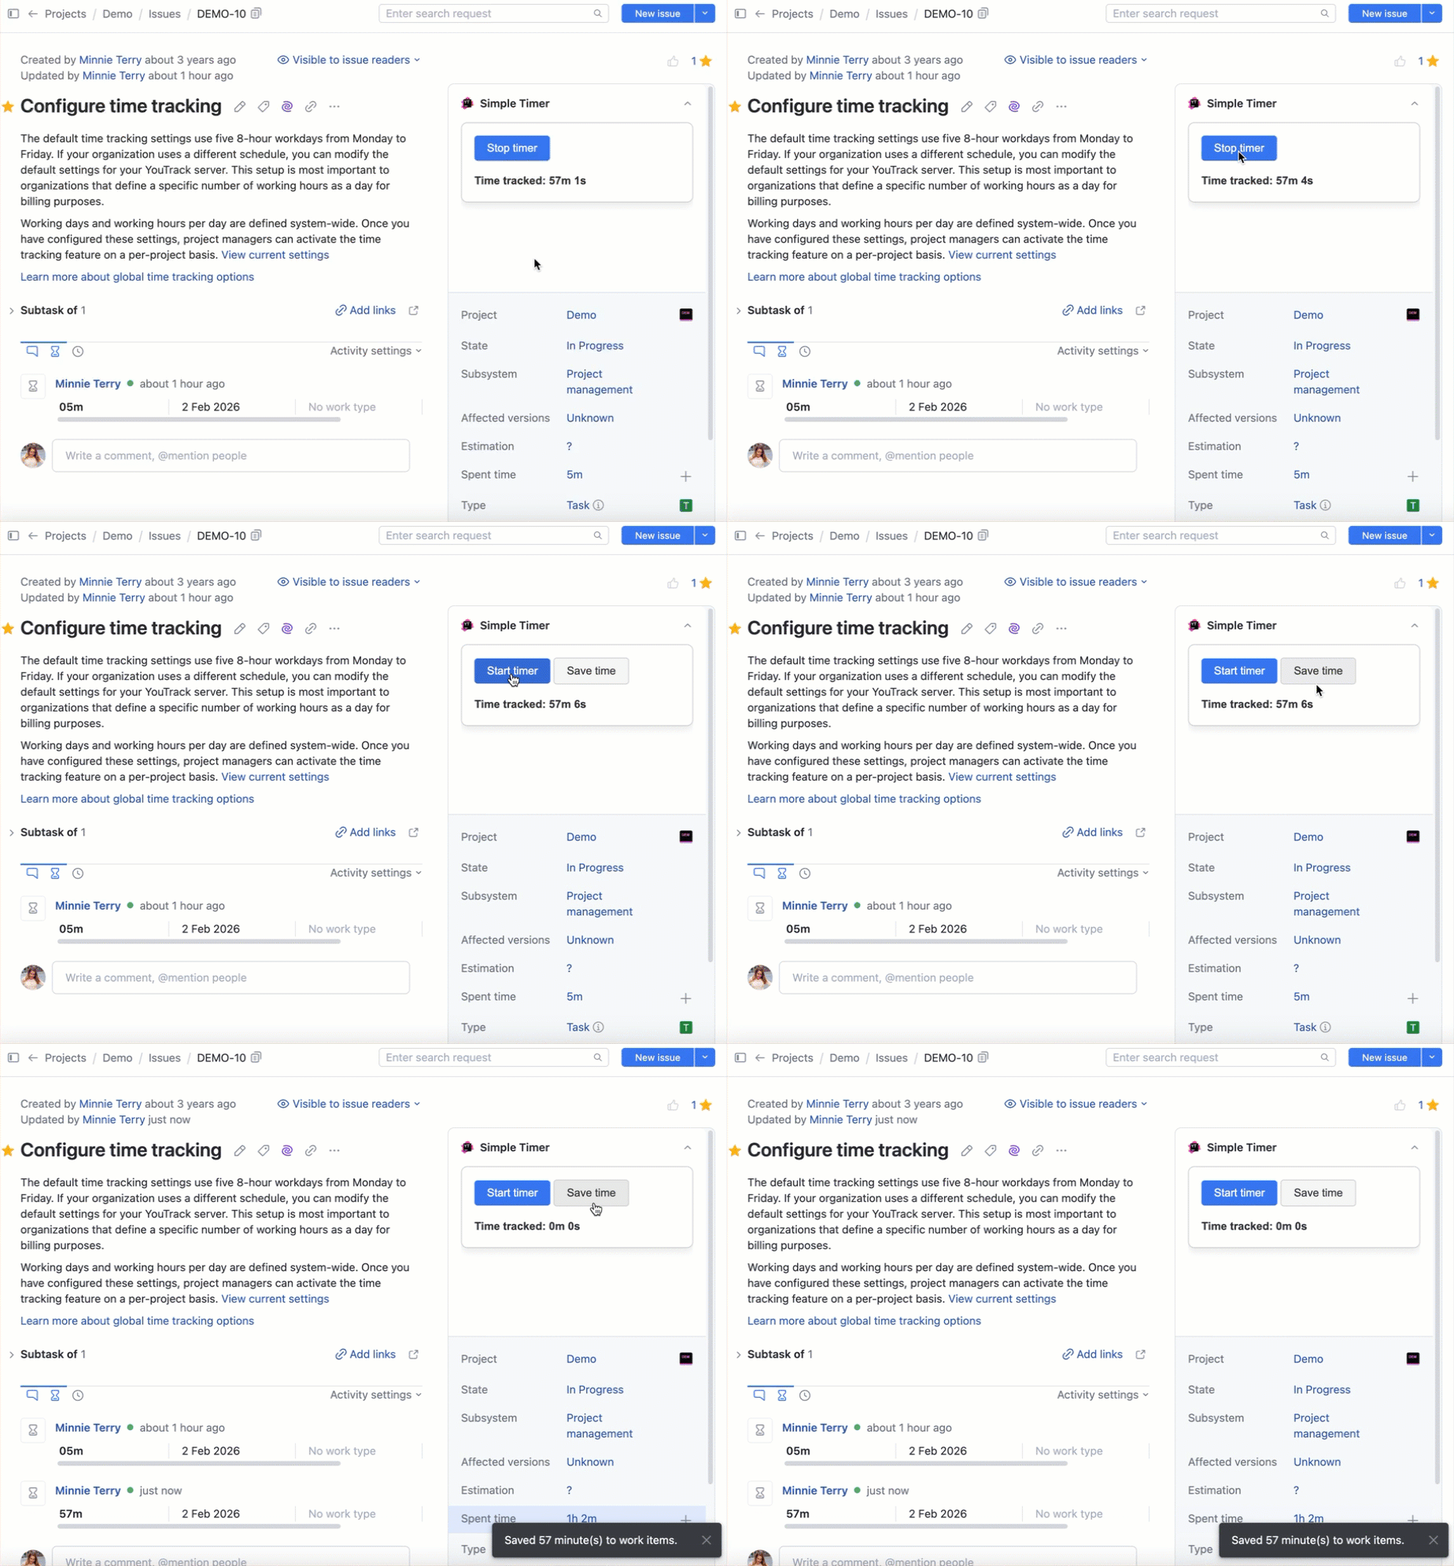
The app includes:
* [A widget](apps-widgets.html) visible in the issue fields panel with a toggle button to start/stop tracking time and a button for saving tracked time.
* A set of [custom HTTP handlers](apps-reference-http-handlers.html) for saving and retrieving tracked time data.
## Prerequisites
To create an app like the one described in this tutorial, you need:
* Basic knowledge of JavaScript.
* Basic-level proficiency in using terminal commands.
* [Node.js](https://nodejs.org/en/) version 16 or later installed on your machine.
* Optionally, an [IDE](https://www.jetbrains.com.cn/en-us/webstorm) for working with the source code.
* Access at the project admin level or higher to a YouTrack instance, with time tracking enabled for at least one project.
## Step 1 — Create an App Package
> **Tip:**
> Requires: Node.js version 16 or later.
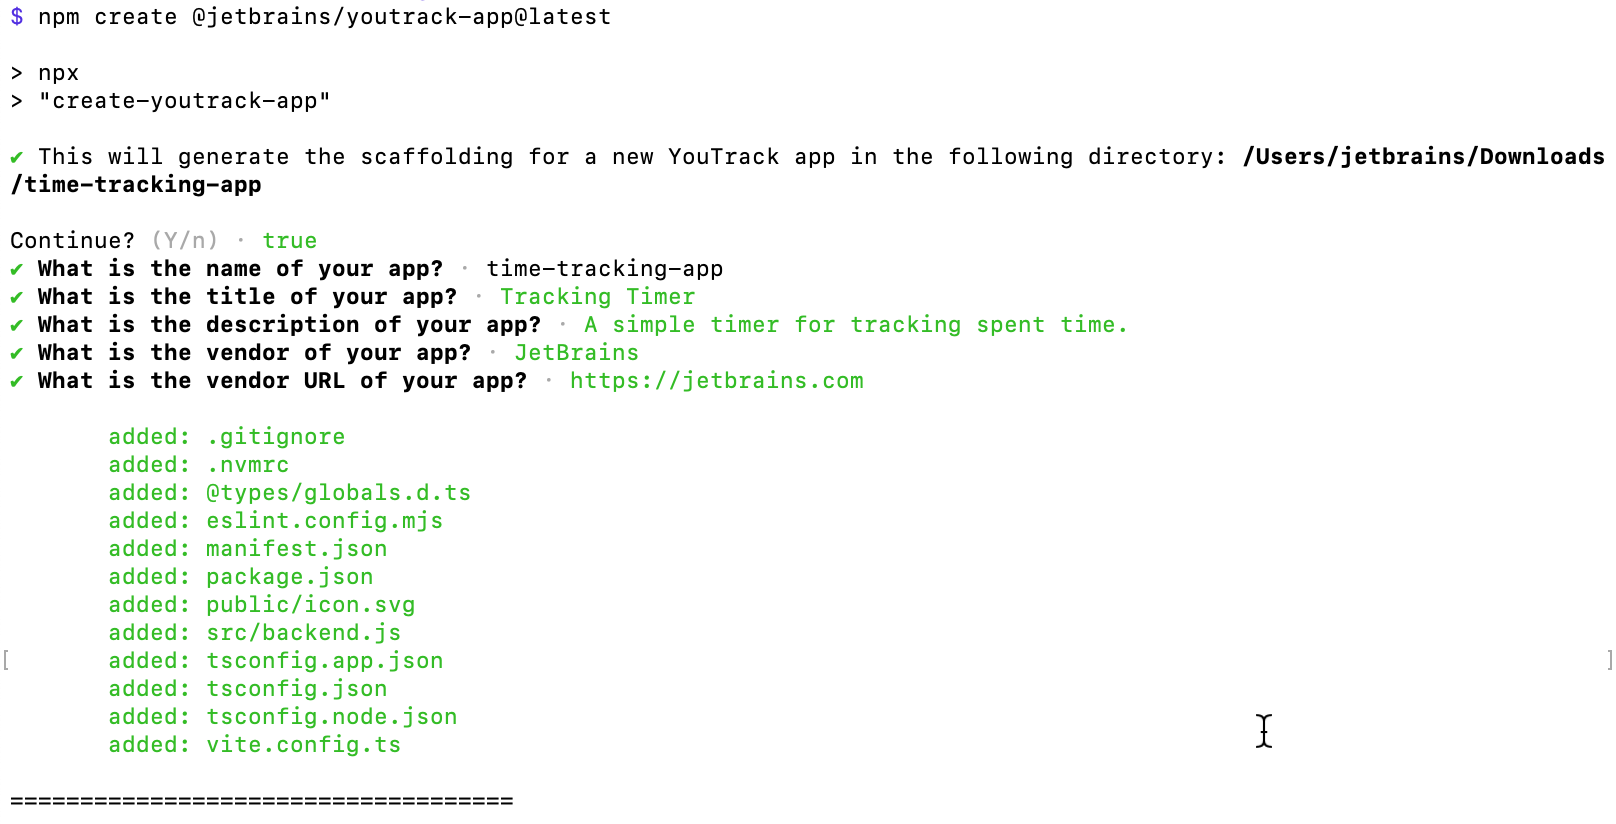
Prepare an empty directory for your app. Open the terminal, navigate to the dedicated app directory, and run the YouTrack app generator using the following command:
```SHELL
npm create @jetbrains/youtrack-app@latest
```
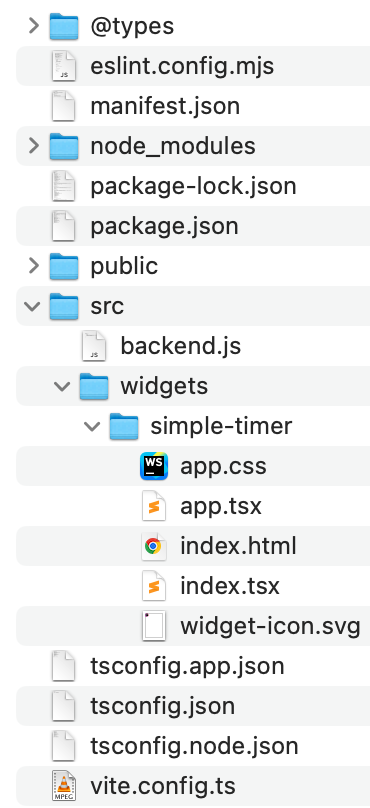
This command starts the YouTrack app generator, which guides you through creating basic scaffolding for an app, including the `manifest.json` file and a folder containing the necessary source files for the widget.
Create an app named `time-tracking-app` with the title "Tracking Timer".
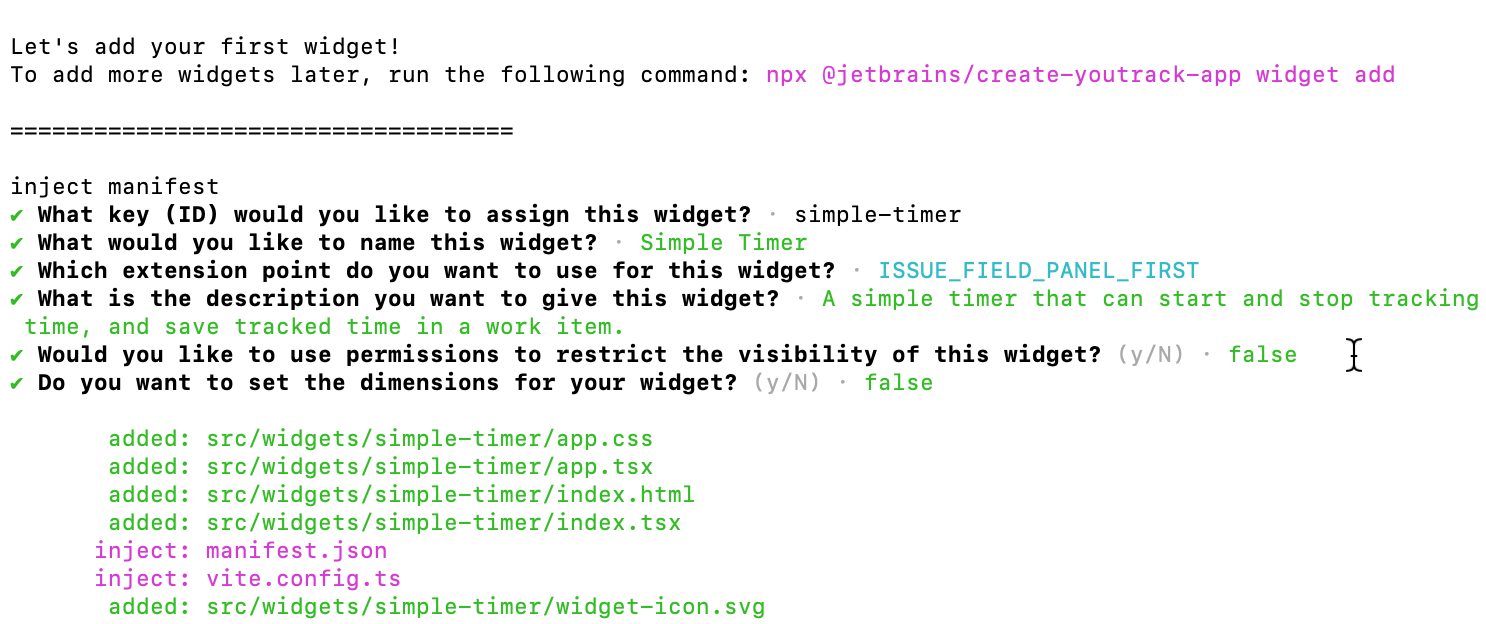
When the generator prompts you to create a widget, add a widget named "Simple Timer" with the `simple-timer` ID. The [extension point](apps-reference-extension-points.html) where the widget is to be displayed should be `ISSUE_FIELD_PANEL_FIRST`. This means the widget is displayed in the issue view [above the field panel](apps-reference-extension-points.html#places-issue-field-panel-first).
When you're done with the app generator, the resulting folder should look like this:
## Step 2 — Update the Manifest
The timer widget is designed to provide functionality relevant only for specific tasks that the YouTrack users are working on. That's why it makes sense to display the widget only in issues of the Task type. Add a condition for the widget in the `manifest.json` file. For details about conditional widgets, see [Conditional Widgets](apps-widget-guards.html).
Open the `manifest.json` file and add this line to the `widgets` block:
```JSON
"guard": "({entity}) => entity.fields.Type?.value === 'Task'"
```
You also need to add permissions to our widget so it can access the time tracking data in the issue. Namely, you need the `READ_ISSUE` and `UPDATE_ISSUE` permissions for accessing the issue and its custom fields, and `READ_WORK_ITEM` and `UPDATE_WORK_ITEM` for updating work items in the issue.
Add the following block to our widget in the `widgets` section:
```JSON
"permissions": [
"READ_ISSUE", "UPDATE_ISSUE", "READ_WORK_ITEM", "UPDATE_WORK_ITEM"
]
```
The manifest.json now looks like this:
```JSON
{
"name": "time-tracking-app",
"title": "Tracking Timer",
"description": "A simple timer for tracking spent time.",
"$schema": "https://json.schemastore.org/youtrack-app.json",
"vendor": {
"name": "JetBrains",
"url": "https://jetbrains.com"
},
"icon": "icon.svg",
"widgets": [
{
"key": "simple-timer",
"name": "Simple Timer",
"indexPath": "simple-timer/index.html",
"extensionPoint": "ISSUE_FIELD_PANEL_FIRST",
"iconPath": "simple-timer/widget-icon.svg",
"description": "A simple timer that can start and stop tracking time, and save tracked time in a work item.",
"guard": "({entity}) => entity.fields.Type?.value === 'Task'",
"permissions:": [
"READ_ISSUE",
"UPDATE_ISSUE",
"READ_WORK_ITEM",
"UPDATE_WORK_ITEM"
]
}
]
}
```
## Step 3 — Build the UI Structure
Now, proceed to build the widget buttons. In the widget folder in the app package, you already have several files. Review the elements that define our widget's visual style.
The folder for the source files for our widget is `/time-tracking-app/src/widgets/simple-timer`. You already have `index.html` and `app.css` there. Let's edit them.
> **Note:**
> You may delete all other files in this folder except for the `widget-icon.svg` file. This is the icon for our widget. You can either leave the generic YouTrack icon or upload your own.
### index.html
This file defines how the widget looks, its structure, and the layout of components.
In the `head` section of the page, add a link to the `app.css` file for the styling:
```HTML
```
In the `body` section, define two buttons and an element displaying tracked time. One button serves as the start/stop control, while the second helps users save their tracked time.
```HTML
Time tracked: 0m 0s
```
Now, the most important part of the widget is the logic that drives the buttons. Include a reference to the `index.js` file in the `script` tag. The `index.js` file contains our widget's frontend.
```HTML
```
The resulting `index.html` file should look like this:
```HTML
Time tracked: 0m 0s
```
### app.css
Style your widget for a clean look. While you can customize the widget's style to your taste, here we use the styling that utilizes the [Ring UI library](https://jetbrains.github.io/ring-ui) and matches the YouTrack UI.
To use the Ring UI components in your app, make sure to include the following line in the `dependencies` block of the default `package.json` file in the root app folder:
```JSON
"@jetbrains/ring-ui-built": "^7.0.8"
```
Paste the following in the `app.css` file. It contains the styles for the widget and its buttons.
```CSS
/* General buttons */
button {
font-family: var(--ring-font-family, Arial, sans-serif); /* Fallback font */
font-size: var(--ring-font-size, 14px);
border-radius: var(--ring-border-radius, 4px); /* Rounded corners */
padding: var(--ring-button-padding-block, 8px 16px);
cursor: pointer;
transition: background-color 0.3s ease; /* Smooth hover effects */
border: none; /* Removes browser default borders */
}
/* Blue "Start timer" button */
#start-stop-timer {
background-color: var(--ring-button-primary-background-color, rgb(53, 116, 240)); /* Primary blue color */
color: var(--ring-white-text-color, #ffffff); /* White text for contrast */
}
#start-stop-timer:hover {
background-color: var(--ring-main-hover-color, rgb(51, 105, 214)); /* Darker blue on hover */
}
/* Make "Save time" button (light gray) use neutral styling */
#save-time {
background-color: var(--ring-content-background-color, #f5f5f5); /* Light gray */
color: var(--ring-text-color, #333); /* Neutral text color */
border: 1px solid var(--ring-line-color, #ccc); /* Light border */
}
#save-time:hover {
background-color: var(--ring-hover-background-color, #e7e7e7); /* Slightly darker gray on hover */
}
/* Timer widget container */
#time-tracker-widget {
font-family: var(--ring-font-family, Arial, sans-serif); /* Fallback font */
font-size: var(--ring-font-size, 14px);
padding: var(--ring-button-padding-block, 16px); /* Padding for the widget */
background-color: var(--ring-content-background-color, #ffffff); /* Background color */
border: 1px solid var(--ring-line-color, #ccc); /* Light border */
border-radius: var(--ring-border-radius, 8px); /* Widget corners */
line-height: var(--ring-line-height, 1.5);
box-shadow: 0 4px 10px rgba(0, 0, 0, 0.1); /* Add a slight shadow */
}
/* Timer display styling */
#timer-display {
margin-top: 15px; /* Add spacing above the timer display */
color: var(--ring-text-color, #333); /* Match text color */
font-weight: bold; /* Make it stand out a bit */
}
```
## Step 4 — Build the Widget Frontend
In the same widget folder `/time-tracking-app/src/widgets/simple-timer`, create a JavaScript file named `index.js`. This file should contain the logic for the start/stop button, the save button, and the timer display. Now it's time to make these elements work.
### Host Registration
First, you need to get the host environment, which is our YouTrack. You need it to execute YouTrack-specific API calls, such as `fetchApp` for backend communication and `fetchYouTrack` for YouTrack REST API calls. For details about communication between apps and YouTrack, see [Host API](apps-host-api.html).
The `host` variable contains the results of the `YTApp.register()` function execution. This function interacts with the YouTrack widget hosting environment (`YTApp`) and ensures the widget is registered and can make REST calls to the backend.
```JS
const host = await YTApp.register();
```
### Backend Communication Helpers
Next, add a couple of helpers to simplify communication between the frontend and the backend.
#### callApp()
Add a reusable function for making calls to backend endpoints. This function uses the `fetchApp()` method to call a server-side HTTP handler.
```JS
async function callApp(path, params) {
const res = await host.fetchApp(path, Object.assign({ scope: true }, params));
return res;
}
```
#### Specific Backend Call Helpers
Add the following specific helpers that wrap `callApp()` to interact with backend endpoints. This makes the code more readable.
For our app, you need five HTTP handlers, which you'll define in the `backend.js` file later. Here are just the wraps for calling those future HTTP handlers using the `callApp()` function defined earlier:
```JS
async function backendGetIssueId() {
const res = await host.fetchApp('backend/getIssueId', { method: 'GET', scope: true });
return res.issueId;
}
async function backendStartTime() { return callApp('backend/start-time', { method: 'POST' }); }
async function backendStopTime() { return callApp('backend/stop-time', { method: 'POST' }); }
async function backendGetTime() { return callApp('backend/get-time', { method: 'GET' }); }
async function backendResetTracker() { return callApp('backend/reset-tracker', { method: 'POST' }); }
```
### YouTrack REST API Helpers
Add some functions to work with YouTrack work items via the YouTrack REST API. They should help you build the payload for the POST requests when adding new work items to the issue, get existing tracked time from the issue, and post new work items.
Without these helpers, the timer exists only in-memory or in the `timeTracking` extension property, so it’s not integrated with YouTrack's built-in time-tracking tools.
```JS
// --- REST helpers (frontend) ---
function buildWorkItemBody(minutes) {
const mins = Math.max(0, Math.floor(minutes));
return { duration: { minutes: mins } };
}
async function ytPostWorkItemMinutes(issueId, minutes) {
const id = String(issueId).trim();
const path = `issues/${id}/timeTracking/workItems`;
const res = await host.fetchYouTrack(path, { method: 'POST', body: buildWorkItemBody(minutes) });
return res;
}
```
### Timer State Management
Add a set of variables to store values important for the widget logic:
```JS
let tickingInterval = null;
let runningSince = null;
let totalSeconds = 0;
let issueId = null; // loaded from backend/getIssueId
```
### Utility Functions
Add extra utilities for rendering the widget buttons:
```JS
// Displays time in a user-friendly format
function formatTime(sec) {
const s = Math.max(0, Math.floor(sec));
const m = Math.floor(s / 60);
const r = s % 60;
return `${m}m ${r}s`;
}
// Calculates how much time the user sees on the timer display.
function computeShownSeconds() {
if (runningSince) {
const elapsed = Math.floor((Date.now() - runningSince) / 1000);
return Math.max(0, totalSeconds + elapsed);
}
return Math.max(0, totalSeconds);
}
```
### UI Rendering
Add a separate function for rendering the widget buttons:
```JS
function render() {
const btn = document.getElementById('start-stop-timer');
const saveBtn = document.getElementById('save-time');
const display = document.getElementById('timer-display');
const isRunning = Boolean(runningSince);
btn.textContent = isRunning ? 'Stop timer' : 'Start timer';
saveBtn.style.display = isRunning ? 'none' : 'inline-block';
display.textContent = `Time tracked: ${formatTime(computeShownSeconds())}`;
}
```
### Timer Functionality
Now let's implement some basic ticking functionality, which is essential for a timer app to track the passage of time incrementally. The ticking mechanism allows the app to update the timer display in real-time.
```JS
function startTicking() {
if (!tickingInterval) {
console.log('[simple-timer] start ticking');
tickingInterval = setInterval(render, 1000);
}
}
function stopTicking() {
if (tickingInterval) {
console.log('[simple-timer] stop ticking');
clearInterval(tickingInterval);
tickingInterval = null;
}
}
```
### Initialization
You should also need a function for initializing the widget on page load. It fetches the timer's initial state and the issue ID.
```JS
async function init() {
try {
issueId = await backendGetIssueId();
if (!issueId) {console.error('[simple-timer] Issue ID is empty');}
} catch (e) {
console.error('[simple-timer] backendGetIssueId failed', e);
}
try {
const state = await backendGetTime();
totalSeconds = Math.max(0, Math.floor(state.trackedSeconds || 0));
runningSince = state.runningSince || null;
} catch (e) {
console.error('[simple-timer] backendGetTime failed', e);
totalSeconds = 0;
runningSince = null;
}
const btn = document.getElementById('start-stop-timer');
const saveBtn = document.getElementById('save-time');
btn.addEventListener('click', async () => {
try {
if (!runningSince) {
const res = await backendStartTime();
runningSince = res.runningSince || Date.now();
startTicking();
} else {
const res = await backendStopTime();
totalSeconds = Math.max(0, Math.floor(res.totalSeconds || 0));
runningSince = null;
stopTicking();
}
render();
} catch (e) {
console.error('[simple-timer] Toggle timer failed', e);
}
});
saveBtn.addEventListener('click', async () => {
try {
if (runningSince) {
const res = await backendStopTime();
totalSeconds = Math.max(0, Math.floor(res.totalSeconds || 0));
runningSince = null;
stopTicking();
}
render();
const minutes = Math.max(0, Math.floor(totalSeconds / 60));
if (minutes <= 0) { host.alert('Nothing to save yet (less than 1 minute tracked).'); return; }
if (!issueId) { host.alert('Cannot save: issue ID is unknown.'); return; }
await ytPostWorkItemMinutes(issueId, minutes);
await backendResetTracker();
totalSeconds = 0;
runningSince = null;
render();
host.alert(`Saved ${minutes} minute(s) to work items.`);
} catch (e) {
console.error('[simple-timer] Save time failed', e);
host.alert('Failed to save time. See console for details.');
}
});
if (runningSince) {startTicking();}
render();
}
```
### Event Listener Setup
Finally, set up an event listener that would wait for the DOM to load before initializing the app.
```JS
if (document.readyState === 'loading') {
document.addEventListener('DOMContentLoaded', init);
} else {
init();
}
```
### index.js Full Script
Here's the script that you should have in the `index.js` file after implementing all the elements described above:
```JS
/* eslint-disable no-console */
/* eslint-disable no-magic-numbers */
// eslint-disable-next-line no-undef
const host = await YTApp.register();
// --- Backend bridge helpers ---
async function callApp(path, params) {
const res = await host.fetchApp(path, Object.assign({ scope: true }, params));
return res;
}
async function backendGetIssueId() {
const res = await host.fetchApp('backend/getIssueId', { method: 'GET', scope: true });
return res.issueId;
}
async function backendStartTime() { return callApp('backend/start-time', { method: 'POST' }); }
async function backendStopTime() { return callApp('backend/stop-time', { method: 'POST' }); }
async function backendGetTime() { return callApp('backend/get-time', { method: 'GET' }); }
async function backendResetTracker() { return callApp('backend/reset-tracker', { method: 'POST' }); }
// --- REST helpers (frontend) ---
function buildWorkItemBody(minutes) {
const mins = Math.max(0, Math.floor(minutes));
return { duration: { minutes: mins } };
}
async function ytPostWorkItemMinutes(issueId, minutes) {
const id = String(issueId).trim();
const path = `issues/${id}/timeTracking/workItems`;
const res = await host.fetchYouTrack(path, { method: 'POST', body: buildWorkItemBody(minutes) });
return res;
}
// --- UI wiring and ticking ---
let tickingInterval = null;
let runningSince = null;
let totalSeconds = 0;
let issueId = null; // loaded from backend/getIssueId
function formatTime(sec) {
const s = Math.max(0, Math.floor(sec));
const m = Math.floor(s / 60);
const r = s % 60;
return `${m}m ${r}s`;
}
function computeShownSeconds() {
if (runningSince) {
const elapsed = Math.floor((Date.now() - runningSince) / 1000);
return Math.max(0, totalSeconds + elapsed);
}
return Math.max(0, totalSeconds);
}
function render() {
const btn = document.getElementById('start-stop-timer');
const saveBtn = document.getElementById('save-time');
const display = document.getElementById('timer-display');
const isRunning = Boolean(runningSince);
btn.textContent = isRunning ? 'Stop timer' : 'Start timer';
saveBtn.style.display = isRunning ? 'none' : 'inline-block';
display.textContent = `Time tracked: ${formatTime(computeShownSeconds())}`;
}
function startTicking() { if (!tickingInterval) { console.log('[simple-timer] start ticking'); tickingInterval = setInterval(render, 1000); } }
function stopTicking() { if (tickingInterval) { console.log('[simple-timer] stop ticking'); clearInterval(tickingInterval); tickingInterval = null; } }
async function init() {
try {
issueId = await backendGetIssueId();
if (!issueId) {console.error('[simple-timer] Issue ID is empty');}
} catch (e) {
console.error('[simple-timer] backendGetIssueId failed', e);
}
try {
const state = await backendGetTime();
totalSeconds = Math.max(0, Math.floor(state.trackedSeconds || 0));
runningSince = state.runningSince || null;
} catch (e) {
console.error('[simple-timer] backendGetTime failed', e);
totalSeconds = 0;
runningSince = null;
}
const btn = document.getElementById('start-stop-timer');
const saveBtn = document.getElementById('save-time');
btn.addEventListener('click', async () => {
try {
if (!runningSince) {
const res = await backendStartTime();
runningSince = res.runningSince || Date.now();
startTicking();
} else {
const res = await backendStopTime();
totalSeconds = Math.max(0, Math.floor(res.totalSeconds || 0));
runningSince = null;
stopTicking();
}
render();
} catch (e) {
console.error('[simple-timer] Toggle timer failed', e);
}
});
saveBtn.addEventListener('click', async () => {
try {
if (runningSince) {
const res = await backendStopTime();
totalSeconds = Math.max(0, Math.floor(res.totalSeconds || 0));
runningSince = null;
stopTicking();
}
render();
const minutes = Math.max(0, Math.floor(totalSeconds / 60));
if (minutes <= 0) { host.alert('Nothing to save yet (less than 1 minute tracked).'); return; }
if (!issueId) { host.alert('Cannot save: issue ID is unknown.'); return; }
await ytPostWorkItemMinutes(issueId, minutes);
await backendResetTracker();
totalSeconds = 0;
runningSince = null;
render();
host.alert(`Saved ${minutes} minute(s) to work items.`);
} catch (e) {
console.error('[simple-timer] Save time failed', e);
host.alert('Failed to save time. See console for details.');
}
});
if (runningSince) {startTicking();}
render();
}
if (document.readyState === 'loading') {
document.addEventListener('DOMContentLoaded', init);
} else {
init();
}
```
Save the `index.js` file in the widget folder at `/time-tracking-app/src/widgets/simple-timer`.
## Step 5 — Add App Storage
To ensure that our widget continues working even when the user refreshes or closes the page, implement data storage for the app. For the purposes of this app, add an extension property called `timeTracking` to the issue entity. It should help you store the tracked time data between sessions. For more details about extension properties, see [Extension Properties](apps-extension-properties.html).
In the main `src` folder, create a file named `entity-extensions.json` and add the following contents there:
```JSON
{
"entityTypeExtensions": [
{
"entityType": "Issue",
"properties": {
"timeTracking": {
"type": "string",
"description": "Stringified JSON: { totalSeconds: number, entries: {seconds:number, at:number}[] }"
}
}
}
]
}
```
## Step 6 — Add HTTP Handlers
For storing and retrieving the tracked time data, you need custom HTTP handlers. In fact, the widget logic in `index.js` already references these handlers.
Open the `backend.js` file in the `src` folder in the app package and define the following five HTTP handlers: `get-time`, `start-time`, `stop-time`, `reset-tracker`, and `getIssueId`.
### get-time
```JS
{
scope: 'issue',
method: 'GET',
path: 'get-time',
handle: function handle(ctx) {
const d = loadData(ctx);
const totalSeconds = Math.max(0, Math.floor(d.totalSeconds || 0));
return ctx.response.json({
success: true,
trackedSeconds: totalSeconds,
trackedMinutes: floorMinutesFromSeconds(totalSeconds),
runningSince: d.runningSince || null });
}
}
```
To fetch the timer state in the widget, add the `get-time` handler. You need the state of the timer when it first starts and when it resumes. The handler returns a JSON with the following values:
* `success` — a signal of the success or failure of the handler.
* `trackedSeconds` — the number of tracked seconds.
* `trackedMinutes` — the tracked time in minutes.
* `runningSince` — the timestamp when the timer was started, or `null` if it's not running.
### start-time
```JS
{
scope: 'issue',
method: 'POST',
path: 'start-time',
handle: function handle(ctx) {
const d = loadData(ctx);
if (!d.runningSince) {
d.runningSince = nowMs();
d.totalSeconds = Math.max(0, Math.floor(d.totalSeconds || 0));
saveData(ctx, d);
}
return ctx.response.json({ success: true, runningSince: d.runningSince });
}
}
```
This is the handler triggered by the `Start timer` button. The handler starts the timer by assigning the current timestamp to the `runningSince` key in the JSON response.
The handler returns a JSON file with the following values:
* `success` — a signal of the success or failure of the handler.
* `runningSince` — the timestamp when the timer was started, or `null` if it's not running.
### stop-time
```JS
{
scope: 'issue',
method: 'POST',
path: 'stop-time',
handle: function handle(ctx) {
const d = loadData(ctx);
if (d.runningSince) {
const elapsed = Math.max(0, Math.floor((nowMs() - d.runningSince) / 1000));
d.totalSeconds = Math.max(0, Math.floor(d.totalSeconds || 0)) + elapsed;
d.runningSince = null;
saveData(ctx, d);
}
const s = Math.max(0, Math.floor(d.totalSeconds || 0));
return ctx.response.json({ success: true, totalSeconds: s, totalMinutes: floorMinutesFromSeconds(s) });
}
}
```
This is the handler triggered by the `Stop timer` button. It calculates the elapsed time and adds it to the total tracked time (`totalSeconds`).
The handler returns a JSON file with the following values:
* `success` — a signal of the success or failure of the handler.
* `totalSeconds` — total tracked time.
### reset-tracker
```JS
{
scope: 'issue',
method: 'POST',
path: 'reset-tracker',
handle: function handle(ctx) {
saveData(ctx, { totalSeconds: 0, entries: [], runningSince: null });
return ctx.response.json({ success: true });
}
}
```
This handler is triggered by the `Save time` button. It saves the tracked time in the `timeTracking` extension property of the issue and resets the timer.
The handler returns a JSON file containing a `success` boolean value.
### getIssueId
```JS
{
scope: 'issue',
method: 'GET',
path: 'getIssueId',
handle: function handle(ctx) {
const issueId = ctx.issue.id;
ctx.response.json({issueId});
}
}
```
The handler returns the unique ID of the issue the widget operates on. It's an auxiliary handler that helps to work with the issue from the widget and save time tracking data in an issue custom field.
### Server-side Helpers
Since the timer needs to store its state persistently, define these four helpers to load, process, and save data in the `timeTracking` extension property:
loadData
: This function safely reads and parses the `timeTracking` extension property from the issue.
saveData
: This function stringifies and saves the tracked time to the `timeTracking` extension property.
nowMs
: This function returns the current time in milliseconds since the Unix epoch (January 1, 1970). It’s essentially a shorthand for Date.now().
floorMinutesFromSeconds
: This function converts a given number of seconds into full minutes, flooring any fractional remainder. It formats and returns the tracked time in a human-readable `minutes` unit, which is displayed in the frontend.
```JS
function loadData(ctx) {
try { return JSON.parse(ctx.issue.extensionProperties.timeTracking || "{}") || {}; } catch { return {}; }
}
function saveData(ctx, data) { ctx.issue.extensionProperties.timeTracking = JSON.stringify(data || {}); }
const nowMs = () => Date.now();
const floorMinutesFromSeconds = s => Math.floor((s || 0) / 60);
```
The resulting code for the `backend.js` file looks like this:
```JAVASCRIPT
/* eslint-disable no-magic-numbers */
function loadData(ctx) {
try { return JSON.parse(ctx.issue.extensionProperties.timeTracking || "{}") || {}; } catch { return {}; }
}
function saveData(ctx, data) { ctx.issue.extensionProperties.timeTracking = JSON.stringify(data || {}); }
const nowMs = () => Date.now();
const floorMinutesFromSeconds = s => Math.floor((s || 0) / 60);
exports.httpHandler = {
endpoints: [
{
scope: 'issue',
method: 'GET',
path: 'getIssueId',
handle: function handle(ctx) {
const issueId = ctx.issue.id;
ctx.response.json({issueId});
}
},
{
scope: 'issue',
method: 'GET',
path: 'get-time',
handle: function handle(ctx) {
const d = loadData(ctx);
const totalSeconds = Math.max(0, Math.floor(d.totalSeconds || 0));
return ctx.response.json({ success: true, trackedSeconds: totalSeconds, trackedMinutes: floorMinutesFromSeconds(totalSeconds), runningSince: d.runningSince || null });
}},
{
scope: 'issue',
method: 'POST',
path: 'start-time',
handle: function handle(ctx) {
const d = loadData(ctx);
if (!d.runningSince) {
d.runningSince = nowMs();
d.totalSeconds = Math.max(0, Math.floor(d.totalSeconds || 0));
saveData(ctx, d);
}
return ctx.response.json({ success: true, runningSince: d.runningSince });
}},
{
scope: 'issue',
method: 'POST',
path: 'stop-time',
handle: function handle(ctx) {
const d = loadData(ctx);
if (d.runningSince) {
const elapsed = Math.max(0, Math.floor((nowMs() - d.runningSince) / 1000));
d.totalSeconds = Math.max(0, Math.floor(d.totalSeconds || 0)) + elapsed;
d.runningSince = null;
saveData(ctx, d);
}
const s = Math.max(0, Math.floor(d.totalSeconds || 0));
return ctx.response.json({ success: true, totalSeconds: s, totalMinutes: floorMinutesFromSeconds(s) });
}},
{
scope: 'issue',
method: 'POST',
path: 'reset-tracker',
handle: function handle(ctx) {
saveData(ctx, { totalSeconds: 0, entries: [], runningSince: null });
return ctx.response.json({ success: true });
}}
]
};
```
By implementing this backend, you’ve created a robust REST-like API for managing your timer.
## Step 7 — Build and Test the App
The code for your app is ready. Before testing it, you need to build the app. Run the following command in your terminal:
```SHELL
npm run build
```
When the app is built, upload it to YouTrack by running the following command:
```
npm run upload -- --host --token
```
Alternatively, you can manually upload the ZIP archive with your app to YouTrack. For details, see [Upload the App to YouTrack](apps-quick-start-guide.html#add-app-to-youtrack).
When you've uploaded the app to YouTrack, attach it to a test project. Make sure that your test project has time tracking enabled.
Open an issue with the Task type in YouTrack and check that the timer appears in the field panel. Click the timer and ensure that it starts. Stop the timer and check that the tracked time is saved in the Spent time custom field.
That's it, you've built a time tracking app with a simple control to start and stop the timer. You can now explore the option to [publish your app to the JetBrains Marketplace](apps-quick-start-guide.html#publish-app).
## Summary
You've built a simple app consisting of one issue widget. This widget contains the following UI elements:
* A `Start timer` button. When the user clicks it, the timer starts ticking, and the button turns into `Stop timer`. When the user clicks it again, the timer pauses, and the `Save time` button becomes available.
* A `Save time` button. It saves the timer time into the `Spent time` field in the issue as a work item, and resets the timer.
* A dynamic label displaying tracked time.
The widget is only visible when the issue type is set to `Task`.

You can fork the app or have a look at the code described on this page on [GitHub](https://github.com/dievskaia/simple-timer).
## Next Steps
Now that you've built a basic timer app, you can go further and add more functionality. Some of the possible enhancements may include:
* Add a button to reset the tracked time.
* Add a dropdown menu to change work item parameters before saving: work item type, date, author, and so on.
* Amplify the app with some charts, diagrams, or other reporting solutions.
* Implement a separate project page for managers to view current team members' timers.
* Show the timer on other YouTrack pages, such as the issue list, Agile boards, and so on.
* Add more complex logic, for example, limit the number of ticking timers per user.
* Map the issue state to the timer state.
* ... and much more!