Create User Accounts
In YouTrack, user accounts can be created in several ways:
A system administrator can create an account manually.
A system administrator can invite a person to register.
Users can register their own accounts.
Users can log in to YouTrack with credentials from a connected service.
The most common way to add new user accounts to YouTrack is to enable an external authentication module. Authentication modules let users log in to YouTrack with the credentials that they manage in a third-party application. Each authentication module lets you create YouTrack accounts automatically for unregistered users who log in with external credentials. You can also add new users to a specific group to automatically grant access to and assign licenses for connected services. For more information, see Auth Modules.
This page describes all the options you can use to create user accounts in YouTrack.
Create a User Account
To provide access to a single user, create a new user account in YouTrack.
To create a user account manually:
From the main navigation menu, select
.
Click the New user button.
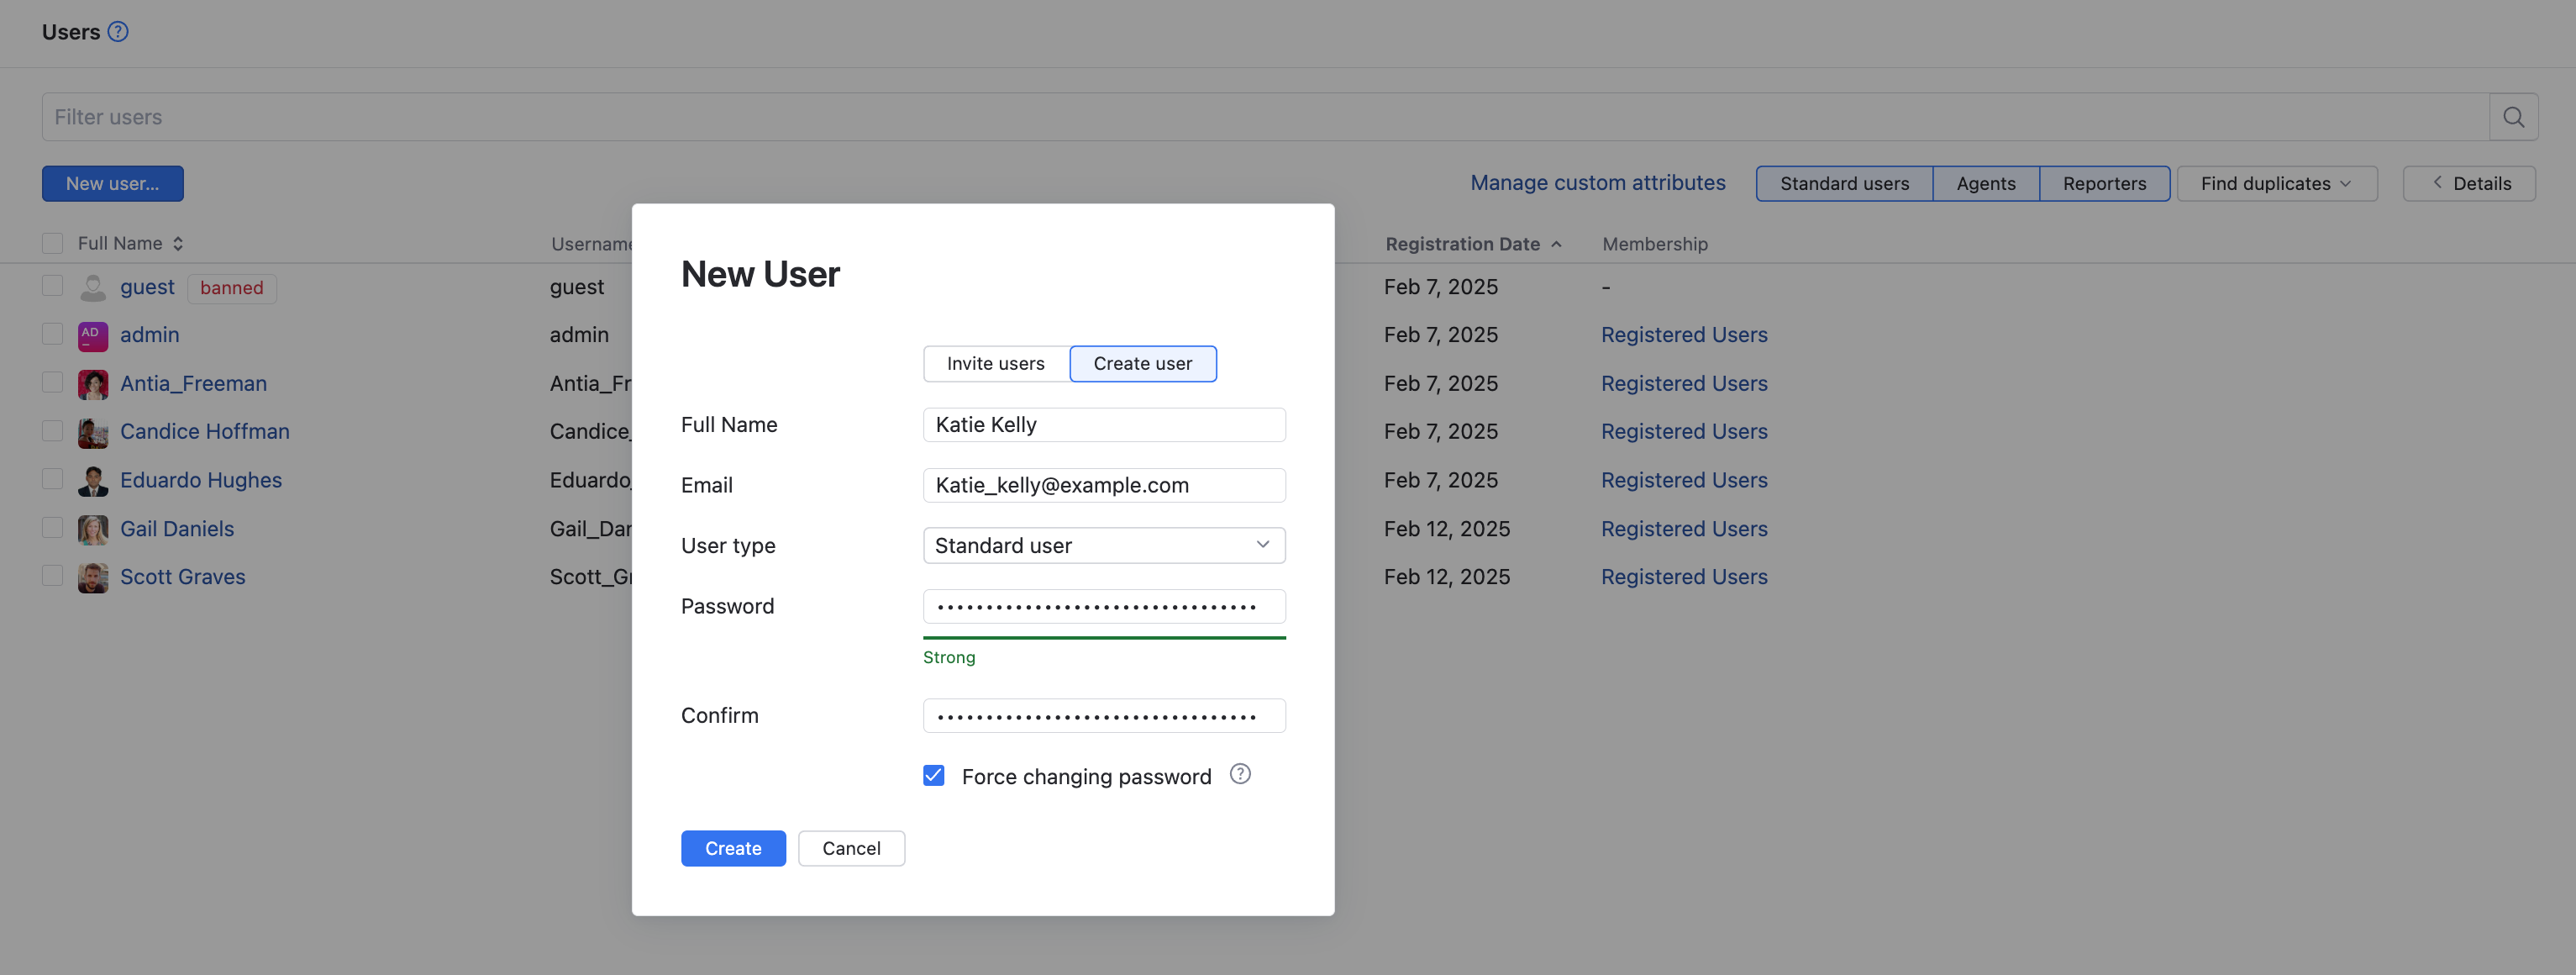
In the New User dialog, click the Create user button.
Enter values for the following settings:
Setting
Description
Full name
Set the full name of the new user.
Email
Enter the email address of the new user. The email address must be valid.
User type
If a Helpdesk project exists, select the user type.
Password
Enter the password for the new user account.
Confirm
Confirm the password for the new user account.
Force Changing Password
Select this option to force the user to change the password. The user is prompted to change the password upon the next login with these credentials.
Click the Create button.
A user account with the specified settings is created.
The profile page for the new user opens. Here, you can configure the access rights for the user account.
After you create the account, you need to ensure that the user has access to projects and the set of permissions that they need to work with YouTrack.
Select the Groups tab and add the user to one or more groups. For more information, see Add and Remove Members.
Select the Roles tab and grant the user one or more roles in a group or project. For more information, see Manage User Access.
Invite New Users to Register
One way to create user accounts in YouTrack is to invite new users to register their own accounts.
When you invite users to register, you actually create an account and profile for the new users. The invited users are able to confirm the account and set their own passwords.
The fact that the account has been created lets you, as an administrator, configure access permissions before the invitation is sent.
To invite one or more users to register an account in YouTrack:
From the main navigation menu, select
.
Click the New user button.
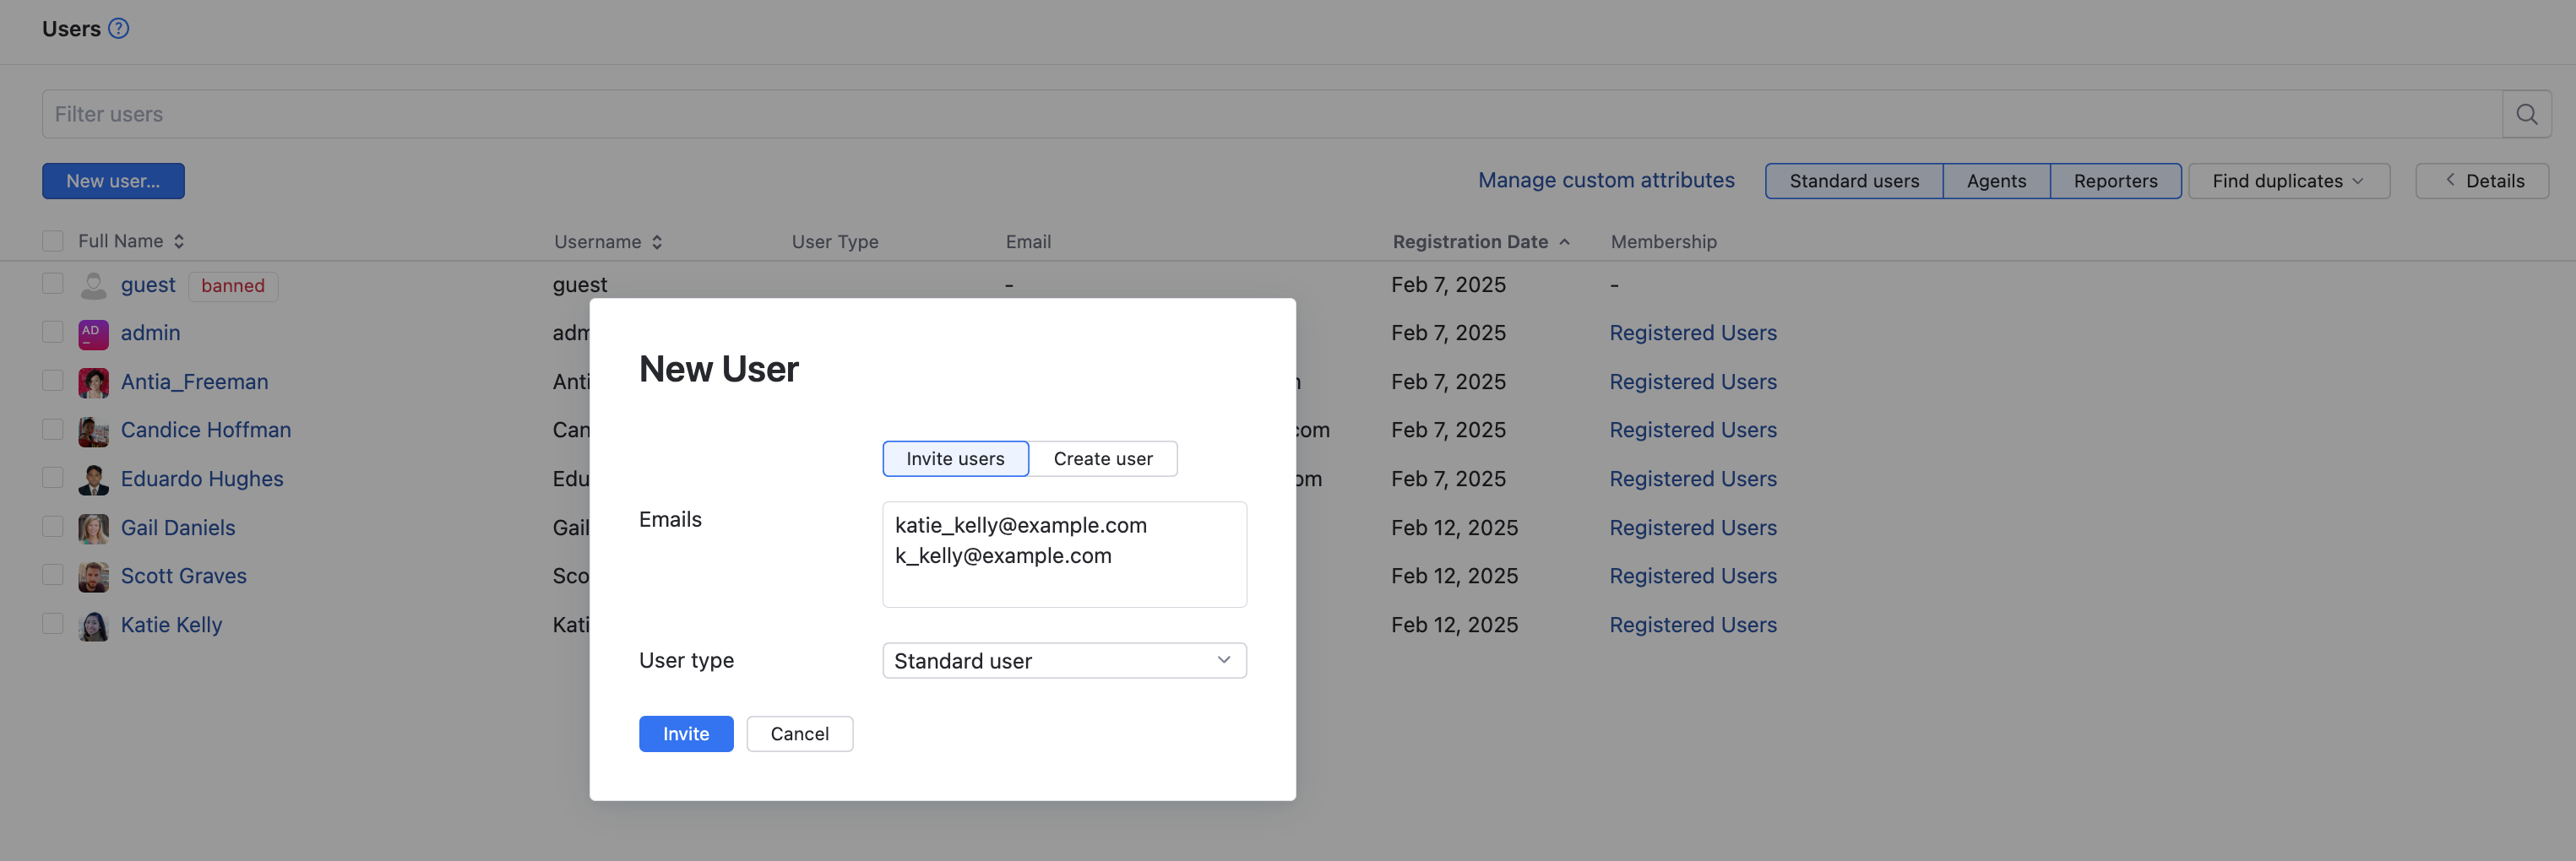
In the New User dialog, click the Invite users button.
In the Emails input field, enter a list of space-separated email addresses of the users who you want to invite to register accounts in Hub.
If a Helpdesk project exists, select the user type.
Click the Invite button.
An invitation is sent to the email address of each user to be invited. The invitation contains a link to the login page where the user can set a password and access Hub.
You can also invite users to YouTrack by entering their email address in a User type custom field in an issue. If the email address isn’t associated with an existing account, an invitation can be sent to invite the new user. This lets you add new contributors directly while working with issues.
To learn more about inviting new users directly form project issues, see Invite new users to a project.
Allow Users to Register Themselves
To let users register their own accounts in YouTrack, enable registration in the Hub authentication module.
To configure the Hub auth module:
From the main navigation menu, select
.
Select the Hub module from the list.
Set the Registration option to Enabled.
Additional settings that you can use to manage users who register their own accounts in YouTrack are shown.
Users can create their own accounts in YouTrack.
To protect your YouTrack server against bots, you can enable reCAPTCHA on your registration page.
To enable reCAPTCHA on the registration page:
From the main navigation menu, select
.
Select the Hub module from the list.
Set the Registration option to Enabled.
Set the reCAPTCHA option to Enabled.
Additional settings for the reCAPTCHA setup are shown.
Click the link to access the reCAPTCHA key management console.
The Create reCAPTCHA key page opens.
Register your YouTrack domain with the reCAPTCHA service. reCAPTCHA is a part of Google services, so you can use your Google account to log in. Read the tips provided on the page before you register and generate your keys.
Copy the Site key in Google and paste it into the corresponding input field in the Hub authentication module.
Copy the Secret key in Google and paste it into the corresponding input field in the Hub authentication module.
Click the Save button.
The reCAPTCHA validation input is enabled for users who register their own accounts in YouTrack.
Enable Log in with Credentials from External Authentication Providers
YouTrack supports authorizing users with accounts from external authentication sources, for example, LDAP or various OpenID providers. To enable users to log in with an account from an external provider, you must enable and configure the corresponding authentication module.
Setup instructions for supported authentication modules are described in the Auth Modules section of the documentation.
Troubleshooting
The process of creating users within your YouTrack environment should be a straight forward process.
If you encounter any problems trying to create new users for your YouTrack environment, see if any of the following conditions apply to you.
Condition — The new user is automatically banned.
Cause | Solution |
|---|---|
You have reached the user limit for your YouTrack license. | Try one of the following approaches:
|
Condition — You want to re-invite a user, and you get an error that the email address already exists.
Cause | Solution |
|---|---|
When you invite a new user, YouTrack immediately creates the account, even before the user has accepted the invitation. Their email address is now attached to this account. | If you need to re-send a user invitation, you first need to delete the original account created for this user in YouTrack. |
Condition — You have created a user manually. This user tries to log into YouTrack via an auth module other than Hub. Now, a new user account is created for this user instead of being tied to their original user account, why?
Cause | Solution |
|---|---|
The new account accessing YouTrack though the auth module has not verified their email address. | The new YouTrack user needs to verify their email before they log into YouTrack through a non-Hub auth module. |
Condition — A new user can log into the YouTrack environment but cannot access anything other than their profile.
Cause | Solution |
|---|---|
The new user doesn't have the required permissions set to access specific project issues or tickets. | An administrator can update the permissions for the user to grant access to YouTrack projects. |
Condition — You want to create a new user and assign them the user type Agent or Reporter, but those options are not available.
Cause | Solution |
|---|---|
Your YouTrack environment doesn't have a Helpdesk project. The Agent and Reporter user types are only available when a Helpdesk project already exists in your YourTrack environment. | Create a Helpdesk Project. After the creation of a Helpdesk project, you can assign new users the type Agent and Reporter. |

