To-do lists
ReSharper provides an easy way to track tasks and technical debt in your code — code items (comments, string literals, or identifiers) matching a specific pattern can be easily located in the editor as well as in the whole solution using the To-do Explorer window.
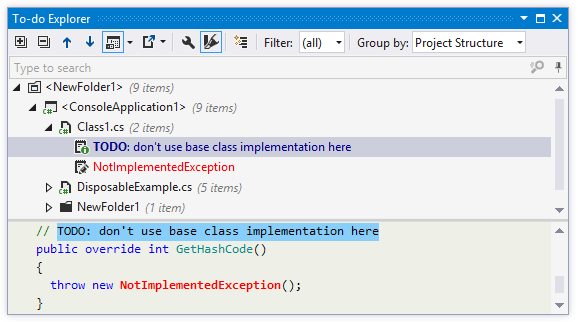
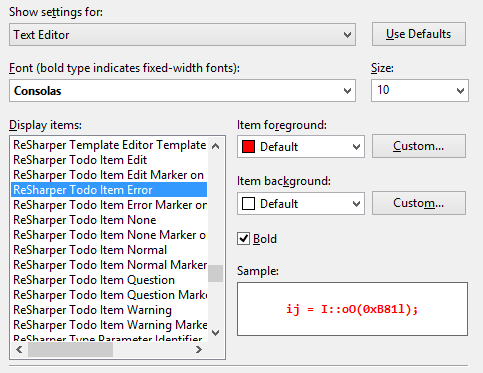
To-do items are highlighted in the editor and on the marker bar according to their types (Edit, Normal, Question, Warning, Error). Colors are configurable on the page of Visual Studio options:
To-do patterns
By default, ReSharper provides three predefined patterns for commonly used To-do items of the following types:
A line in a comment containing
TODOorTODO: some description(both case-insensitive) - NormalA line in a comment containing
BUG:(case sensitive) - ErrorA
NotImplementedExceptionin the code - Edit
You can also define your own patterns, so that you could quickly access your specific technical debt items in the To-do Explorer window.
Define a custom To-do pattern
Open the page of ReSharper options Alt+R, O.
Click Add on the toolbar.
Provide a title for your To-do pattern and specify a regular expression with keywords that you want to detect in comments. For example,
(\W|^)(?<TAG>Refactor)(\W|$)(.*).Select where ReSharper should apply the expression to find the To-do items (comments, strings, and/or identifiers).
Optionally, specify whether the pattern is case-sensitive.
Select a type for the pattern to define how matched items will be colored in the editor and in the To-do Explorer window.
Click OK to add this pattern to the list.
You can also duplicate, edit or remove existing patterns.
Click Save in the Options dialog to apply the modifications and let ReSharper choose where to save them, or save the modifications to a specific settings layer by choosing this layer from the Save To selector. For more information, see manage and share resharper settings.
Multiline To-do items in comments
By default, To-do items in comments can be multi-line if the following lines are indented from the first line with at least one whitespace:
If you want to have only single-line To-do items in comments, you can clear the Treat indented text on the following lines as part of the same To-do on the page of ReSharper options Alt+R, O
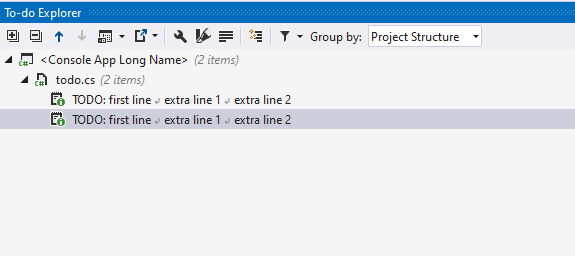
When multiline To-do items in comments are enabled, you can choose whether to display multiline items as is or to display the whole multiline item in a single line. To do so, use the Enable multiline presentation button on the To-do Explorer toolbar:
Link To-do items to external URLs
In a To-do pattern, you can add a placeholder for items that will point to an external URL. This comes in particularly handy for issue trackers — you can use IDs of the issues in your comments, and ReSharper will let you open the corresponding issues in the browser or directly in the editor peek view.
Suppose your project is on GitHub and you want to add comments for GitHub issues in your code. All you have to do is create a custom To-do pattern for that:
Regular expression:
(?<=\W|^)(?<TAG>GH \#(?<ISSUE_ID>\d+))(\W|$)(.*)URL:
https://github.com/<YOUR_PROJECT>/issues/${ISSUE_ID}
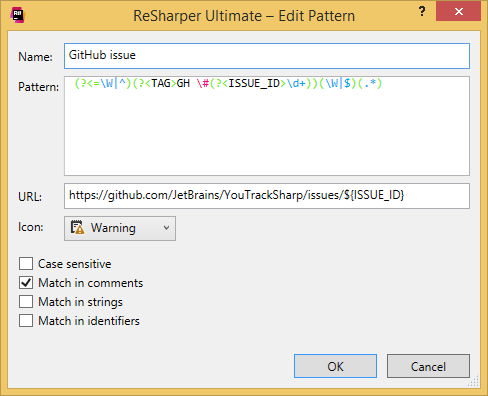
ReSharper will now treat GH #XX in your comments as links to the corresponding GitHub issues.

Besides Ctrl-clicking on these comments, you can also Ctrl+Shift-click to open the link in the editor peek preview. Both ways of navigating to the URLs are also available from the Alt+Enter menu.
Navigate between To-do items
To navigate between To-do items in the current file, use To-do marks on the marker bar.
Study To-do items in the whole solution
Press Control+Alt+. or choose from the main menu. Alternatively, you can press Control+Shift+A, start typing the command name in the popup, and then choose it there.
In the To-do Explorer window that opens, click
.png) or
or .png) to navigate to the next or previous item.
to navigate to the next or previous item.To locate To-do items in the editor, double-click them .
To study the source code of the selected item right in the window, click Show Preview
.png) on the toolbar. If necessary, you can locate the preview pane at the bottom or on the right.
on the toolbar. If necessary, you can locate the preview pane at the bottom or on the right.
Group and filter To-do items
By default, the To-Do Explorer lists to-do items based on the project structure. If necessary, you can change grouping options using the Group by selector. You can disable grouping, group by tags, types, namespaces, directories, projects.
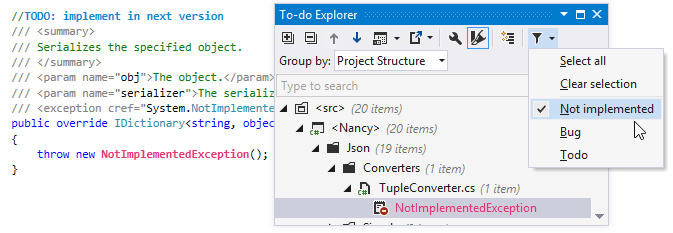
Depending on the size and age of the codebase, there may be lots of To-do items. To focus on specific items, you can filter To-do items by pattern (for example, TODO or BUG) — just select the desired patterns in the Filter ![]() selector to display items matching the corresponding patterns and hide all others.
selector to display items matching the corresponding patterns and hide all others.
To-do Explorer window toolbar controls
Control | Name | Description |
|---|---|---|
| Expand All/Collapse All | Expands/collapses all nodes in the current tab. |
| Previous/Next | Navigate to the previous/next item and scrolls through the source code accordingly. |
| Show Preview Ctrl+P | Hides or shows the pane with a preview of the selected item in the position specified using the list (at the bottom or in the right part of the window). |
| Export | Click this button to export the data currently displayed in the window in text format , or use the drop-down selector to export the data in an XML or HTML format. The Export Data dialog that appears will help you save the data to a file or copy it to the clipboard . |
| To-do Settings | Opens the page of ReSharper options , where you can manage patterns for To-do items. |
| Paint items | Toggles coloring of To-do items in the window according to their types (Edit, Normal, Question, Warning, Error). Colors are configurable on the page of Visual Studio options:  |
| Enable multiline presentation | When multiline To-do items in comments are enabled, you use this button to choose whether to display multiline items as is or to display the whole multiline item in a single line. |
| Show To-do items in generated code | Allows you to show or hide To-do items in generated code. You can configure the list of files and regions containing generated code on the page of ReSharper options . |
Filter | Use this list to select a filter to show items that pertain to the corresponding pattern only. By default, five filters are provided:
| |
Group by | Use this list to select criteria for grouping To-do items. Several options are provided:
|
This feature is supported in the following languages and technologies:
The instructions and examples given here address the use of the feature in C#. For more information about other languages, refer to corresponding topics in the Languages and frameworks section.