Diff Viewer for files
This Diff Viewer is displayed when you compare two files or two versions of a file (local changes or changes between local files and their revisions in a remote repository). You can compare files of any types, including binaries and .jar files. To open it, select two files to compare or a file to compare its versions and press Ctrl+D. The Diff Viewer will be opened in a new tab.
The Diff Viewer provides a powerful editor that enables code completion, live templates, and other features.
The changes that you apply in the Diff Viewer are automatically applied to the files. You can view the changes in the files at any time while working with the Diff Viewer and after closing it.
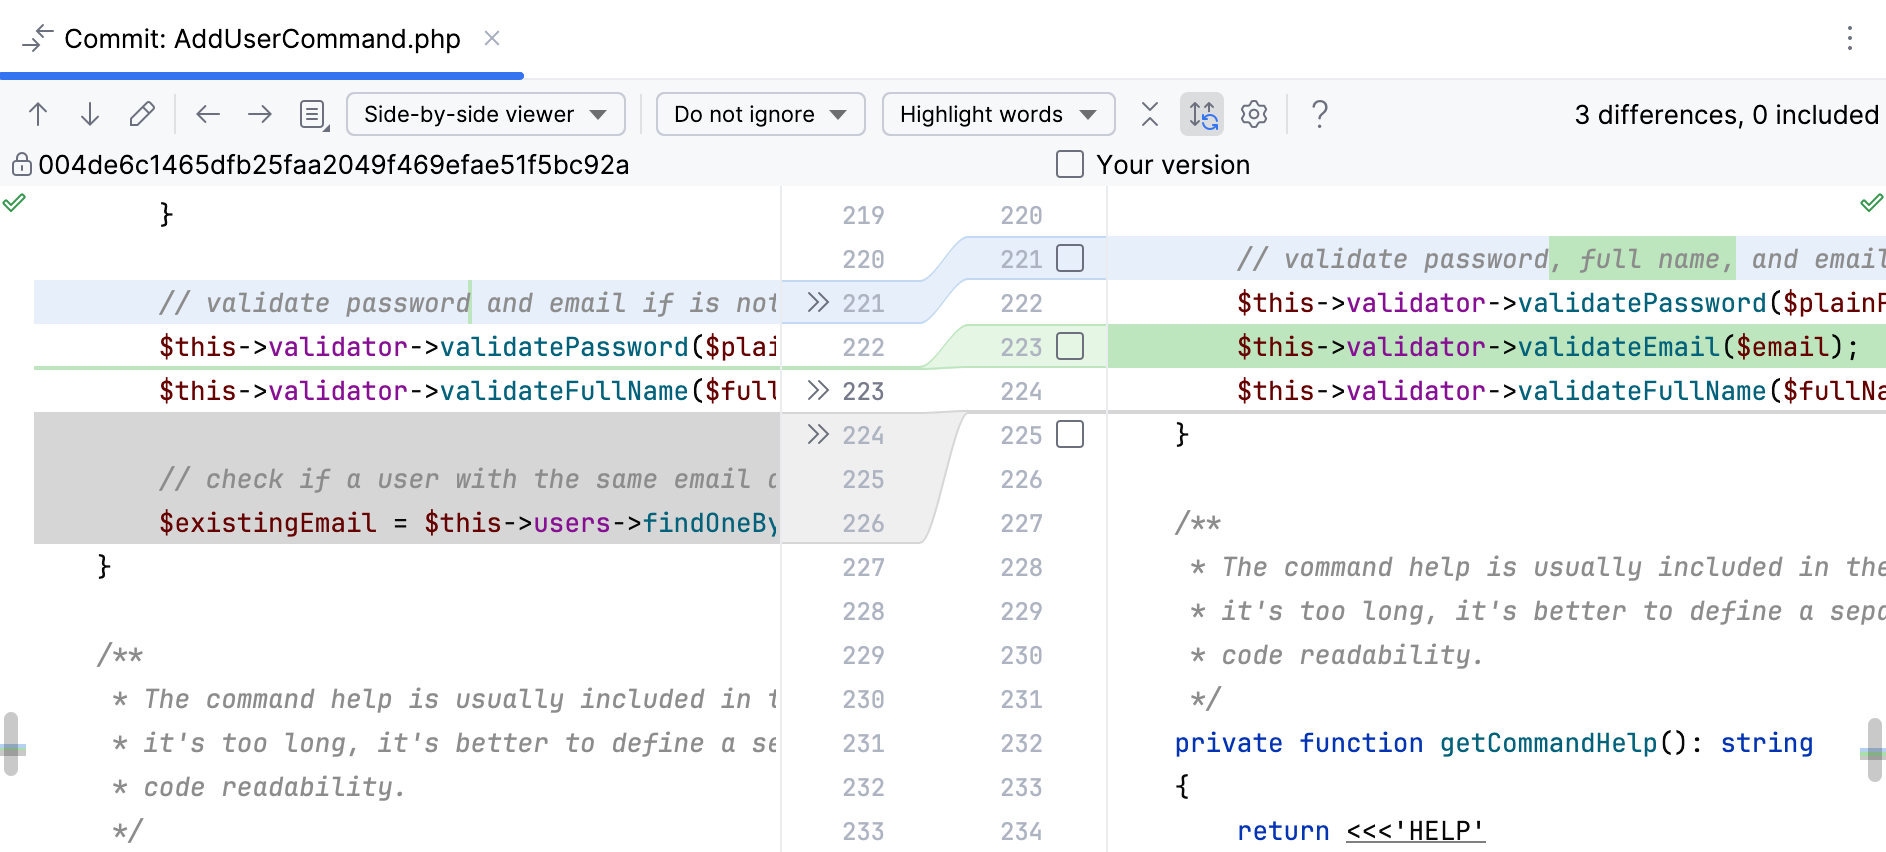
Color | Description |
|---|---|
| Added |
| Modified |
| Deleted |
 Green
Green Blue
Blue Gray
GrayDiff & Merge viewer
Item | Tooltip and Shortcut | Description |
|---|---|---|
| Previous Difference / Next Difference Shift+F7 F7 | Jump to the next or previous difference. When the last or the first difference is reached, PhpStorm suggests clicking the arrow buttons or pressing F7/Shift+F7 once more and comparing other files modified locally. This behavior depends on the Go to the next file after reaching last change option in the Diff Viewer settings. |
| Compare Previous/Next File Alt+LeftAlt+Right | Compare the local copy of the previous or next file with its update from the server. |
| Jump to Source F4 | Open the selected file in the editor. The caret is placed in the same position as in the Diff Viewer. |
| Collapse Unchanged Fragments | Collapse all the unchanged fragments in both files. The number of non-collapsible unchanged lines is configurable on the Diff & Merge settings page. To open the Diff & Merge page, open settings by pressing Ctrl+Alt+S and navigate to . . |
Side-by-side viewer / Unified viewer | Select a viewer mode: side-by-side or unified. The side-by-side mode has two panels, and the unified mode has one panel. You can edit code and perform the Accept, Append, Revert actions in both viewers. You can change text only in the right part of the side-by-side viewer or in the lower line in the unified viewer. You can edit only local versions of your files. You cannot edit files that have read-only status. | |
| Settings | Some of these commands are also available from the context menu of the Diff Viewer gutter. Align Changes in Side-by-Side Diff: vertically aligns the corresponding lines by padding differences with empty space. Synchronize Scrolling: scroll both diff panes simultaneously. Show Diff in Editor Tab: displays the Diff viewer as an editor tab instead of a separate window. Show Diff in Separate Window: displays the Diff viewer as a separate window instead of an editor tab. Ignore Differences: define how the Diff Viewer should treat whitespaces.
Highlighting Differences: select the way differences granularity is highlighted.
|
| Help F1 | Open a browser and show the corresponding help page. |
Ctrl+Shift+Tab | Switch between the panes of the Diff Viewer. The active pane has the caret. | |
| Accept | Apply differences between panes (in case of the side-by-side viewer) or between lines (in case of the unified viewer). The chevron buttons can change their behavior:
|
Merge actions | ||
| Compare Contents | Click this icon to invoke the list of options allowing you to compare different versions of a file to resolve a conflict. Note that Base refers to the file version that the local and the repository versions originated from (initially displayed in the middle pane), while Middle refers to the resulting version. |
| Apply All Non-Conflicting Changes | Click this button to apply all non-conflicting changes. You can also make this behavior automatic by selecting the checkbox Automatically apply non-conflicting changes in the Diff & Merge page of the Settings dialog. |
| Apply Non-Conflicting Changes from the Left/Right Side | Click these buttons to merge non-conflicting changes from the left/right parts of the dialog. |
| Resolve Simple Conflicts | Click this button to resolve simple conflicts (for example, if the beginning and the end of the same line have been modified in different file revisions) and merging the changes. Such conflicts are not resolved with the Apply non-conflicting changes actions since you have to make sure that they are resolved properly. |
Annotate with GitBlame | This option is only available from the context menu of the gutter. Use this option to explore who introduced which changes to the repository version of the file and when. The annotations view lets you see detailed information for each line of code, such as the version from which this line originated, the ID of the user who committed this line, and the commit date. For more information about annotations, refer to Locate code author (Annotate with Git Blame). | |
 /
/


 or
or  and append changes.


Keyboard shortcuts
Keyboard shortcut | Description |
|---|---|
Ctrl+Shift+D | Use this keyboard shortcut to show the popup menu of the most commonly used diff commands. |
Ctrl+Shift+Tab | Use this keyboard shortcut to switch between the left and the right panes. |
Ctrl+Z/Ctrl+Shift+Z | Use this keyboard shortcut to undo/redo a merge operation. Conflicts will be kept in sync with the text. |
Context menu commands
This context menu is available in the middle of the editor:
Item | Description |
|---|---|
Annotate | Enable this option to annotate the changes. |
Show Whitespaces | Enable this option to show whitespaces as the dots in the Diff Viewer. |
Show Line Numbers | Enable this option to show line numbers in the Diff Viewer. |
Show Indent Guides | Enable this option to have PhpStorm display vertical lines in the Diff Viewer to indicate positions of indents. |
Use Soft Wraps | Enable this option to have PhpStorm wrap the lines of code, when the dialog is resized. |
Highlighting level | Use this menu item to select the highlighting level in the Diff Viewer. To learn more about the level of highlighting, refer to Change the highlighting level for a file. |
This context menu is available in both editors:
Item | Description |
|---|---|
Annotate | Enable this option to annotate the changes. |
Accept/Append | Select these commands to accept or append the lines shown in the Diff Viewer. |
Compare with Clipboard | Select this command to compare the file in the respective pane of the Diff Viewer with the contents of the Clipboard. |
Switch to Three-Side Viewer | This option is available only when you are comparing two files against each other. It allows you to load a third file and add it to the comparison. |
This context menu is available in the right-hand panel of the Diff Viewer:
Item | Description |
|---|---|
Go to high-priority problems only/Go to next problem | Click one of these radio-buttons to define the way of navigating between the encountered problems. |
Customize highlighting level | Click to show the slider to change the highlighting level in the Diff Viewer. |
Show code lens on scrollbar hover | Enables viewing code outside the visible area of the Diff Viewer when hovering over the scrollbar. |