# JPA console
> **TL;DR**
> Required plugin: [Jakarta EE: Persistence (JPA)](https://plugins.jetbrains.com/plugin/20202) (bundled)
Use the JPA console to write and run JPQL queries. It provides useful highlighting and completion for JPQL keywords, object, and property names.
> **Note:**
> Your project should use JDK 8 or later for the JPA console to be available.
> **Note:**
> If your project has the Hibernate facet, the [Hibernate Console](hibernate.html) tool window is available and can be used for Hibernate queries. Otherwise, the JPA Console is used for both JPQL and HQL queries.
> **Tip:**
> Associate your persistence units with the corresponding [data sources](managing-data-sources.html#data_sources). Otherwise, you will have to manually specify the database connection settings when using the JPA console. For more information, refer to [Associate persistence units with data sources](persistence-tool-window.html#assign_data_source).
Make sure that `persistence.xml` contains the necessary information for the persistence unit to be able to run JPQL queries from the corresponding JPA console: the persistence provider, a list of persistent classes, and connection properties. For example, in the case of EclipseLink and MySQL, it could be similar to the following:
```XML
org.eclipse.persistence.jpa.PersistenceProvider
com.example.MyApp.models.ProductsEntity
...
```
Procedure: Open the JPA console
Do any of the following:
1. In the [Persistence](persistence-tool-window.html) tool window, right-click a persistence unit or entity and select JPA Console. Alternatively, you can click  in the toolbar or press `Ctrl+Shift+F10` (Windows), `⌘ ⇧ F10` (macOS), `⌘ ⇧ F10` (IntelliJ IDEA Classic (macOS)), `⌘ ⇧ F10` (macOS System Shortcuts), `Ctrl+Shift+F10` (XWin), `Ctrl+Shift+F10` (GNOME), `Ctrl+Shift+F10` (KDE), `Ctrl+Shift+F10` (Emacs), `Ctrl+Shift+F10` (Sublime Text), `⌘ ⇧ F10` (Sublime Text (macOS)), `Ctrl+Shift+F10` (NetBeans), `Ctrl+Shift+F10` (Visual Studio), `⌘ ⇧ F10` (Visual Studio (macOS)), `Ctrl+Shift+F10` (Eclipse), `⌘ ⇧ F10` (Eclipse (macOS)).
2. [Run query methods right from the editor](#run-spring-data-query-methods-from-the-editor).
The JPA console input pane opens as a separate tab where you can write and execute JPQL queries.
The JPA console toolbar contains the following buttons:
|  | `Ctrl+Enter` (Windows), `⌘ ⏎` (macOS), `⌘ ⏎` (IntelliJ IDEA Classic (macOS)), `⌘ ⏎` (macOS System Shortcuts), `Ctrl+Enter` (XWin), `Ctrl+Enter` (GNOME), `Ctrl+Enter` (KDE), `Ctrl+Enter` (Emacs), `Ctrl+Enter` (Sublime Text), `⌘ ⏎` (Sublime Text (macOS)), `Ctrl+Enter` (NetBeans), `Ctrl+Enter` (Visual Studio), `⌘ ⏎` (Visual Studio (macOS)), `Ctrl+Enter` (Eclipse), `⌘ ⏎` (Eclipse (macOS)) | Run the current query. |
|  | | Open the [Database \| Query execution](settings-tools-database.html) page of the Settings dialog `Ctrl+Alt+S` (Windows), `⌘ Comma` (macOS), `⌘ Comma` (IntelliJ IDEA Classic (macOS)), `⌘ Comma` (macOS System Shortcuts), `Ctrl+Alt+S` (XWin), `Ctrl+Alt+S` (GNOME), `Ctrl+Alt+S` (KDE), `Ctrl+Alt+S` (Emacs), `Ctrl+Alt+S` (Sublime Text), `⌘ Comma` (Sublime Text (macOS)), `Ctrl+Alt+S` (NetBeans), `Ctrl+Alt+S` (Visual Studio), `⌘ Comma` (Visual Studio (macOS)), `Ctrl+Alt+S` (Eclipse), `⌘ Comma` (Eclipse (macOS)). |
|  | | Open the Parameters pane to see the parameters used in your queries and set their values. |
|  | `Ctrl+Alt+E` (Windows), `⌘ ⌥ E` (macOS), `⌘ ⌥ E` (IntelliJ IDEA Classic (macOS)), `⌘ ⌥ E` (macOS System Shortcuts), `Ctrl+Alt+E` (XWin), `Ctrl+Alt+E` (GNOME), `Ctrl+Alt+E` (KDE), `Ctrl+Alt+E` (Emacs), `Ctrl+Alt+E` (Sublime Text), `⌘ ⌥ E` (Sublime Text (macOS)), `Ctrl+Alt+E` (NetBeans), `Ctrl+Alt+E` (Visual Studio), `⌘ ⌥ E` (Visual Studio (macOS)), `Ctrl+Alt+E` (Eclipse), `⌘ ⌥ E` (Eclipse (macOS)) | Open the console history dialog that shows all the queries that you have run in this console. |
|  | | Restore the original tool window layout after layout changes. |
|  | | Select the source for properties (available if a persistence unit is configured outside of `persistence.xml`). |
|  | `Ctrl+F2` (Windows), `⌘ F2` (macOS), `⌘ F2` (IntelliJ IDEA Classic (macOS)), `⌃ ⇧ .` (macOS System Shortcuts), `Ctrl+F2` (XWin), `Ctrl+F2` (GNOME), `Ctrl+2` (KDE), `Ctrl+F2` (Emacs), `Ctrl+F2` (Sublime Text), `Ctrl+F2` (Sublime Text (macOS)), `Shift+F5` (NetBeans), `Shift+F5` (Visual Studio), `⇧ F5` (Visual Studio (macOS)), `Ctrl+F2` (Eclipse), `⌘ F2` (Eclipse (macOS)) | Terminate the current console session. |
|  | `Ctrl+Shift+F4` (Windows), `⌃ ⇧ F4` (macOS), `⌘ ⇧ F4` (IntelliJ IDEA Classic (macOS)), `⌃ ⇧ F4` (macOS System Shortcuts), `Ctrl+Shift+F4` (XWin), `Ctrl+Shift+F4` (GNOME), `Ctrl+Shift+4` (KDE), `Ctrl+Shift+F4` (Emacs), `Ctrl+Shift+F4` (Sublime Text), `⌃ ⇧ F4` (Sublime Text (macOS)), `Ctrl+Shift+F4` (NetBeans), `Ctrl+Shift+F4` (Visual Studio), `⌃ ⇧ F4` (Visual Studio (macOS)), `Ctrl+W` (Eclipse), `⌘ W` (Eclipse (macOS)) | Close the current console. |
Procedure: Run JPQL queries
After you write a query, do one of the following:
* Press `Ctrl+Enter` (Windows), `⌘ ⏎` (macOS), `⌘ ⏎` (IntelliJ IDEA Classic (macOS)), `⌘ ⏎` (macOS System Shortcuts), `Ctrl+Enter` (XWin), `Ctrl+Enter` (GNOME), `Ctrl+Enter` (KDE), `Ctrl+Enter` (Emacs), `Ctrl+Enter` (Sublime Text), `⌘ ⏎` (Sublime Text (macOS)), `Ctrl+Enter` (NetBeans), `Ctrl+Enter` (Visual Studio), `⌘ ⏎` (Visual Studio (macOS)), `Ctrl+Enter` (Eclipse), `⌘ ⏎` (Eclipse (macOS)).
* Click  in the toolbar.
When you execute a query with parameters, you will need to enter their values. Alternatively, click  to open the Parameters pane.
IntelliJ IDEA stores all queries that you execute. Press `Up` (Windows), `↑` (macOS), `↑` (IntelliJ IDEA Classic (macOS)), `↑` (macOS System Shortcuts), `Up` (XWin), `Up` (GNOME), `Up` (KDE), `Up` (Emacs), `Up` (Sublime Text), `↑` (Sublime Text (macOS)), `Up` (NetBeans), `Up` (Visual Studio), `↑` (Visual Studio (macOS)), `Up` (Eclipse), `↑` (Eclipse (macOS)) to see the previously executed commands, starting from the most recent one. To see the full history, click .
Procedure: Run Spring Data query methods from the editor
If your project uses Spring Data, you can run your repository methods right from the editor. This lets you test your queries without having to run the entire application. This feature is available for the following method types:
* Methods where the query is [derived from the method name](https://docs.spring.io/spring-data/jpa/reference/repositories/query-methods-details.html#repositories.query-methods.query-creation)
* Methods annotated with `@Query` that define explicit JPQL or SQL queries
* Methods annotated with `@NativeQuery` that define explicit SQL queries
* Methods where the name references a `@NamedQuery` or a `@NamedNativeQuery` declared in the repository's entity class
> **Note:**
> This feature is only available for methods that do not pass entities as parameters.
1. Open a repository in the editor.
2. In the gutter, click  Run query in console next to a query method.
3. If the query accepts parameters, the Parameters dialog opens. Specify the values and click Execute.
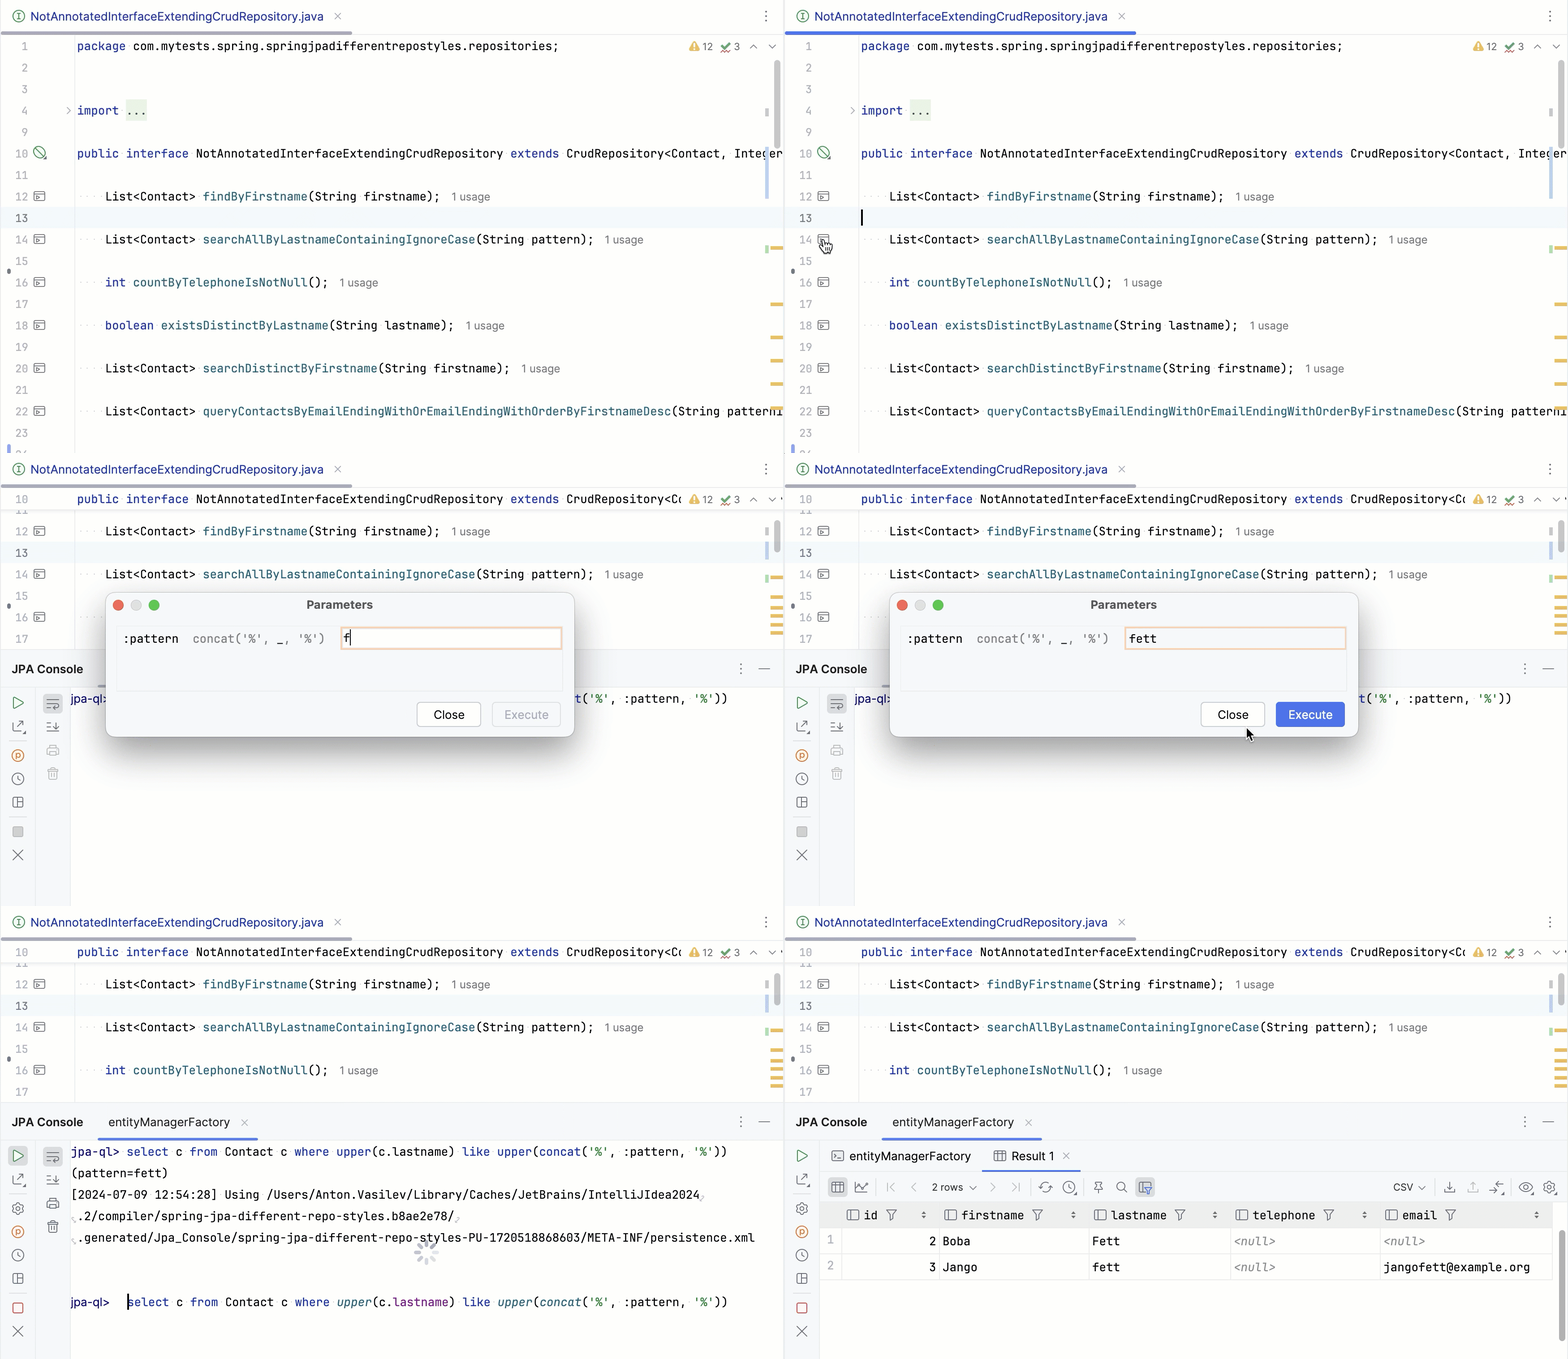
IntelliJ IDEA automatically runs the query against the data source from the [Database tool
window](database-tool-window.html). If there is more than one data source, the IDE selects the first match from the following: [query console](query-consoles.html) attached to the file, running [Spring Debugger](spring-debugger.html) session, assignment in the [Persistence tool window](persistence-tool-window.html), or data source URL in [Spring Boot](spring-boot.html) configuration files.
If you ran a JPQL query, the IDE opens the query's results in the JPA Console. If you ran a native SQL query, it opens the results in the [Services tool window](services-tool-window.html#db-sessions) instead.
Procedure: Navigate to the declaration of a class or field
When composing a query, it is useful to look at the declaration of the corresponding class or field.
* Hold `Ctrl` (Windows), `Ctrl` (macOS), `Ctrl` (IntelliJ IDEA Classic (macOS)), `Ctrl` (macOS System Shortcuts), `Ctrl` (XWin), `Ctrl` (GNOME), `Ctrl` (KDE), `Ctrl` (Emacs), `Ctrl` (Sublime Text), `Ctrl` (Sublime Text (macOS)), `Ctrl` (NetBeans), `Ctrl` (Visual Studio), `Ctrl` (Visual Studio (macOS)), `Ctrl` (Eclipse), `Ctrl` (Eclipse (macOS)) and click the relevant object or property.
* Place the caret at the name of the relevant object or property and press `Ctrl+B` (Windows), `⌘ B` (macOS), `⌘ B` (IntelliJ IDEA Classic (macOS)), `⌘ B` (macOS System Shortcuts), `Ctrl+B` (XWin), `Ctrl+B` (GNOME), `Ctrl+B` (KDE), `Ctrl+Alt+G` (Emacs), `F12` (Sublime Text), `F12` (Sublime Text (macOS)), `Ctrl+B` (NetBeans), `F12` (Visual Studio), `F12` (Visual Studio (macOS)), `F3` (Eclipse), `F3` (Eclipse (macOS)) or select `Navigate | Go to Declaration` from the main menu.
## Use the JPA console with custom JVM options
The JPA Console runs in a separate Java process. You can run this process with custom JVM options by creating a [run
configuration](run-debug-configuration.html) and then selecting it when you open the console.
Procedure:
1. Open the Run/Debug Configurations dialog:
* In the main toolbar, click the [run widget](guided-tour-around-the-user-interface.html#toolbar) and select Edit Configurations….
* Alternatively, go to `Run | Edit Configurations…`.
2. On the left side of the dialog, select ` Add New Configuration |  Application`.
3. On the right side of the dialog, select `Modify options | Add VM options`.
4. In the VM options field, specify the options that you want to pass to the JVM when opening the JPA Console.
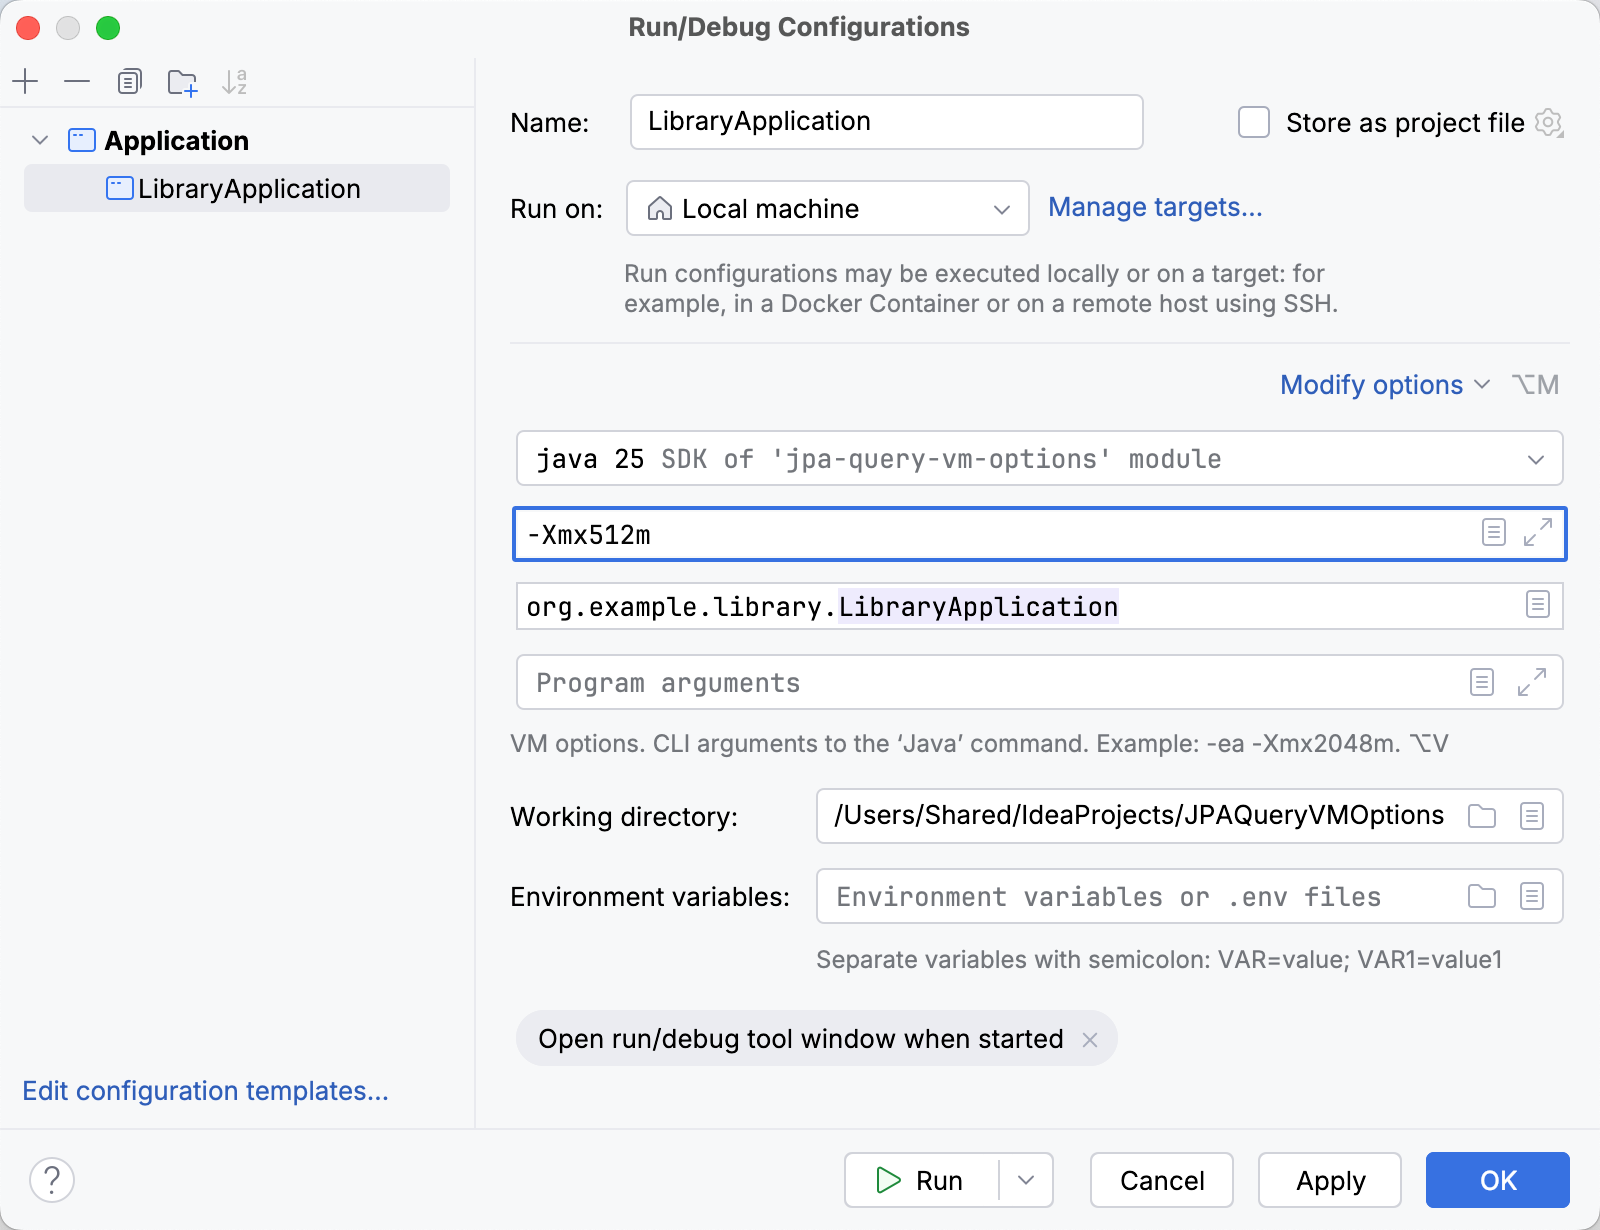
You can also set up other [run configuration settings](run-debug-configuration-java-application.html), but it is not required for the JPA Console.
5. Click Apply and then OK.
6. Go to the [Persistence](persistence-tool-window.html) tool window.
7. In the tool window toolbar, select ` JPA Console |  `.
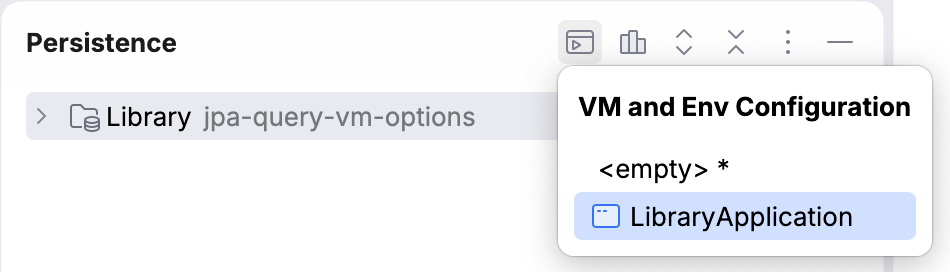
> **Note:**
> If JPA Console is already running, your configuration will be available under ` JPA Console |  JPA Console |  `.
8. The JPA Console opens with your JVM options applied. You can now [run
JPQL queries](#run-queries).