# Tutorial: Explore Spring support features
> **TL;DR**
> Required plugins: Spring and Spring Boot (bundled)
This tutorial expands on [Tutorial: Create your first Spring application](your-first-spring-application.html) to show how IntelliJ IDEA can help you write code, analyze your Spring application, and manage it at runtime. The tutorial assumes that you start with a simple Spring Boot Maven project generated with Spring Initializr. It should already have the Spring Boot Starter Web dependency for building web applications.
This tutorial guides you through steps that cover the following:
* Add dependencies for JPA and H2 that enable your Spring application to store and retrieve relational data
* Write and examine your code
* Run your application and execute HTTP requests
* Add Spring Boot Actuator for advanced health monitoring and endpoint analysis
* Add Spring Boot Developer Tools for faster application updates
Procedure: Add dependencies for JPA and H2
The [Spring Data JPA](https://spring.io/projects/spring-data-jpa) module provides support for data access using the Java Persistence API (JPA).
[H2](https://www.h2database.com/) is a fast in-memory SQL database written in Java.
1. Open the `pom.xml` file in your project root directory.
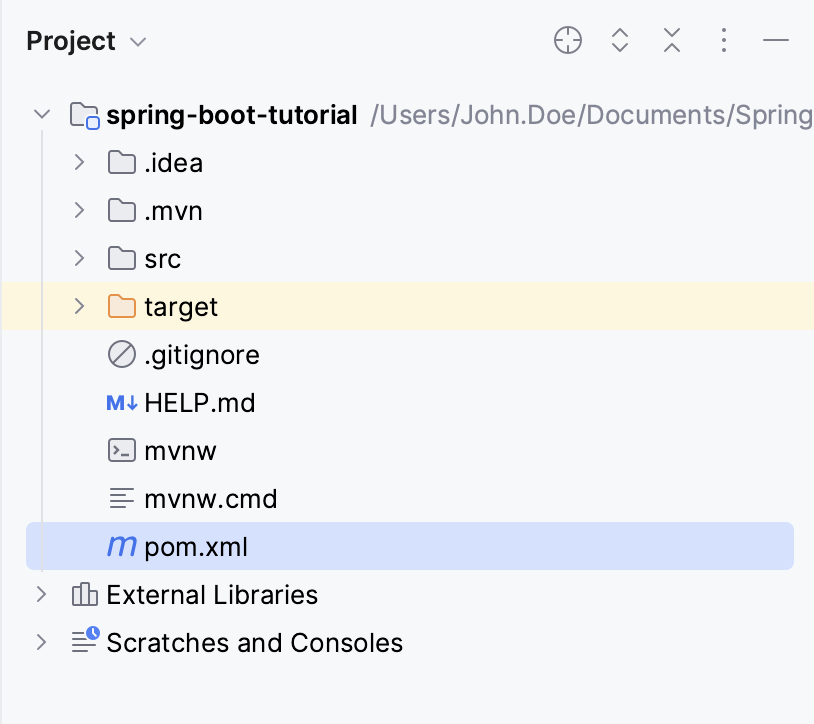
2. With the `pom.xml` file open in the editor, press `Alt+Insert` (Windows), `⌘ N` (macOS), `⌃ N` (IntelliJ IDEA Classic (macOS)), `⌘ N` (macOS System Shortcuts), `Alt+Insert` (XWin), `Alt+Insert` (GNOME), `Alt+Insert` (KDE), `Alt+Insert` (Emacs), `Ctrl+N` (Sublime Text), `⌘ N` (Sublime Text (macOS)), `Alt+Insert` (NetBeans), `Ctrl+N` (Visual Studio), `⌘ N` (Visual Studio (macOS)), `Alt+Insert` (Eclipse), `⌘ N` (Eclipse (macOS)) and select Add Starters .
3. In the window that opens, select the Spring Data JPA and H2 Database dependencies.
* `org.springframework.boot:spring-boot-starter-data-jpa`
* `com.h2database:h2`
Alternatively, you can add these dependencies to `pom.xml` manually:
```XML
org.springframework.bootspring-boot-starter-data-jpacom.h2databaseh2
```
4. Click  in the popup or press `Ctrl+Shift+O` (Windows), `⌘ ⇧ I` (macOS), `⌘ ⇧ O` (IntelliJ IDEA Classic (macOS)), `⌘ ⇧ I` (macOS System Shortcuts), `Ctrl+Shift+O` (XWin), `Ctrl+Shift+O` (GNOME), `Ctrl+Shift+O` (KDE), `Ctrl+Shift+O` (Emacs), `Ctrl+Shift+O` (Sublime Text), `⌘ ⇧ I` (Sublime Text (macOS)), `Ctrl+Shift+O` (NetBeans), `Ctrl+Shift+O` (Visual Studio), `⌘ ⇧ I` (Visual Studio (macOS)), `Ctrl+Shift+O` (Eclipse), `Ctrl+Shift+O` (Eclipse (macOS)) to sync the updated project structure.
Procedure: Create a JPA entity that will be stored in the database
To define the data model for your Spring application, create a JPA entity. The application will create and store `Customer` objects that have an ID, a first name, and a last name.
1. Create the `Customer.java` file under `src/main/java/com/example/springboottutorial`.
In the Project tool window, select the `src/main/java/com/example/springboottutorial` directory and then select `File | New | Java Class` from the main menu (or press `Alt+Insert` (Windows), `⌘ N` (macOS), `⌃ N` (IntelliJ IDEA Classic (macOS)), `⌘ N` (macOS System Shortcuts), `Alt+Insert` (XWin), `Alt+Insert` (GNOME), `Alt+Insert` (KDE), `Alt+Insert` (Emacs), `Ctrl+N` (Sublime Text), `⌘ N` (Sublime Text (macOS)), `Alt+Insert` (NetBeans), `Ctrl+N` (Visual Studio), `⌘ N` (Visual Studio (macOS)), `Alt+Insert` (Eclipse), `⌘ N` (Eclipse (macOS)) and select Java Class). Select Class and type the name of the class: `Customer`.
2. Modify the default template or replace it with the following Java code:
```JAVA
package com.example.springboottutorial;
import jakarta.persistence.Entity;
import jakarta.persistence.GeneratedValue;
import jakarta.persistence.GenerationType;
import jakarta.persistence.Id;
@Entity
public class Customer {
@Id
@GeneratedValue(strategy = GenerationType.AUTO)
private Integer id;
private String firstName;
private String lastName;
public Integer getId() {
return id;
}
public void setId(Integer id) {
this.id = id;
}
public String getFirstName() {
return firstName;
}
public void setFirstName(String firstName) {
this.firstName = firstName;
}
public String getLastName() {
return lastName;
}
public void setLastName(String lastName) {
this.lastName = lastName;
}
}
```
The `@Entity` annotation indicates that the `Customer` class is a JPA entity that should translate into the corresponding table in the database. IntelliJ IDEA designates it with  in the gutter.
The `@Id` annotation indicates that the `id` field is the object's ID. IntelliJ IDEA designates it with  in the gutter. The `@GeneratedValue` tells JPA that the ID should be generated automatically.
All other entity attributes (`firstName` and `lastName` in our example) are designated with  in the gutter. You can use it to quickly open the attribute [in Persistence view](persistence-tool-window.html).
Procedure: Create a repository interface
Spring Data JPA will create a repository implementation from this interface at runtime.
1. Create the `CustomerRepository.java` file under `src/main/java/com/example/springboottutorial`.
In the Project tool window, select the `src/main/java/com/example/springboottutorial` directory and then select `File | New | Java Class` from the main menu (or press `Alt+Insert` (Windows), `⌘ N` (macOS), `⌃ N` (IntelliJ IDEA Classic (macOS)), `⌘ N` (macOS System Shortcuts), `Alt+Insert` (XWin), `Alt+Insert` (GNOME), `Alt+Insert` (KDE), `Alt+Insert` (Emacs), `Ctrl+N` (Sublime Text), `⌘ N` (Sublime Text (macOS)), `Alt+Insert` (NetBeans), `Ctrl+N` (Visual Studio), `⌘ N` (Visual Studio (macOS)), `Alt+Insert` (Eclipse), `⌘ N` (Eclipse (macOS)) and select Java Class). Select Interface and type the name of the interface: `CustomerRepository`.
2. Modify the default template or replace it with the following Java code:
```JAVA
package com.example.springboottutorial;
import org.springframework.data.repository.CrudRepository;
public interface CustomerRepository extends CrudRepository {
Customer findCustomerById(Integer id);
}
```
This repository works with `Customer` entities and `Integer` IDs. It also declares the `findCustomerById()` method. Spring Data JPA will derive a query based on this method's signature, which will select the `Customer` object for the specified ID. You can try adding other methods to see how IntelliJ IDEA provides completion suggestions based on available JPA entities (in this case, the `Customer` class).
Procedure: Create a web controller
A controller handles HTTP requests for your Spring application. The application will use the `/add` endpoint to add `Customer` objects to the database, the `/list` endpoint to fetch all `Customer` objects from the database, and the `/find/{id}` endpoint to find the customer with the specified ID.
1. Create the `DemoController.java` file under `/src/main/java/com/example/springboottutorial/`.
In the Project tool window, select the `/src/main/java/com/example/springboottutorial/` directory and then select `File | New | Java Class` from the main menu (or press `Alt+Insert` (Windows), `⌘ N` (macOS), `⌃ N` (IntelliJ IDEA Classic (macOS)), `⌘ N` (macOS System Shortcuts), `Alt+Insert` (XWin), `Alt+Insert` (GNOME), `Alt+Insert` (KDE), `Alt+Insert` (Emacs), `Ctrl+N` (Sublime Text), `⌘ N` (Sublime Text (macOS)), `Alt+Insert` (NetBeans), `Ctrl+N` (Visual Studio), `⌘ N` (Visual Studio (macOS)), `Alt+Insert` (Eclipse), `⌘ N` (Eclipse (macOS)) and select Java Class). Select Class and type the name of the class: `DemoController`.
2. Modify the default template or replace it with the following Java code:
```JAVA
package com.example.springboottutorial;
import org.springframework.beans.factory.annotation.Autowired;
import org.springframework.web.bind.annotation.*;
@RestController
public class DemoController {
@Autowired
private CustomerRepository customerRepository;
@PostMapping("/add")
public String addCustomer(@RequestParam String first, @RequestParam String last) {
Customer customer = new Customer();
customer.setFirstName(first);
customer.setLastName(last);
customerRepository.save(customer);
return "Added new customer to repo!";
}
@GetMapping("/list")
public Iterable getCustomers() {
return customerRepository.findAll();
}
@GetMapping("/find/{id}")
public Customer findCustomerById(@PathVariable Integer id) {
return customerRepository.findCustomerById(id);
}
}
```
> **Tip:**
> To simplify and speed up the creation of controllers, consider using [live templates](using-live-templates.html). Spring MVC live templates are available in classes annotated with `@Controller` and `@RestController`. For example, within such a class, start typing `reqm` to quickly add a `@RequestMapping` method with the corresponding import statement.
>
>
>
> To view all live templates or create new ones, open the IDE settings (`Ctrl+Alt+S` (Windows), `⌘ Comma` (macOS), `⌘ Comma` (IntelliJ IDEA Classic (macOS)), `⌘ Comma` (macOS System Shortcuts), `Ctrl+Alt+S` (XWin), `Ctrl+Alt+S` (GNOME), `Ctrl+Alt+S` (KDE), `Ctrl+Alt+S` (Emacs), `Ctrl+Alt+S` (Sublime Text), `⌘ Comma` (Sublime Text (macOS)), `Ctrl+Alt+S` (NetBeans), `Ctrl+Alt+S` (Visual Studio), `⌘ Comma` (Visual Studio (macOS)), `Ctrl+Alt+S` (Eclipse), `⌘ Comma` (Eclipse (macOS))) and navigate to `Appearance & Behavior | Editor | Live Templates | Spring MVC`.
Here is what each Spring annotation means:
* The `@RestController` annotation marks the `DemoController` class as a request handler (a REST controller). IntelliJ IDEA designates it with  in the gutter, which you can click to navigate to the corresponding Spring bean declaration.
* The `@Autowired` annotation tells Spring to inject the `customerRepository` bean, which is implemented from the [repository interface](#create-repo). IntelliJ IDEA designates it with  in the gutter, which you can click to navigate to the corresponding autowired dependency. > **Tip:** > You can use intention actions and postfix completion to [quickly find and inject beans](#quickly_inject_beans).
* The `@PostMapping("/add")` annotation maps the `addCustomer()` method to POST requests for `/add`.
* The `@RequestParam` annotations map the method parameters to the corresponding web request parameters.
* The `@GetMapping("/list")` annotation maps the `getCustomers()` method to GET requests for `/list`.
* The `@GetMapping("/find/{id}")` annotation maps the `findCustomerById()` method to GET requests for `/find/{id}`.
* The `@PathVariable` annotation maps the value in place of the `id` variable from the URL to the corresponding method parameter.
IntelliJ IDEA designates the web request methods with  in the gutter, which you can click to execute the corresponding request in the build-in [HTTP client](http-client-in-product-code-editor.html).
Procedure: Run your application and execute requests
1. Press `Shift+F10` (Windows), `⌃ R` (macOS), `⇧ F10` (IntelliJ IDEA Classic (macOS)), `⌥ ⇧ R` (macOS System Shortcuts), `Shift+F10` (XWin), `Shift+F10` (GNOME), `Shift+F10` (KDE), `Shift+F10` (Emacs), `Shift+F10` (Sublime Text), `Shift+F10` (Sublime Text (macOS)), `F6` (NetBeans), `Ctrl+F5` (Visual Studio), `⌃ F5` (Visual Studio (macOS)), `Alt+Shift+X` (Eclipse), `⌘ ⇧ F11` (Eclipse (macOS)) or use the  icon in the gutter of the `SpringBootTutorialApplication.java` file to run your application.
By default, IntelliJ IDEA shows your running Spring Boot application in the [Run](run-tool-window.html) tool window.
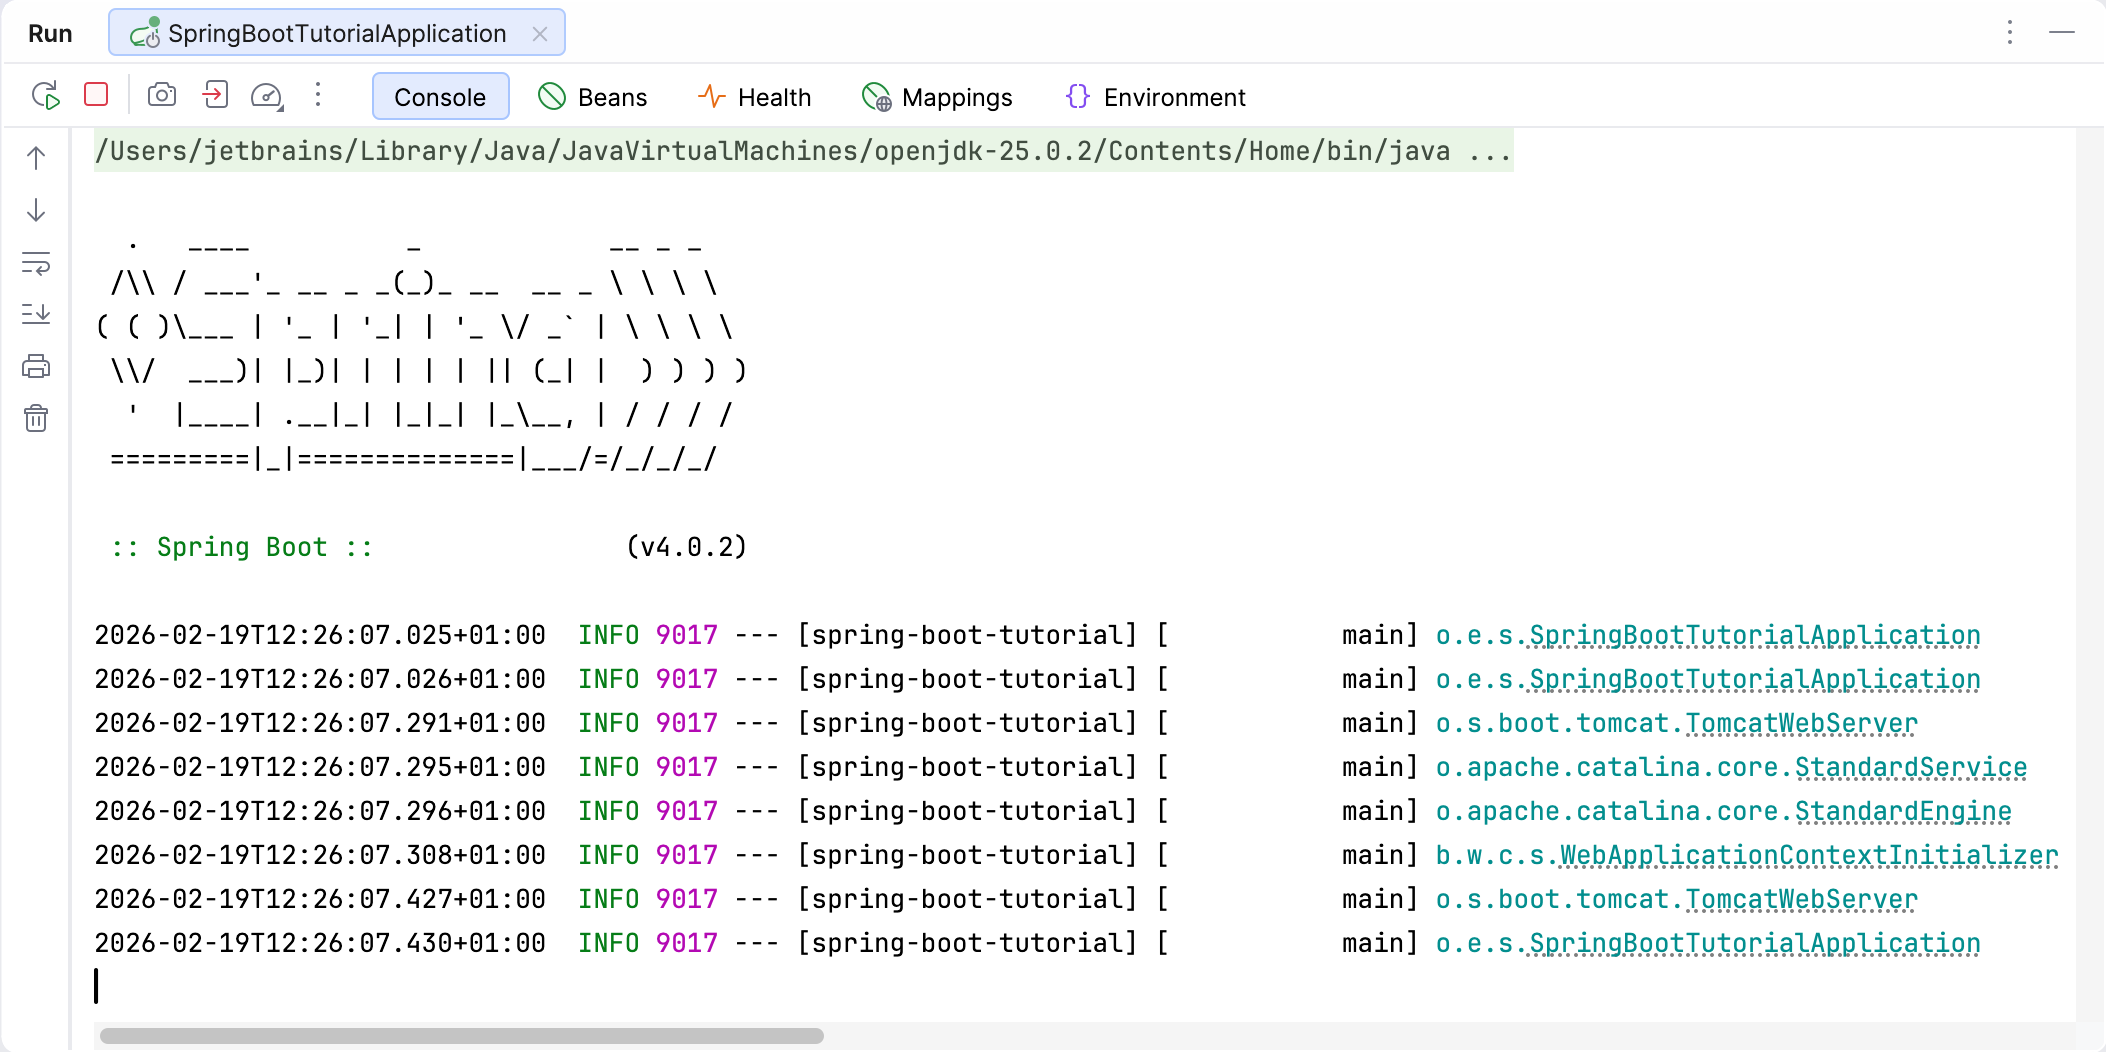
The Console tab shows the output of Spring log messages. By default, the built-in Apache Tomcat server is listening on port 8080.
2. Open a web browser and go to [http://localhost:8080/list](http://localhost:8080/list). You should see your application respond with an empty list `[ ]` because you don't have any customers in the database.
To add customers, you need to send a POST request to the `/add` endpoint with request parameters that specify the first and last name. IntelliJ IDEA has an [HTTP client](http-client-in-product-code-editor.html) built into the editor to compose and execute HTTP requests.
3. Open `DemoController.java` and click  in the gutter next to the `addCustomer()` method.
4. In the request file, compose the following POST request:
```HTTP_REQUEST
###
POST http://localhost:8080/add?first=Homer&last=Simpson
```
5. Click  in the gutter to execute the request.
IntelliJ IDEA opens the Run tool window and prints both the request and the response:
```HTTP_REQUEST
POST http://localhost:8080/add?first=Homer&last=Simpson
HTTP/1.1 200
Content-Type: text/plain;charset=UTF-8
Content-Length: 19
Date: Thu, 28 May 2020 08:10:30 GMT
Keep-Alive: timeout=60
Connection: keep-alive
Added new customer to repo!
Response code: 200; Time: 217ms; Content length: 19 bytes
```
6. Open the HTTP requests file again and compose a GET request to fetch all customers:
```HTTP_REQUEST
###
GET http://localhost:8080/list
```
IntelliJ IDEA provides completion suggestions for the request method and body, locations, and available endpoints.
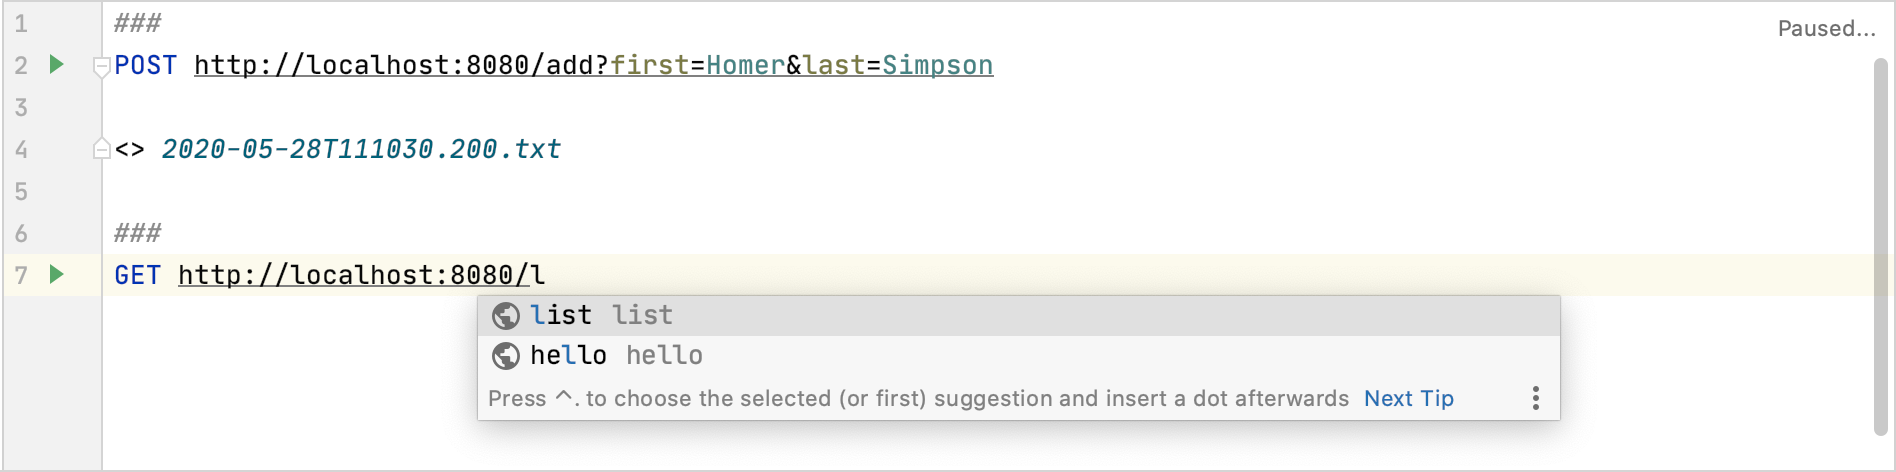
7. Execute the GET request to retrieve all of the customers:
```HTTP_REQUEST
GET http://localhost:8080/list
HTTP/1.1 200
Content-Type: application/json
Transfer-Encoding: chunked
Date: Thu, 28 May 2020 08:23:05 GMT
Keep-Alive: timeout=60
Connection: keep-alive
[
{
"id": 1,
"firstName": "Homer",
"lastName": "Simpson"
}
]
Response code: 200; Time: 171ms; Content length: 51 bytes
```
Try running more POST requests to add other customers. Each one will get a unique ID. Then compose and execute a GET request to return a customer with a specific ID. For example:
```HTTP_REQUEST
###
GET http://localhost:8080/find/1
```
Procedure: Add Spring Boot Actuator
[Spring Boot Actuator](https://docs.spring.io/spring-boot/docs/current/reference/html/production-ready-features.html) adds a number of endpoints that help you monitor and manage your application. This enables IntelliJ IDEA to expose the application's health information and all request mappings available at runtime.
1. Open the `pom.xml` file in your project root directory.
2. With the `pom.xml` file open in the editor, press `Alt+Insert` (Windows), `⌘ N` (macOS), `⌃ N` (IntelliJ IDEA Classic (macOS)), `⌘ N` (macOS System Shortcuts), `Alt+Insert` (XWin), `Alt+Insert` (GNOME), `Alt+Insert` (KDE), `Alt+Insert` (Emacs), `Ctrl+N` (Sublime Text), `⌘ N` (Sublime Text (macOS)), `Alt+Insert` (NetBeans), `Ctrl+N` (Visual Studio), `⌘ N` (Visual Studio (macOS)), `Alt+Insert` (Eclipse), `⌘ N` (Eclipse (macOS)) and select Add Starters .
3. In the Add Starters window that opens, select the Spring Boot Actuator dependency.
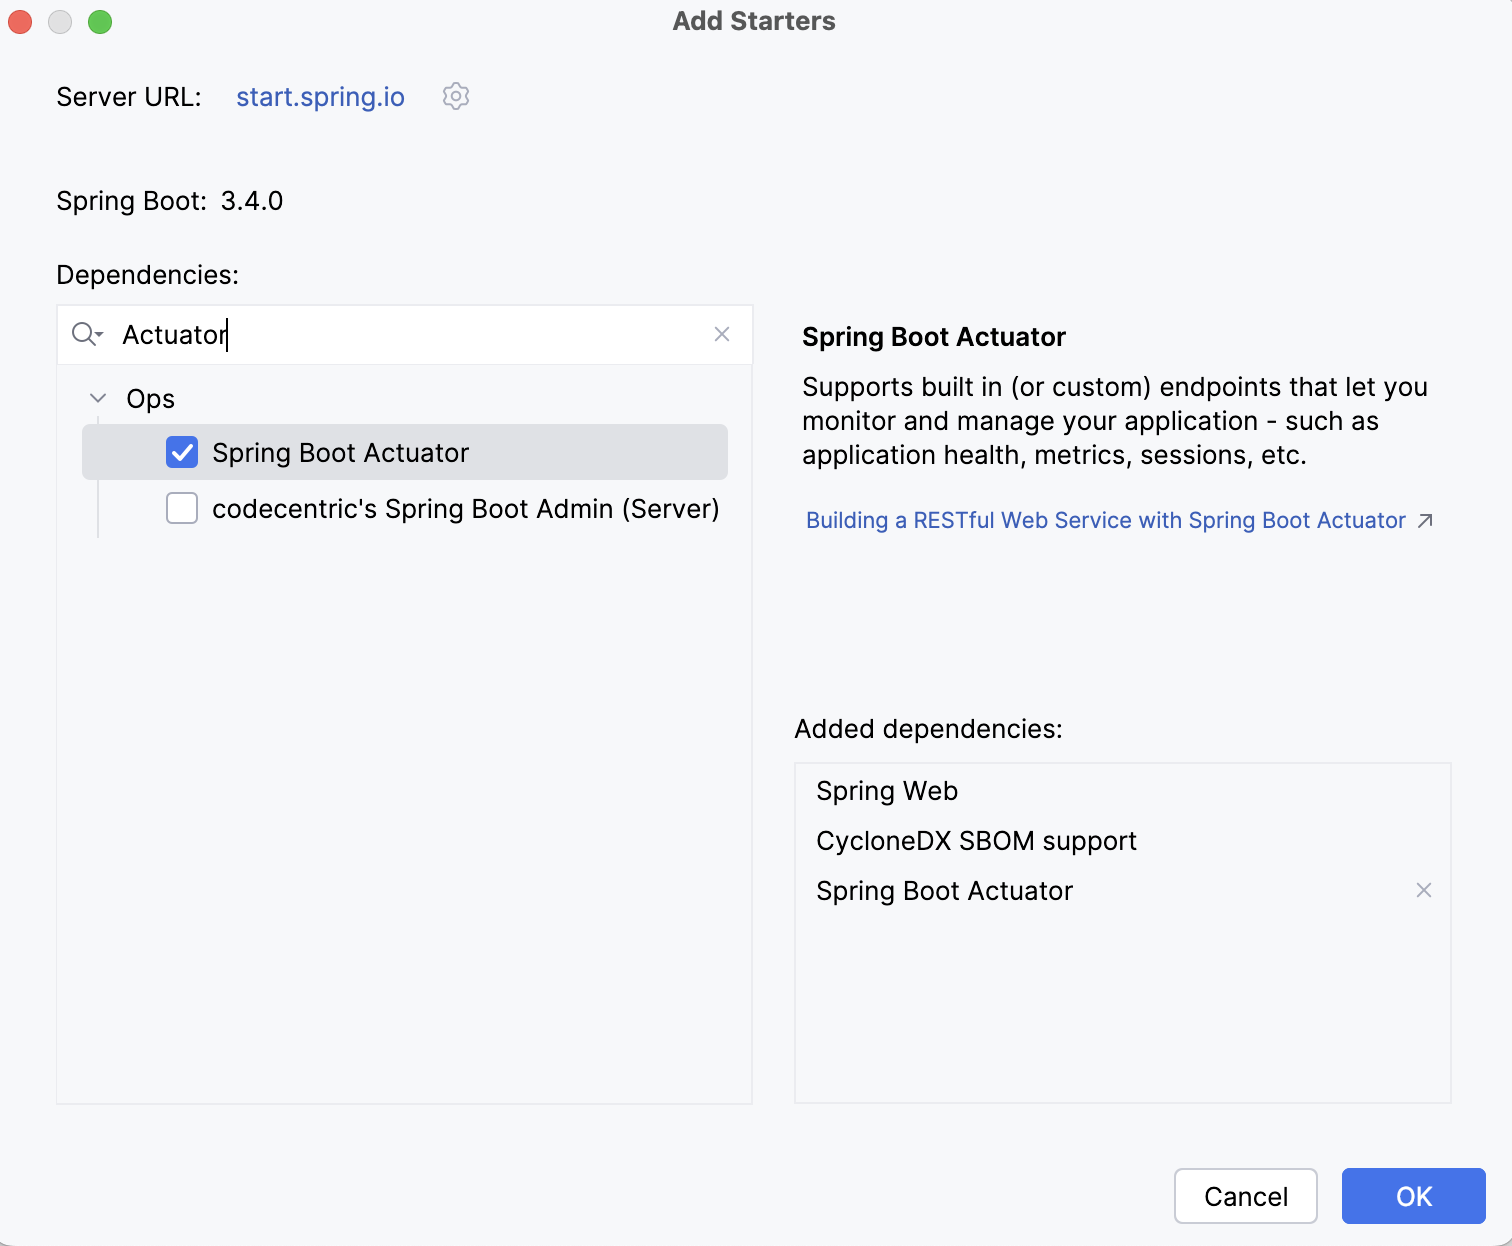
Alternatively, you can add the dependency manually:
```XML
org.springframework.bootspring-boot-starter-actuator
```
4. Click  in the popup or press `Ctrl+Shift+O` (Windows), `⌘ ⇧ I` (macOS), `⌘ ⇧ O` (IntelliJ IDEA Classic (macOS)), `⌘ ⇧ I` (macOS System Shortcuts), `Ctrl+Shift+O` (XWin), `Ctrl+Shift+O` (GNOME), `Ctrl+Shift+O` (KDE), `Ctrl+Shift+O` (Emacs), `Ctrl+Shift+O` (Sublime Text), `⌘ ⇧ I` (Sublime Text (macOS)), `Ctrl+Shift+O` (NetBeans), `Ctrl+Shift+O` (Visual Studio), `⌘ ⇧ I` (Visual Studio (macOS)), `Ctrl+Shift+O` (Eclipse), `Ctrl+Shift+O` (Eclipse (macOS)) to synchronize the updated project structure.
5. Restart your Spring application with  or `Ctrl+F5` (Windows), `⌘ R` (macOS), `⌃ F5` (IntelliJ IDEA Classic (macOS)), `⌘ R` (macOS System Shortcuts), `Ctrl+F5` (XWin), `Ctrl+F5` (GNOME), `Ctrl+5` (KDE), `Ctrl+F5` (Emacs), `Ctrl+F5` (Sublime Text), `⌘ R` (Sublime Text (macOS)), `Ctrl+F5` (NetBeans), `Ctrl+Shift+F5` (Visual Studio), `⌥ ⇧ F5` (Visual Studio (macOS)), `Ctrl+F11` (Eclipse), `Ctrl+F5` (Eclipse (macOS)).
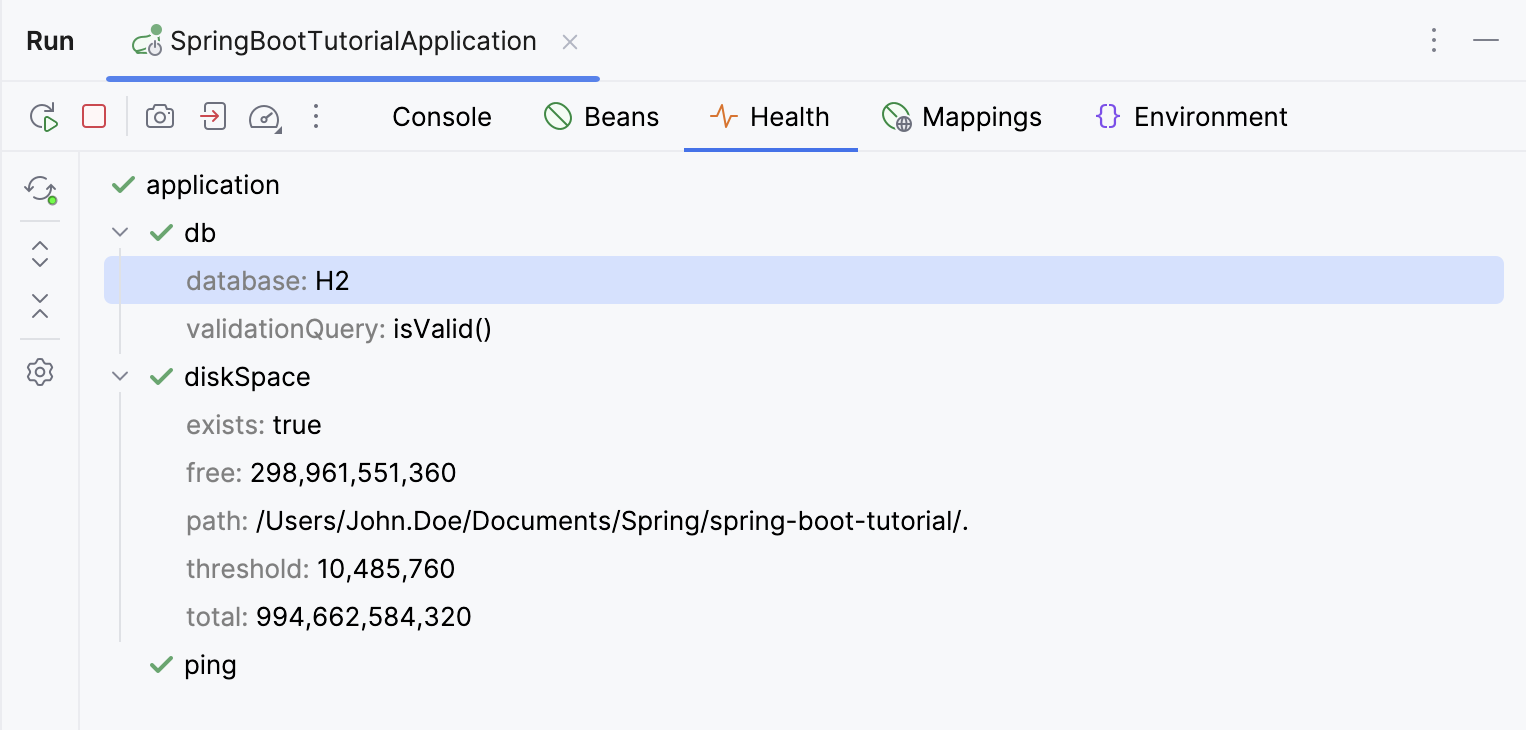
6. Open the Health tab to monitor the status of your application.
7. Open the Mappings tab to interact with request mapping endpoints.
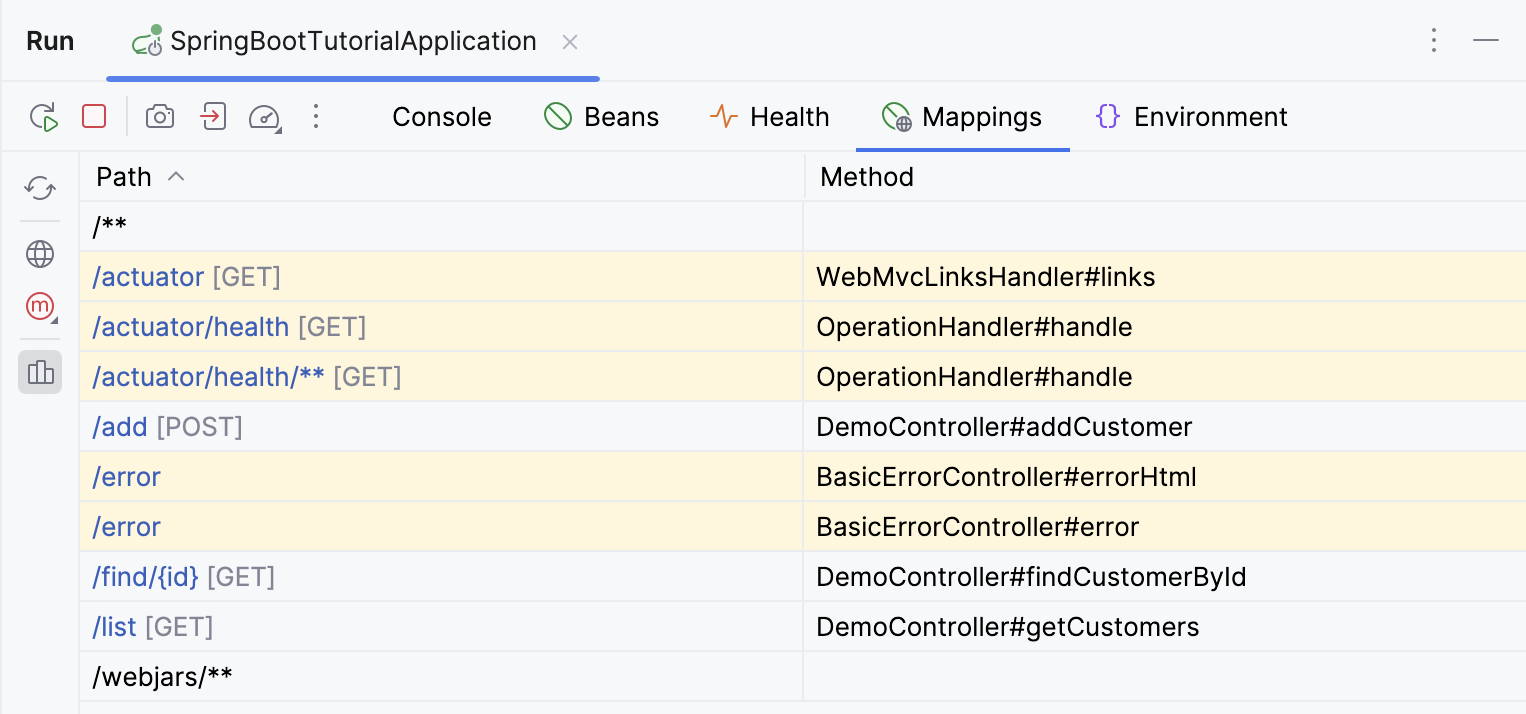
To show endpoints provided by libraries (such as the Spring Boot Actuator itself), click . Click the endpoint path to run the corresponding request directly, generate and open it in an HTTP request file to modify and execute when you need it, or open the endpoint URL in a web browser if it's a GET request.
8. Open the Environment tab to view Spring Environment. This information, sourced from the `/actuator/env` endpoint, includes all available properties from various configuration sources, such as application properties and environment variables.
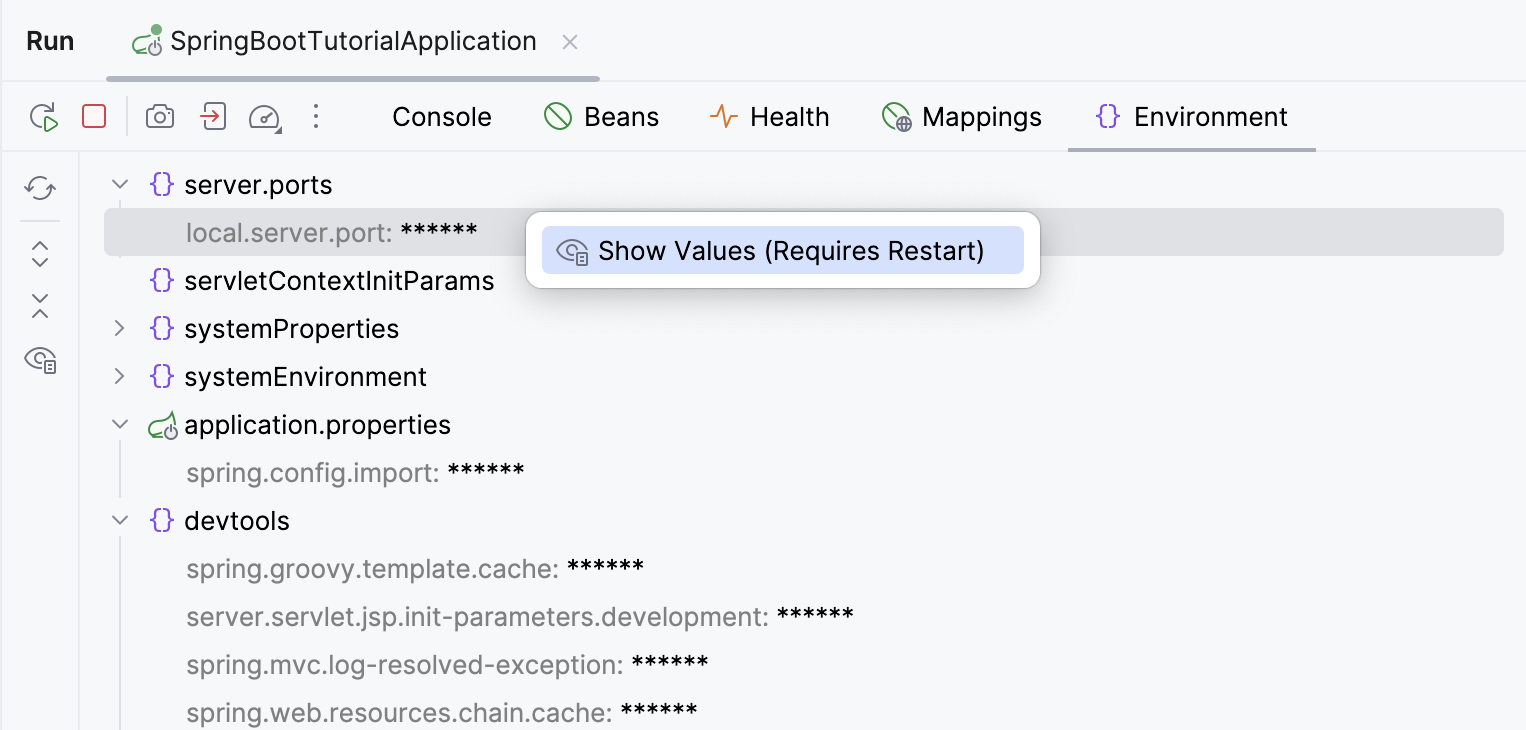
For more information, refer to [Environment](spring-boot.html#endpoints-environment).
Procedure: Add Spring Boot Developer Tools
When you make a change in your code, you need to rerun the whole project: shut down the application with all its dependencies, rebuild the code, start the application with the new code. IntelliJ IDEA provides a way to restart just your Spring application context without having to also restart all the external library contexts. This can save time in a large project with a lot of dependencies, especially for debugging and tweaking your code. You can also update static and template resources in a running application.
This functionality is based on the [spring-boot-devtools](https://docs.spring.io/spring-boot/docs/current/reference/html/using-spring-boot.html#using-boot-devtools) module.
1. Open the `pom.xml` file in your project root directory.
2. With the `pom.xml` file open in the editor, press `Alt+Insert` (Windows), `⌘ N` (macOS), `⌃ N` (IntelliJ IDEA Classic (macOS)), `⌘ N` (macOS System Shortcuts), `Alt+Insert` (XWin), `Alt+Insert` (GNOME), `Alt+Insert` (KDE), `Alt+Insert` (Emacs), `Ctrl+N` (Sublime Text), `⌘ N` (Sublime Text (macOS)), `Alt+Insert` (NetBeans), `Ctrl+N` (Visual Studio), `⌘ N` (Visual Studio (macOS)), `Alt+Insert` (Eclipse), `⌘ N` (Eclipse (macOS)) and select Add Starters .
3. In the Add Starters window that opens, select the Spring Boot DevTools dependency.
Alternatively, you can add the dependency manually:
```XML
org.springframework.bootspring-boot-devtools
```
4. Click  in the popup or press `Ctrl+Shift+O` (Windows), `⌘ ⇧ I` (macOS), `⌘ ⇧ O` (IntelliJ IDEA Classic (macOS)), `⌘ ⇧ I` (macOS System Shortcuts), `Ctrl+Shift+O` (XWin), `Ctrl+Shift+O` (GNOME), `Ctrl+Shift+O` (KDE), `Ctrl+Shift+O` (Emacs), `Ctrl+Shift+O` (Sublime Text), `⌘ ⇧ I` (Sublime Text (macOS)), `Ctrl+Shift+O` (NetBeans), `Ctrl+Shift+O` (Visual Studio), `⌘ ⇧ I` (Visual Studio (macOS)), `Ctrl+Shift+O` (Eclipse), `Ctrl+Shift+O` (Eclipse (macOS)) to synchronize the updated project structure.
5. In the main menu, go to `Run | Edit Configurations` and select the SpringBootTutorialApplication configuration.
6. Under Modify options, set both the On 'Update' action and On frame deactivation options to Update classes and resources and click OK to apply the changes.
7. Restart your Spring application.
Your application will work the same, but now whenever you make a change in your source code or resources, you can trigger the updates. Either select `Run | Debugging Actions | Update 'SpringBootTutorialApplication' application` `Ctrl+F10` (Windows), `⌘ F10` (macOS), `⌘ F10` (IntelliJ IDEA Classic (macOS)), `⌘ F10` (macOS System Shortcuts), `Ctrl+F10` (XWin), `Ctrl+F10` (GNOME), `Ctrl+F10` (KDE), `Ctrl+F10` (Emacs), `Ctrl+F10` (Sublime Text), `⌘ F10` (Sublime Text (macOS)), `Ctrl+F10` (NetBeans), `Ctrl+F10` (Visual Studio), `⌘ F10` (Visual Studio (macOS)), `Ctrl+F10` (Eclipse), `⌘ F10` (Eclipse (macOS)) from the main menu or change focus from IntelliJ IDEA to another application, for example, the web browser. This will update all the classes and resources for your application and restart your application if necessary.
Procedure: Change the home page
To demonstrate how application updates work, let's expose the `/add` and `/list` HTTP endpoints on the home page. For more information about adding a home page, refer to [Add a home page](your-first-spring-application.html#add-home-page).
1. Open the `/src/main/resources/static/index.html` file, modify it or replace with the following HTML code:
```HTML
You first Spring application
```
2. Open your web browser and go to [http://localhost:8080/](http://localhost:8080/). If necessary, refresh the page to make see the new home page.
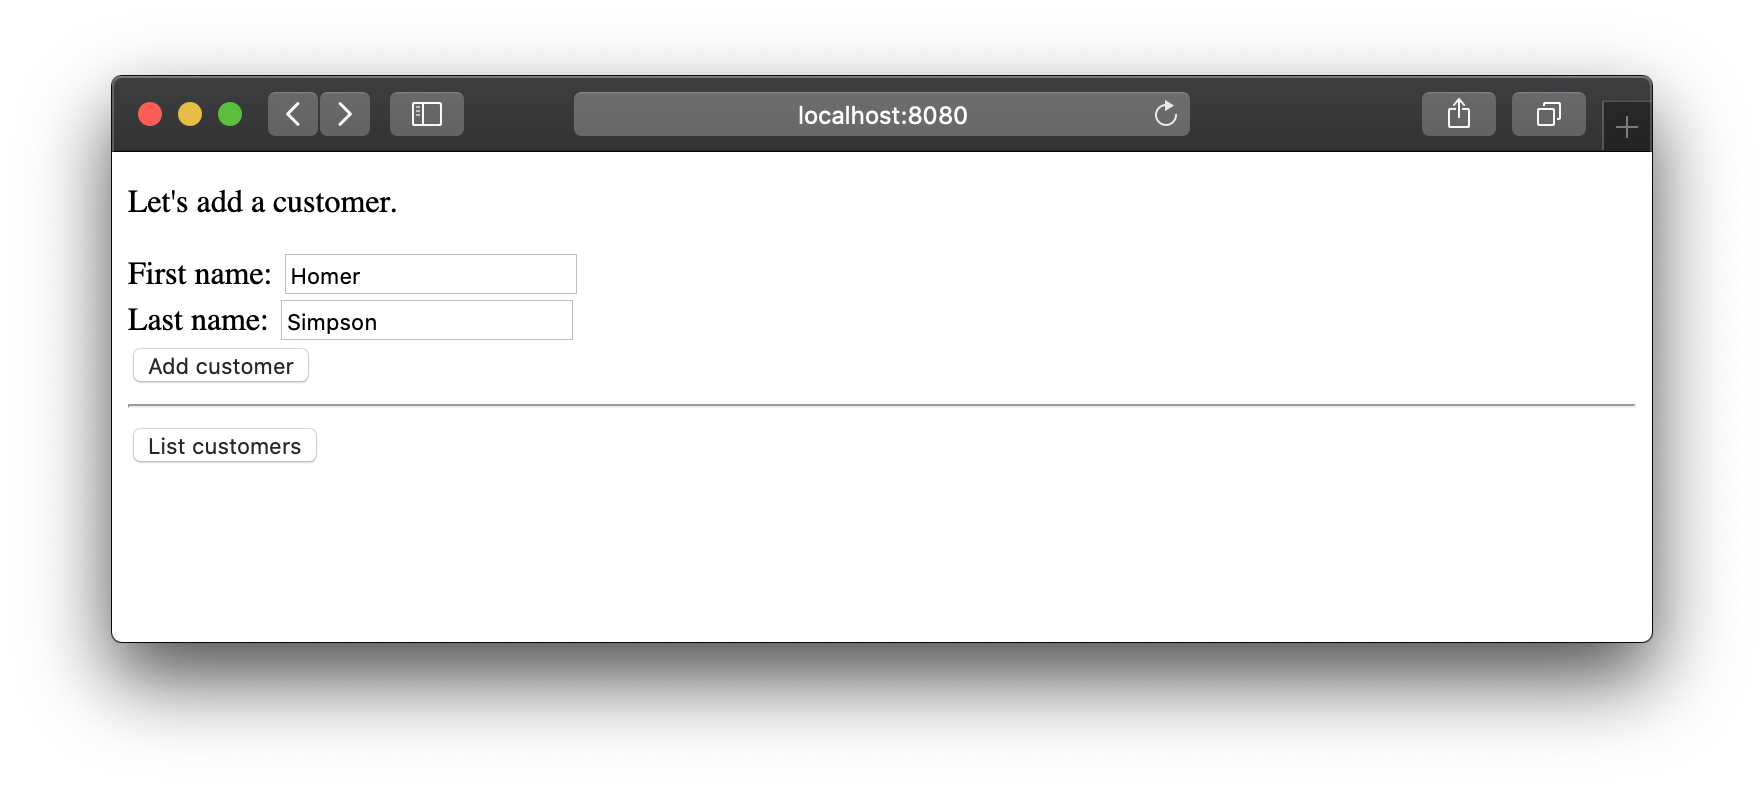
Add some customers and list them. You can also try sending an HTTP request to [http://localhost:8080/find/2](http://localhost:8080/find/2) to find the customer with ID 2.
3. You can change the HTML code in `index.html`, then switch to the web browser and see the changes after you refresh the page.
You can go even further and install [LiveReload](https://docs.spring.io/spring-boot/docs/current/reference/html/using-spring-boot.html#using-boot-devtools-livereload) so the browser will refresh automatically.
## Productivity tips
Procedure: Quickly inject beans
IntelliJ IDEA provides a number of ways to quickly inject beans, which saves you from having to manually type annotations and fields or constructors.
1. Within a Spring component, start typing a bean name.
2. Use one of the following ways to get the needed bean:
* Press `Alt+Enter` (Windows), `⌥ ⏎` (macOS), `⌥ ⏎` (IntelliJ IDEA Classic (macOS)), `⌥ ⏎` (macOS System Shortcuts), `Alt+Enter` (XWin), `Alt+Enter` (GNOME), `Alt+Enter` (KDE), `Alt+Enter` (Emacs), `Alt+Enter` (Sublime Text), `⌥ ⏎` (Sublime Text (macOS)), `Alt+Enter` (NetBeans), `Alt+Enter` (Visual Studio), `⌥ ⏎` (Visual Studio (macOS)), `Ctrl+1` (Eclipse), `⌘ 1` (Eclipse (macOS)) and select Add dependency with name matching 'bean name'.
* Start typing a bean name and enter `.autowire` to invoke the [postfix completion template](postfix-code-completion.html). For example, enter `custom.autowire` to find beans that start with `custom`.
3. If the entered name matches exactly the name of a bean, it will be injected right away. If it matches only a part of the name, you can select the needed bean from the Select Bean window that opens.
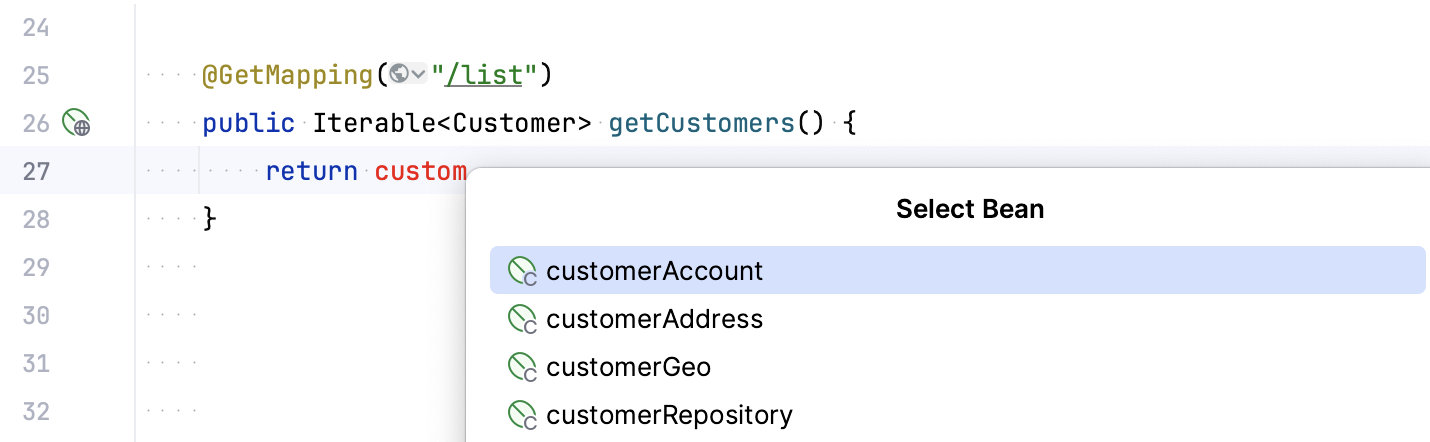
If a class has fields annotated with `@Autowire`, this will add a new `@Autowire` field. Otherwise, it will add the corresponding parameter to the class constructor.
Alternatively, you can press `Alt+Insert` (Windows), `⌘ N` (macOS), `⌃ N` (IntelliJ IDEA Classic (macOS)), `⌘ N` (macOS System Shortcuts), `Alt+Insert` (XWin), `Alt+Insert` (GNOME), `Alt+Insert` (KDE), `Alt+Insert` (Emacs), `Alt+Insert` (Sublime Text), `⌘ N` (Sublime Text (macOS)), `Alt+Insert` (NetBeans), `Alt+Insert` (Visual Studio), `⌘ ⌃ N` (Visual Studio (macOS)), `Alt+Insert` (Eclipse), `⌘ N` (Eclipse (macOS)) and select the injection type from the Generate context menu: @Autowired Dependency, Constructor Dependency, or Setter Dependency. Unlike the method described above, this method lets you select a way to inject a bean and does not filter the beans, so you can preview all of them.
Procedure: Navigate to secure URL
If you use [Spring Security](https://docs.spring.io/spring-security/reference/index.html), you may have security rules in place, such as allowing access to URLs for authenticated users only or for users with specific roles. IntelliJ IDEA provides navigation from security matchers to Spring controllers and from controllers to security matchers.
* To navigate to a controller method from a Spring security matcher, click  next to the matcher (such as `antMatchers`, `mvcMatchers`, `requestMatchers` in Spring Security before 5.8 or `securityMatcher` in Spring Security 5.8 and higher, or in XML URL patterns).
* To check the security configuration for a controller (and navigate to this configuration if it's available), click  next to the controller URL and select Show security configurations for URL.

> **Note:**
> To disable the  inlay hint icons, press `Alt+Enter` (Windows), `⌥ ⏎` (macOS), `⌥ ⏎` (IntelliJ IDEA Classic (macOS)), `⌥ ⏎` (macOS System Shortcuts), `Alt+Enter` (XWin), `Alt+Enter` (GNOME), `Alt+Enter` (KDE), `Alt+Enter` (Emacs), `Alt+Enter` (Sublime Text), `⌥ ⏎` (Sublime Text (macOS)), `Alt+Enter` (NetBeans), `Alt+Enter` (Visual Studio), `⌥ ⏎` (Visual Studio (macOS)), `Ctrl+1` (Eclipse), `⌘ 1` (Eclipse (macOS)) next to the icon and select Hide secured URLs inlays. To disable the  inlay hint icons, press `Alt+Enter` (Windows), `⌥ ⏎` (macOS), `⌥ ⏎` (IntelliJ IDEA Classic (macOS)), `⌥ ⏎` (macOS System Shortcuts), `Alt+Enter` (XWin), `Alt+Enter` (GNOME), `Alt+Enter` (KDE), `Alt+Enter` (Emacs), `Alt+Enter` (Sublime Text), `⌥ ⏎` (Sublime Text (macOS)), `Alt+Enter` (NetBeans), `Alt+Enter` (Visual Studio), `⌥ ⏎` (Visual Studio (macOS)), `Ctrl+1` (Eclipse), `⌘ 1` (Eclipse (macOS)) next to the icon and select Hide URL path inlays for current language.
>
>
>
> To enable them back, open the IDE settings (`Ctrl+Alt+S` (Windows), `⌘ Comma` (macOS), `⌘ Comma` (IntelliJ IDEA Classic (macOS)), `⌘ Comma` (macOS System Shortcuts), `Ctrl+Alt+S` (XWin), `Ctrl+Alt+S` (GNOME), `Ctrl+Alt+S` (KDE), `Ctrl+Alt+S` (Emacs), `Ctrl+Alt+S` (Sublime Text), `⌘ Comma` (Sublime Text (macOS)), `Ctrl+Alt+S` (NetBeans), `Ctrl+Alt+S` (Visual Studio), `⌘ Comma` (Visual Studio (macOS)), `Ctrl+Alt+S` (Eclipse), `⌘ Comma` (Eclipse (macOS))), go to `Editor | Inlay Hints`, and select the needed checkboxes under URL path.
Procedure: Quickly create a connection to a database
Using the Database Tools and SQL plugin, IntelliJ IDEA lets you create and manage [connections to databases](connecting-to-a-database.html).
In a Spring Boot project, you can instantly create it from your application properties file.
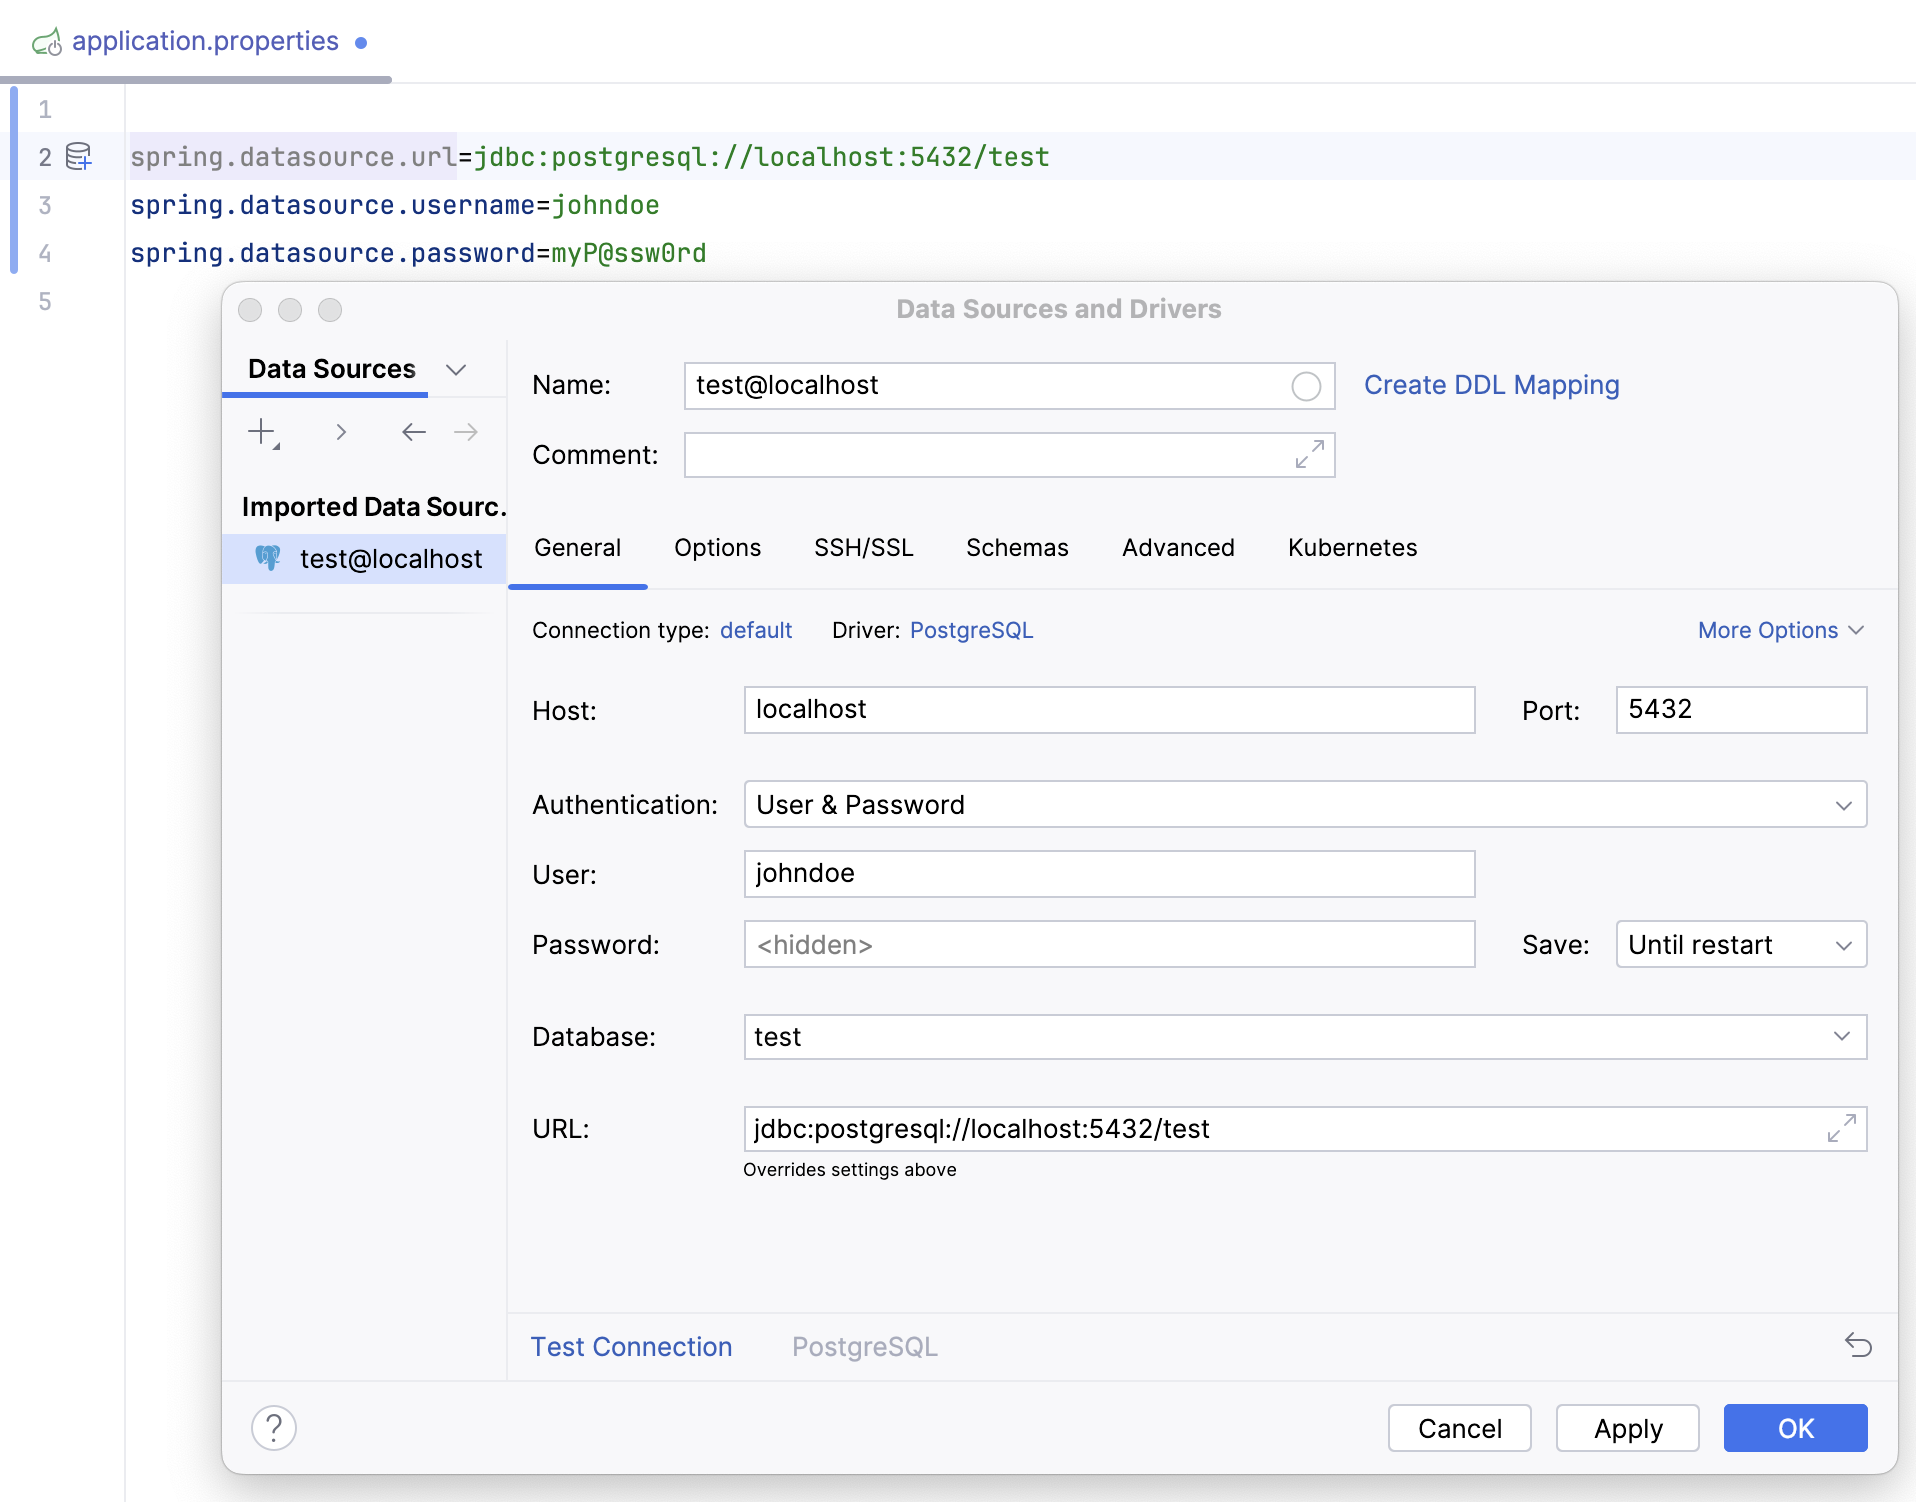
1. Open an `application.properties` or `application.yml` file. If it contains datasource-related properties (for example, `spring.datasource.url`) , the datasource icon  will be displayed in the gutter.
2. Click . This will open the data source creation form with datasource parameters (such as URL, username, or database name) populated based on data from your configuration file.
If the data source is already configured, the datasource icon  is displayed instead. Click it to open the datasource in the Database tool window.
Below is the list of databases for which this action is available:
* Amazon Redshift
* Apache Cassandra
* Apache Derby
* Couchbase
* H2
* HSQLDB
* IBM Db2
* MariaDB
* Microsoft SQL Server
* MongoDB
* MySQL
* Oracle Database
* PostgreSQL
* Redis
* SQLite
* Sybase
For more details on data source parameters, refer to [Data sources](managing-data-sources.html).
## What's next?
This covers all the basic features provided by IntelliJ IDEA for Spring development. You can also check out [Spring diagrams](spring-diagrams.html) for an overview of the dependencies in a Spring application and read more specific information about the covered [Spring Boot](spring-boot.html) features.