# Spring Boot
[Spring Boot](https://spring.io/projects/spring-boot) is an extension of the [Spring](https://spring.io/) framework that simplifies the initial configuration of Spring applications. It enables you to quickly create a working standalone Spring application with minimum default configuration.
[Spring Initializr](https://start.spring.io/) is a web application that can generate a Spring Boot project. You can select the necessary configuration, including the build tool, language, version of the Spring Boot framework, and any dependencies for your project. IntelliJ IDEA provides the Spring Initializr project wizard that integrates with the Spring Initializr API to generate and import your project directly from the IDE.
Procedure: Create a new Spring Boot project via the Spring Boot wizard
1. In the main menu, go to `File | New | Project…`.
2. In the left pane of the New Project wizard, select Spring Boot.
3. Go through the steps of the [Spring Boot project wizard](spring-initializr-project-wizard.html).
For an example, refer to [Tutorial: Create your first Spring application](your-first-spring-application.html).
Spring Initializr generates a valid project structure with the following files:
* A build configuration file, for example, `build.gradle` for Gradle or `pom.xml` for Maven.
* A class with the `main()` method to bootstrap the application.
* An empty JUnit test class.
* An empty Spring application configuration file: `application.properties`
Procedure: Add starters to existing Spring Boot projects
When you create a new Spring Boot project with IntelliJ IDEA, you can add starters in the [dedicated new project wizard](). You can also add them to existing projects using Add Starters inlay hints in your build files.
1. Open your `pom.xml` or `build.gradle(.kts)` file.
2. In the `dependencies` block, click  Add Starters.
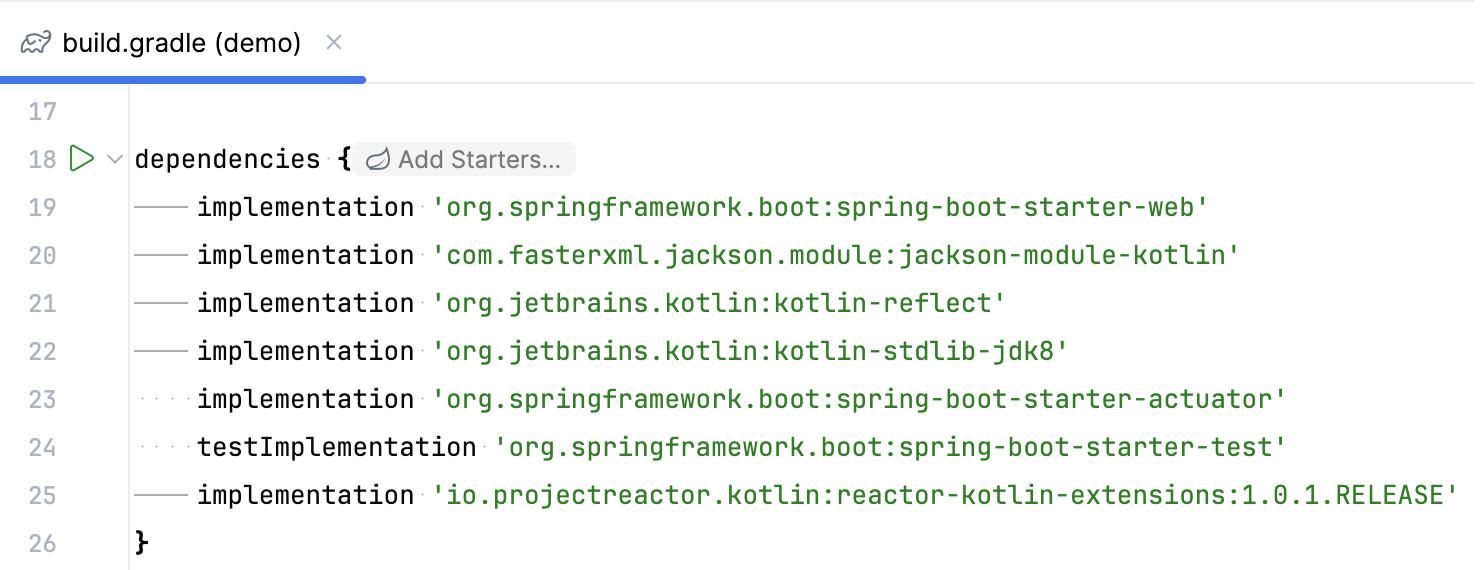
3. In the Add Starters dialog that opens, select starters that you want to add.
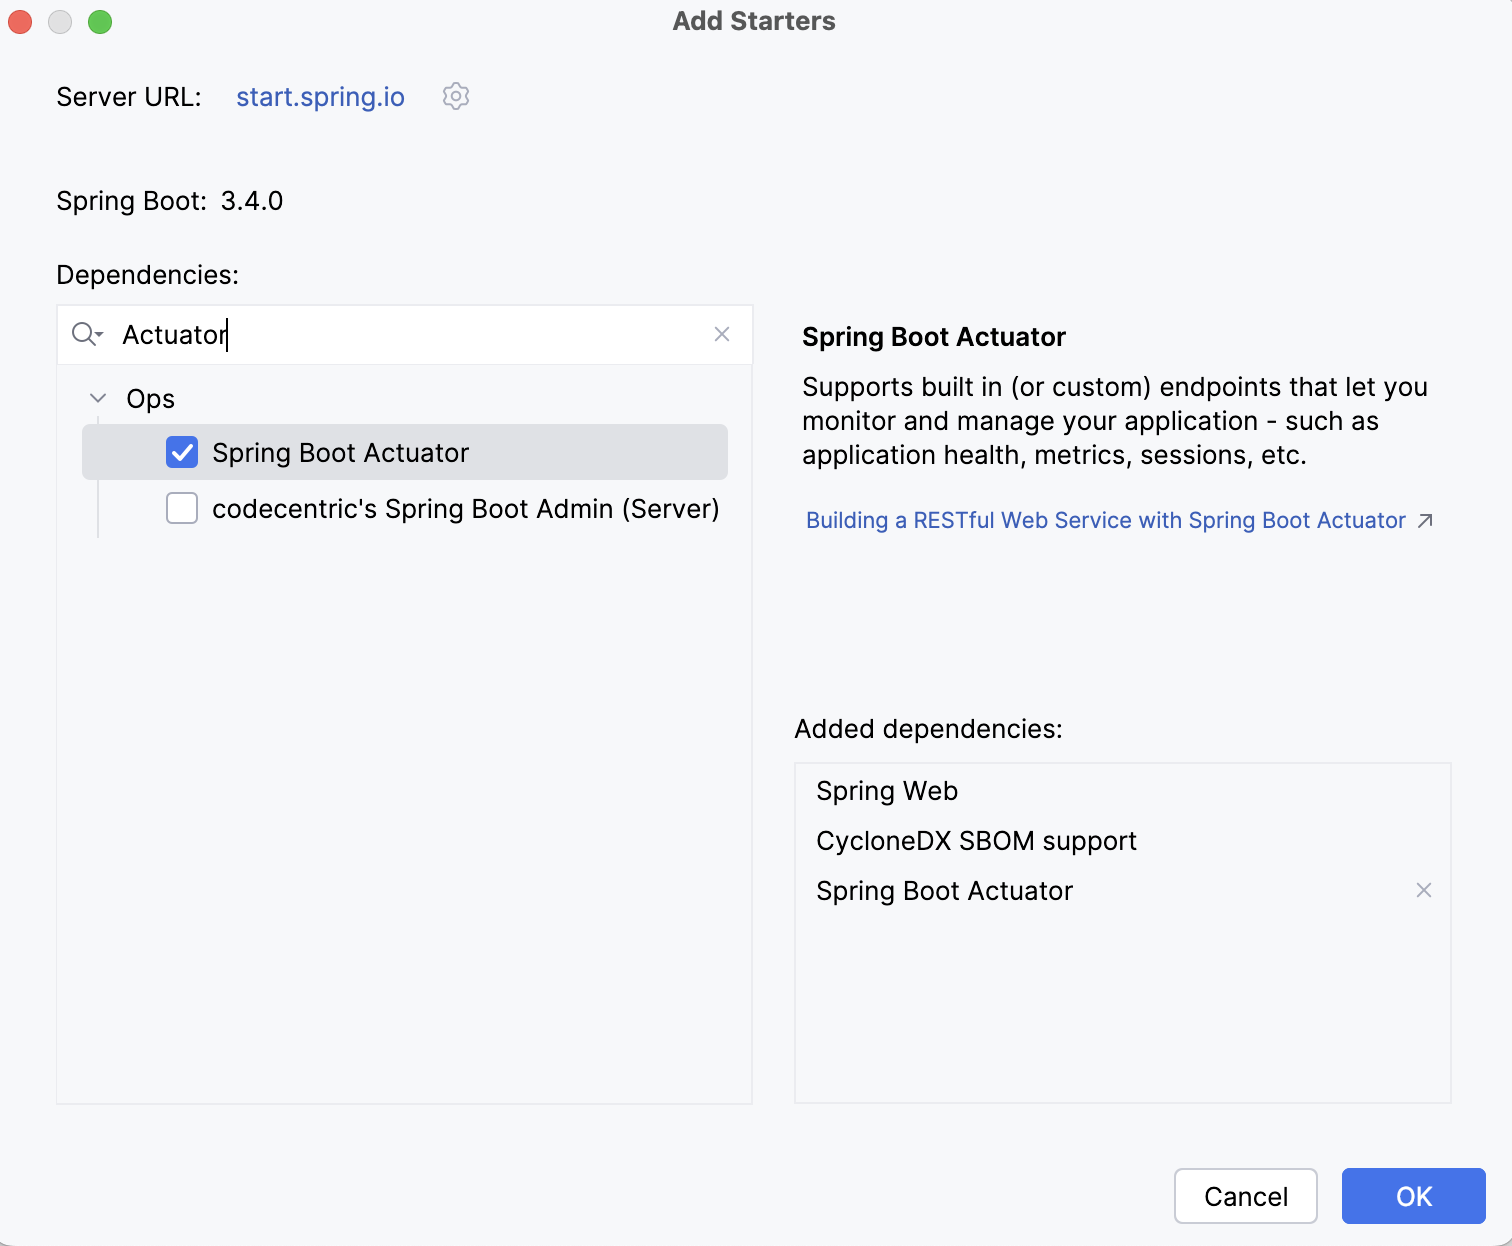
Your build file will be modified accordingly. When you add dependencies this way, IntelliJ IDEA considers your Spring Boot version, saving you from the need to worry about compatible dependency versions.
You can disable and enable this inlay hint in the IDE settings (`Ctrl+Alt+S` (Windows), `⌘ Comma` (macOS), `⌘ Comma` (IntelliJ IDEA Classic (macOS)), `⌘ Comma` (macOS System Shortcuts), `Ctrl+Alt+S` (XWin), `Ctrl+Alt+S` (GNOME), `Ctrl+Alt+S` (KDE), `Ctrl+Alt+S` (Emacs), `Ctrl+Alt+S` (Sublime Text), `⌘ Comma` (Sublime Text (macOS)), `Ctrl+Alt+S` (NetBeans), `Ctrl+Alt+S` (Visual Studio), `⌘ Comma` (Visual Studio (macOS)), `Ctrl+Alt+S` (Eclipse), `⌘ Comma` (Eclipse (macOS))), in `Editor | Inlay Hints | Other`, under Groovy, Kotlin, and XML.
By default, IntelliJ IDEA applies [code formatting](reformat-and-rearrange-code.html) to the generated files. If you want the files to remain formatted as they are generated by Spring Initializr, open the IDE settings with `Ctrl+Alt+S` (Windows), `⌘ Comma` (macOS), `⌘ Comma` (IntelliJ IDEA Classic (macOS)), `⌘ Comma` (macOS System Shortcuts), `Ctrl+Alt+S` (XWin), `Ctrl+Alt+S` (GNOME), `Ctrl+Alt+S` (KDE), `Ctrl+Alt+S` (Emacs), `Ctrl+Alt+S` (Sublime Text), `⌘ Comma` (Sublime Text (macOS)), `Ctrl+Alt+S` (NetBeans), `Ctrl+Alt+S` (Visual Studio), `⌘ Comma` (Visual Studio (macOS)), `Ctrl+Alt+S` (Eclipse), `⌘ Comma` (Eclipse (macOS)), select `Languages & Frameworks | Spring | Spring Initializr` and disable the Reformat code when creating a new project option.
Procedure: Run a Spring Boot application
* Open the class with the `main()` method (it is usually also designated with the `@SpringBootApplication` annotation), click  in the gutter, and select to run the class.
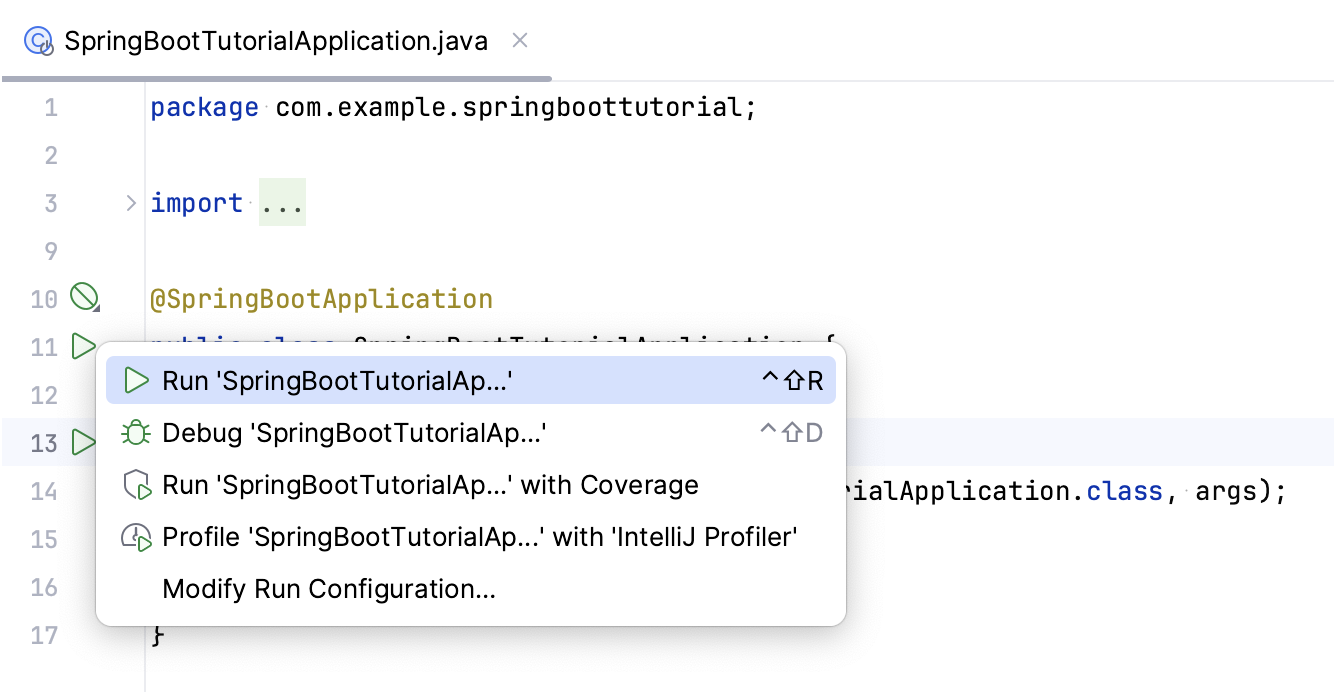
Alternatively, you can press `Ctrl+Shift+F10` (Windows), `⌃ ⇧ R` (macOS), `⌃ ⇧ F10` (IntelliJ IDEA Classic (macOS)), `⌃ ⇧ R` (macOS System Shortcuts), `Ctrl+Shift+F10` (XWin), `Ctrl+Shift+F10` (GNOME), `Ctrl+Shift+F10` (KDE), `Ctrl+Shift+F10` (Emacs), `Ctrl+Shift+F10` (Sublime Text), `Ctrl+Shift+F10` (Sublime Text (macOS)), `Alt+Shift+F6` (NetBeans), `Ctrl+Alt+F5` (Visual Studio), `⌃ ⌥ F5` (Visual Studio (macOS)), `Ctrl+Shift+F10` (Eclipse), `⌃ ⇧ R` (Eclipse (macOS)) with the class file open in the editor.
IntelliJ IDEA creates and executes the Spring Boot run configuration. For more information, refer to [Spring Boot run configuration](run-debug-configuration-spring-boot.html).
Procedure: Use Gradle to run Spring Boot
By default, for Spring Boot Gradle-based applications, IntelliJ IDEA uses Gradle to build the project and IntelliJ IDEA to run it. You can configure the IDE to use Gradle instead of IntelliJ IDEA to run Spring Boot applications.
1. Go to the Advanced Settings settings page `Ctrl+Alt+S` (Windows), `⌘ Comma` (macOS), `⌘ Comma` (IntelliJ IDEA Classic (macOS)), `⌘ Comma` (macOS System Shortcuts), `Ctrl+Alt+S` (XWin), `Ctrl+Alt+S` (GNOME), `Ctrl+Alt+S` (KDE), `Ctrl+Alt+S` (Emacs), `Ctrl+Alt+S` (Sublime Text), `⌘ Comma` (Sublime Text (macOS)), `Ctrl+Alt+S` (NetBeans), `Ctrl+Alt+S` (Visual Studio), `⌘ Comma` (Visual Studio (macOS)), `Ctrl+Alt+S` (Eclipse), `⌘ Comma` (Eclipse (macOS)) .
2. Under Frameworks. Spring Boot select Run using Gradle.
The Run using Gradle checkbox has no effect if IntelliJ IDEA is selected in `Build, Execution, Deployment | Build Tools | Gradle | Build and run using`. In this case, IntelliJ IDEA will be used to both build and run your Spring Boot application.
> **Tip:**
> The value of `Advanced Settings | Run using Gradle` is an IDE-level setting while settings under `Build, Execution, Deployment | Build Tools | Gradle` can be configured for each project individually.
## Custom configuration files
Spring Initializr creates one default configuration file that may not always be sufficient for development. If you do not want to use the default configuration file, or if you want to run your code in different environments, you can use custom configuration files defined in your project.
Let IntelliJ IDEA know which files are configuration files in your project to enable relevant highlighting and coding assistance:
Procedure: Define project configuration files
1. In the main menu, go to `File | Project Structure` or press `Ctrl+Alt+Shift+S` (Windows), `⌘ ;` (macOS), `⌘ ;` (IntelliJ IDEA Classic (macOS)), `⌘ ⇧ Comma` (macOS System Shortcuts), `Ctrl+Alt+Shift+S` (XWin), `Ctrl+Alt+Shift+S` (GNOME), `Ctrl+Alt+Shift+S` (KDE), `Ctrl+Alt+Shift+S` (Emacs), `Ctrl+Alt+Shift+S` (Sublime Text), `⌘ ;` (Sublime Text (macOS)), `Ctrl+Alt+Shift+S` (NetBeans), `Ctrl+Alt+Shift+S` (Visual Studio), `⌘ ;` (Visual Studio (macOS)), `Ctrl+Alt+Shift+S` (Eclipse), `⌘ ;` (Eclipse (macOS)) to open the Project Structure dialog.
2. Add the Spring facet: from the left-hand list, select Facets, click , and select Spring.
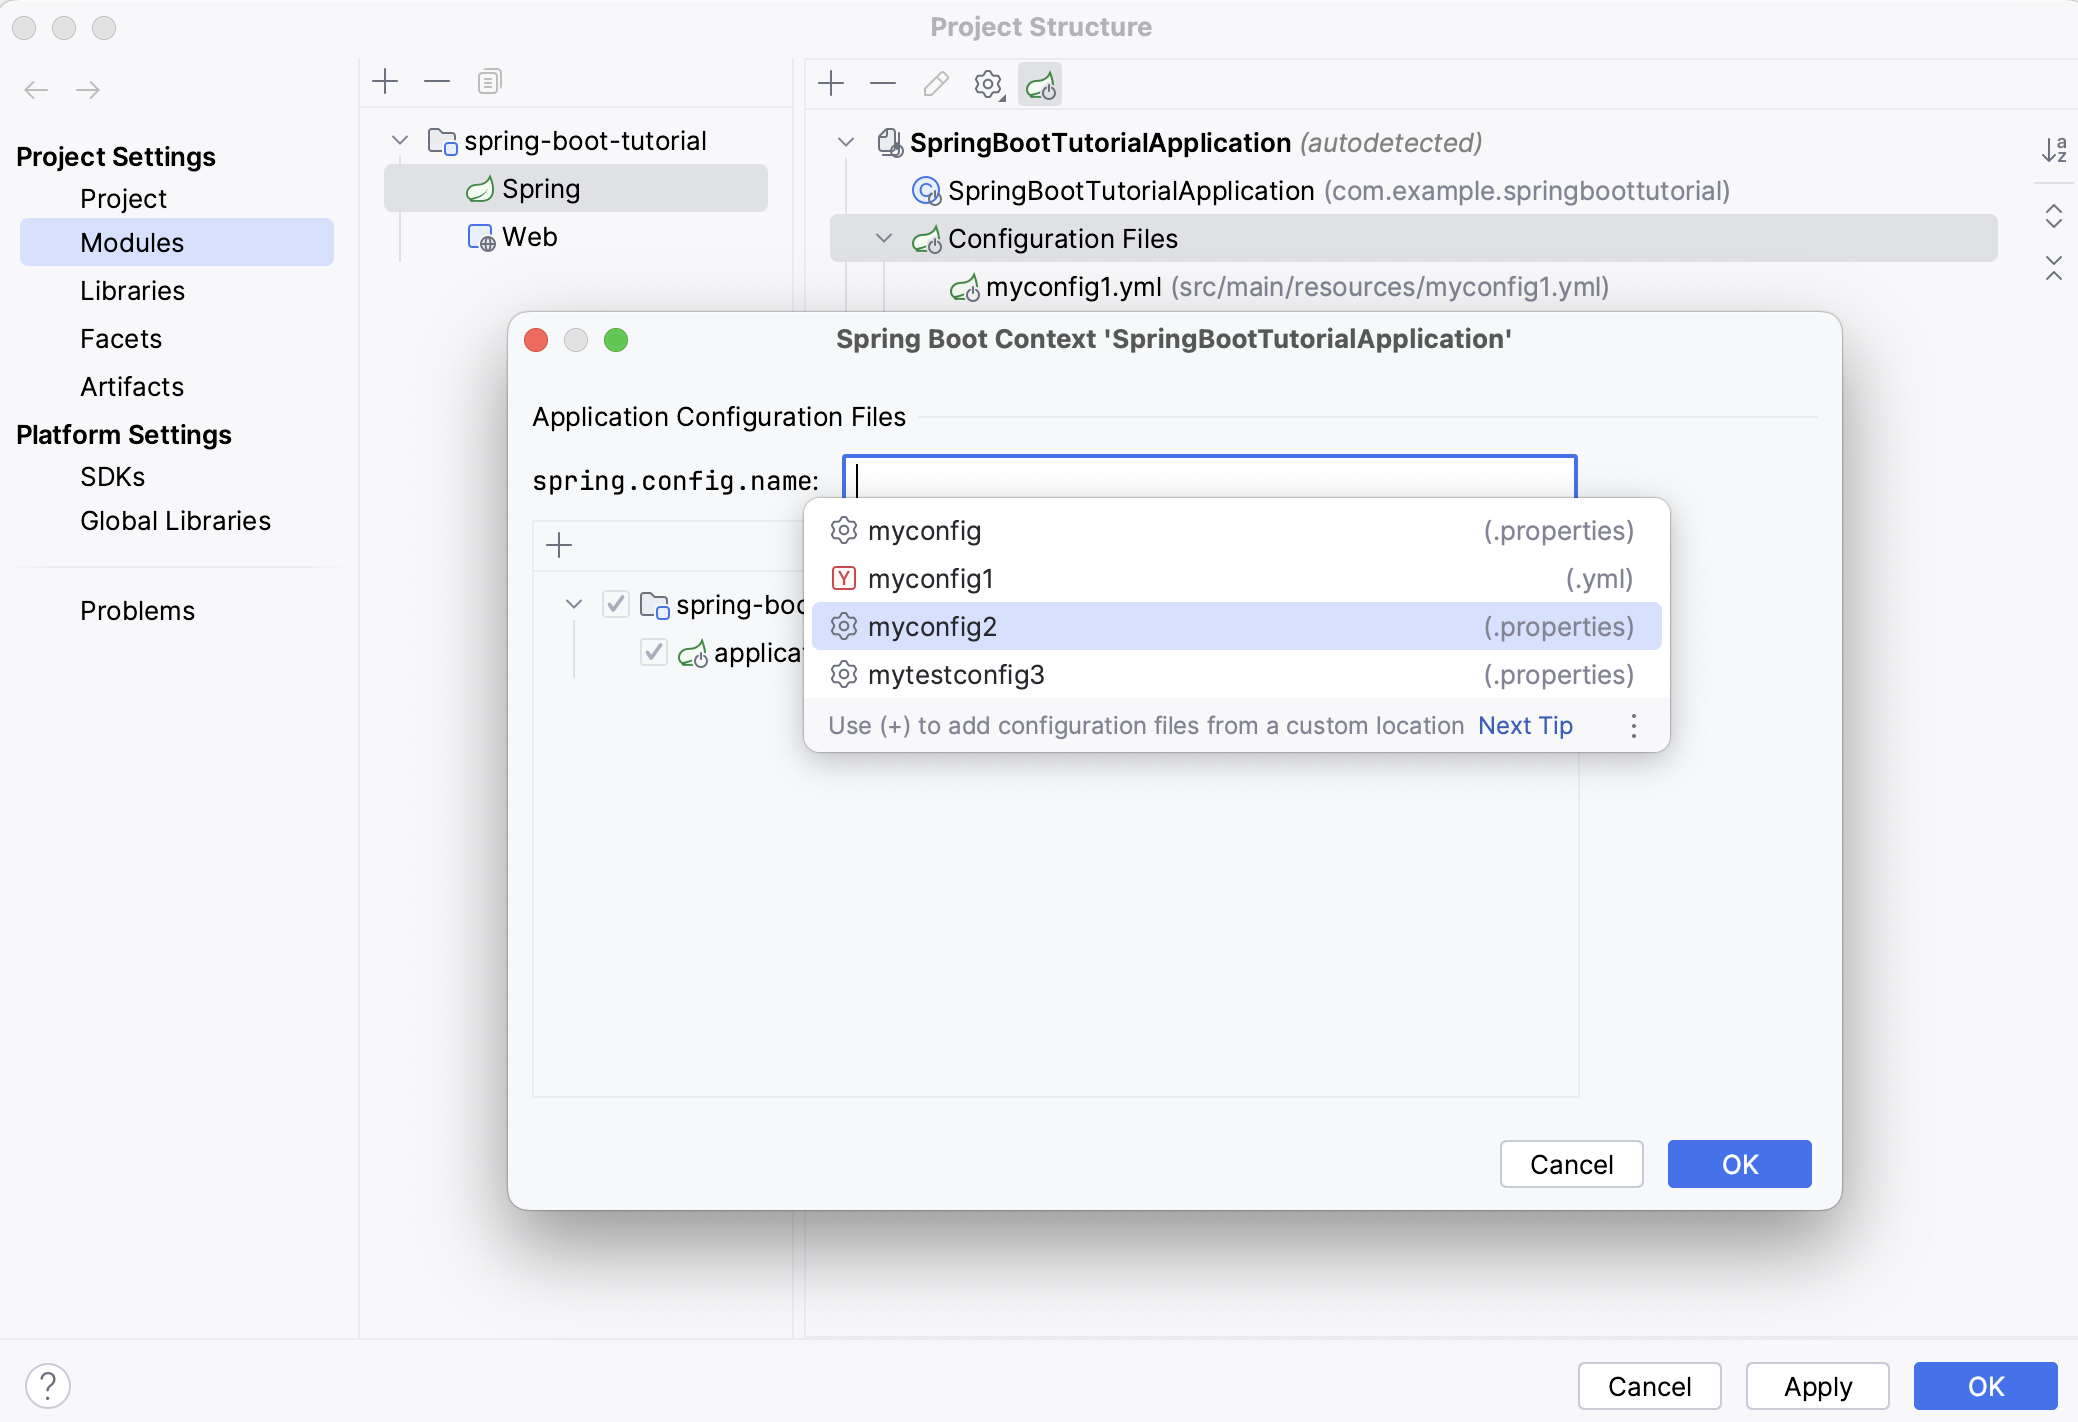
3. In the right-hand section, select Configuration Files and click  (Customize Spring Boot) in the toolbar.
4. If you want to use a custom configuration file instead of the default one, type its name in the `spring.config.name` field.
If you want to use multiple configuration files, click  and select files from the project tree.
Valid configuration files are marked with .
5. Click OK and apply the changes.
> **Note:**
> Some custom configuration files are detected automatically. For example, profile-specific configuration files with names that match the current naming pattern will be added to the context.
## Runtime endpoints
Spring Boot includes additional features for monitoring and managing the state of your application in the production environment through HTTP endpoints or with Java Management Extensions (JMX). For more information, refer to [Spring Boot Actuator: Production-ready Features](https://docs.spring.io/spring-boot/docs/current/reference/html/production-ready-features.html).
Procedure: Enable the Spring Boot actuator endpoints
1. In your `pom.xml` or `build.gradle` file, click the Add Starters… inlay hint next to the `dependencies` list.
Alternatively, press `Alt+Insert` (Windows), `⌘ N` (macOS), `⌃ N` (IntelliJ IDEA Classic (macOS)), `⌘ N` (macOS System Shortcuts), `Alt+Insert` (XWin), `Alt+Insert` (GNOME), `Alt+Insert` (KDE), `Alt+Insert` (Emacs), `Ctrl+N` (Sublime Text), `⌘ N` (Sublime Text (macOS)), `Alt+Insert` (NetBeans), `Ctrl+N` (Visual Studio), `⌘ N` (Visual Studio (macOS)), `Alt+Insert` (Eclipse), `⌘ N` (Eclipse (macOS)) anywhere in the file and select Add Starters.
2. In the window that opens, select Spring Boot Actuator.

Or you can add the `spring-boot-starter-actuator` dependency manually:
Maven:
Open the `pom.xml` file and add the following dependency under `dependencies`:
```XML
org.springframework.boot
spring-boot-starter-actuator
```
Gradle Groovy:
Open the `build.gradle` file and add the following dependency under `dependencies`:
```GROOVY
implementation 'org.springframework.boot:spring-boot-starter-actuator'
```
Gradle Kotlin:
Open the `build.gradle.kts` file and add the following dependency under `dependencies`:
```KOTLIN
implementation("org.springframework.boot:spring-boot-starter-actuator")
```
When you run your application with this dependency, you will be able to access the exposed actuator endpoints via HTTP. For example, if the application is running on localhost port number 8080, the default URL for the `health` endpoint will be [http://localhost:8080/actuator/health](http://localhost:8080/actuator/health).
Procedure: View the Spring Boot actuator endpoints
1. Run your Spring Boot application and open the [Services](services-tool-window.html) tool window: select `View | Tool Windows | Services` or press `Alt+8` (Windows), `⌘ 8` (macOS), `⌘ 8` (IntelliJ IDEA Classic (macOS)), `⌘ 8` (macOS System Shortcuts), `Alt+8` (XWin), `Alt+8` (GNOME), `Alt+8` (KDE), `Alt+8` (Emacs), `Alt+8` (Sublime Text), `⌘ 8` (Sublime Text (macOS)), `Alt+8` (NetBeans), `Alt+8` (Visual Studio), `Alt+8` (Visual Studio (macOS)), `Alt+8` (Eclipse), `⌘ 8` (Eclipse (macOS)).
2. Select your running Spring Boot application and use the following tabs to get information from actuator endpoints:
* [Beans](#endpoints-beans)
* [Health](#endpoints-health)
* [Mappings](#endpoints-mappings)
* [Environment](#endpoints-environment)
> **Note:**
> If the Spring Boot run configurations are not available in the Services tool window, either [add them](services-tool-window.html#run-configs) or use the Run or Debug tool window.
### Beans
The Beans tab shows the [runtime beans](https://docs.spring.io/spring-boot/docs/current/actuator-api/html/#beans) of your Spring Boot application. Double-click any bean to open its declaration in the editor. These beans are indicated using the  icon in the gutter. Click this icon to view dependent and injected beans.
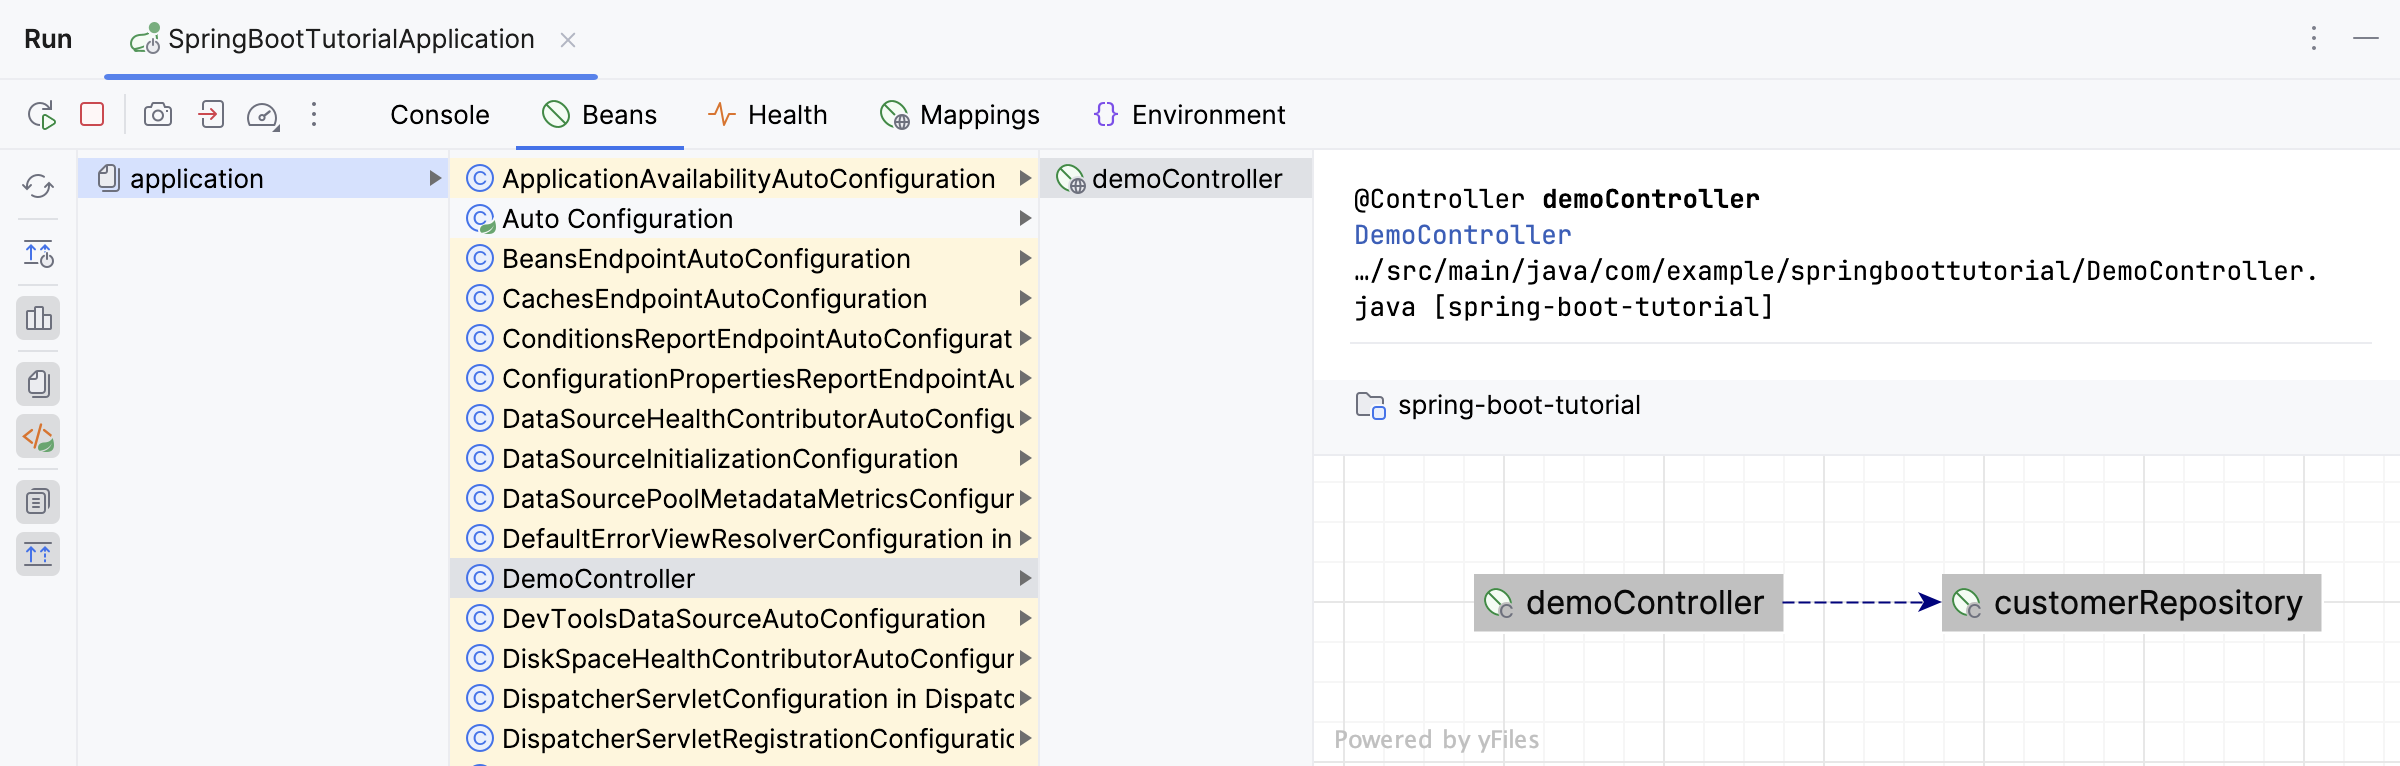
The Beans tab includes the following toolbar actions:
| Action | Description |
| --- | --- |
|  Refresh | Refresh the runtime beans information collected by the JMX agent. |
|  Diagram Mode | Show the complete graph for all your runtime beans instead of a list. Required plugin: Diagrams (bundled). |
|  Show Library Beans | Show beans from libraries. |
|  Show Contexts | Show available [Spring application contexts](spring-projects.html#create-application-context). |
|  Show Configuration Files | Show available configuration files. |
|  Show Bean Documentation | Show the documentation for the selected bean. |
|  Show Bean Graph | Show the direct dependencies for the selected bean. Required plugin: Diagrams (bundled). |
### Health
The Health tab shows the status of your application. There are some [auto-configured health indicators](https://docs.spring.io/spring-boot/docs/current/reference/html/production-ready-features.html#production-ready-health-indicators) and you can also [write custom health indicators](https://docs.spring.io/spring-boot/docs/current/reference/html/production-ready-features.html#writing-custom-healthindicators).
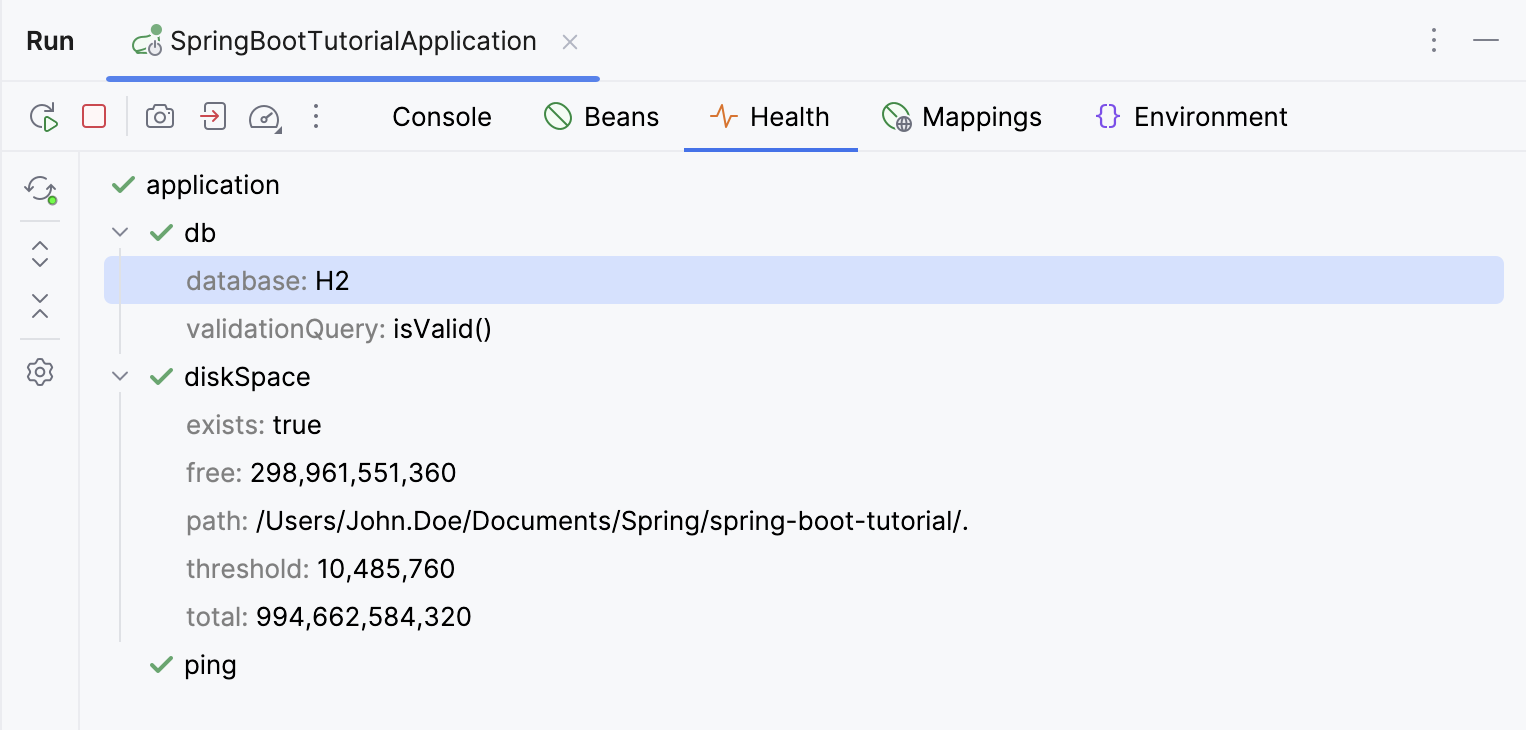
For more information, refer to [Health](https://docs.spring.io/spring-boot/docs/current/actuator-api/html/#health).
### Mappings
The Mappings tab shows the [request mappings](https://docs.spring.io/spring-boot/docs/current/actuator-api/html/#mappings) of your application. It lists all methods with the `@RequestMapping` annotation or its shortcuts, such as `@GetMapping`.
If you click the path mapping URI, you can select to run the corresponding HTTP request, open an HTTP requests file with the request, or open the request URL in the web browser (if it's a `GET` request). For more information, refer to [HTTP Client](http-client-in-product-code-editor.html).
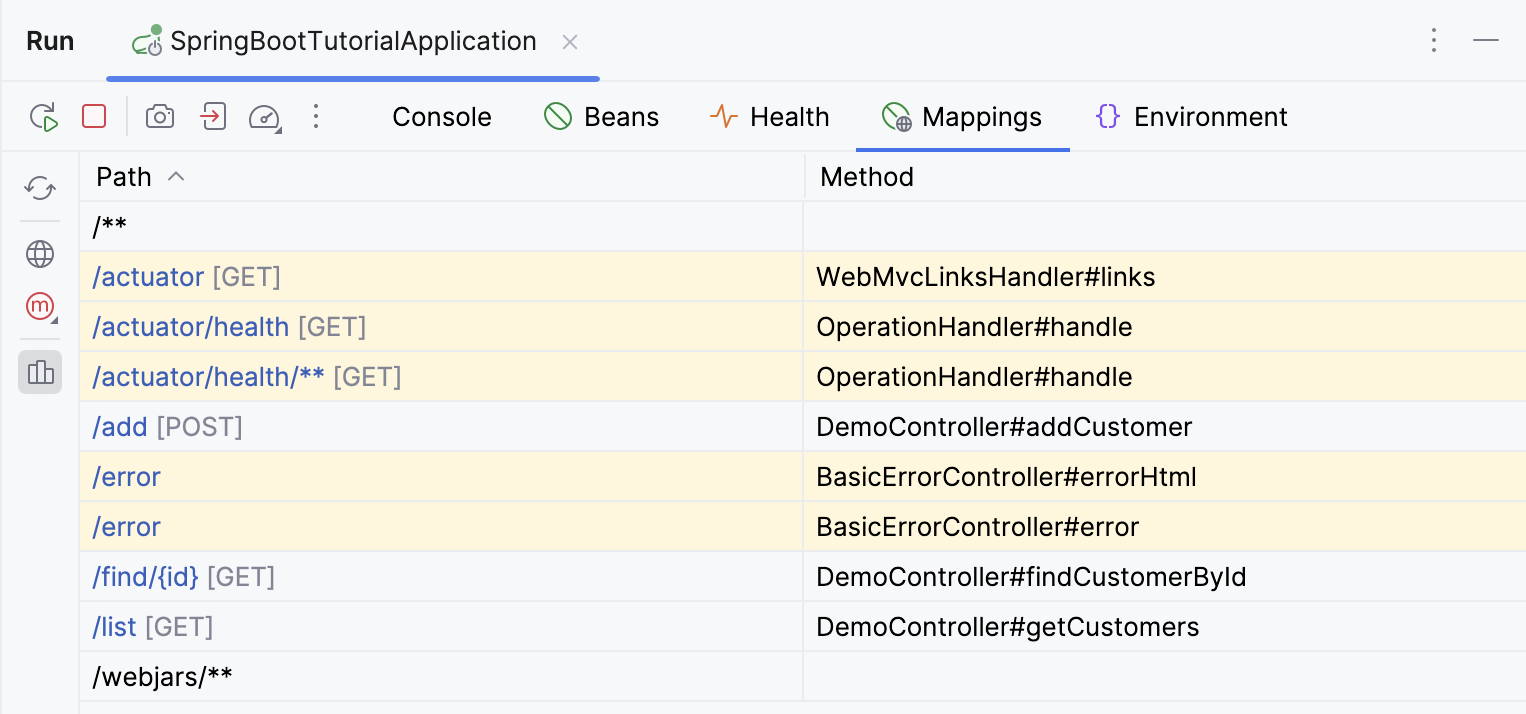
Double-click a method to open its declaration in the editor. Spring registers such methods as handlers and IntelliJ IDEA indicates them with the  icon in the gutter. Click this icon to run the corresponding HTTP request, open it in a requests files, or in the web browser (if it's a `GET` request).
The Mappings tab includes the following toolbar actions:
| Action | Description |
| --- | --- |
|  Refresh | Refresh the request mappings collected by the JMX agent. |
|  Open in Browser | Open the root application URL in a web browser. |
|  Request Method | Select which request methods to show. |
|  Show Library Mappings | Show request mappings from libraries. |
### Environment
The Environment tab shows Spring Environment, which contains information sourced from the `/actuator/env` endpoint. It includes all available properties from various configuration sources, such as application properties and environment variables.
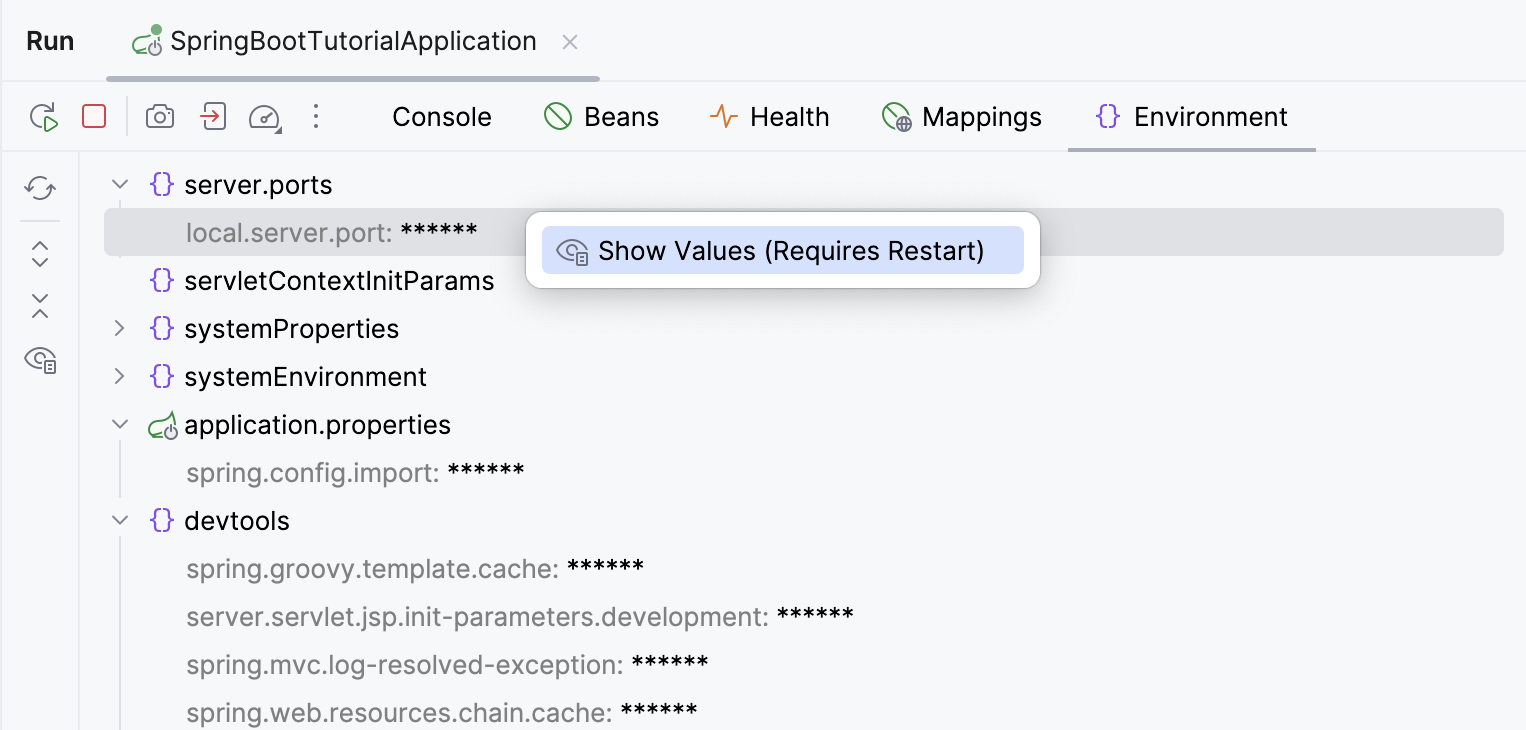
In Spring Boot version higher than 3.0, values provided by Spring Environment are fully sanitized (replaced with `******`). In earlier Spring Boot versions, only credentials-related keys are sanitized by default. In both cases, you can reveal hidden values by clicking  on the toolbar or right-clicking a property and selecting Show Values. This action restarts the application and adds the necessary flags to the Override configuration properties section of the [Spring Boot run](run-debug-configuration-spring-boot.html#spring-boot) configuration. In Spring version higher than 3.0, it's `management.endpoint.env.show-values=when_authorized`; in earlier versions, it's `management.endpoint.env.keys-to-sanitize` with an empty value.
To hide the values again, click  again or right-click a property and select Hide Values. This will also restart the application and remove the added property from the run configuration.
## Application update policies
With the `spring-boot-devtools` module, your application will restart every time files on the classpath change. If IntelliJ IDEA is configured to continuously compile changed files, you can set a trigger file. In this case, your application will restart only after you modify the trigger file. For more information, refer to [Automatic Restart](https://docs.spring.io/spring-boot/docs/current/reference/html/using-spring-boot.html#using-boot-devtools-restart).
Procedure: Enable automatic restart
* Add the `spring-boot-devtools` module dependency for your project.
Maven:
Open the `pom.xml` file and add the following dependency under `dependencies`:
```XML
org.springframework.boot
spring-boot-devtools
true
```
Setting the `spring-boot-devtools` dependency as `optional` prevents it from being used in other modules that use your project.
Gradle:
Open the `build.gradle` file and add the following dependency under `dependencies`:
```GRADLE
developmentOnly("org.springframework.boot:spring-boot-devtools")
```
Setting the `spring-boot-devtools` dependency as `developmentOnly` prevents it from being used in other modules that use your project.
To update a running application, go to `Run | Debugging Actions | Update Running Application` `Ctrl+F10` (Windows), `⌘ F10` (macOS), `⌘ F10` (IntelliJ IDEA Classic (macOS)), `⌘ F10` (macOS System Shortcuts), `Ctrl+F10` (XWin), `Ctrl+F10` (GNOME), `Ctrl+F10` (KDE), `Ctrl+F10` (Emacs), `Ctrl+F10` (Sublime Text), `⌘ F10` (Sublime Text (macOS)), `Ctrl+F10` (NetBeans), `Ctrl+F10` (Visual Studio), `⌘ F10` (Visual Studio (macOS)), `Ctrl+F10` (Eclipse), `⌘ F10` (Eclipse (macOS)) in the main menu, or select your application in the [Services](services-tool-window.html) tool window and click . Depending on your needs, you can configure what the IDE will do when you execute this action.
> **Note:**
> If the Spring Boot run configurations are not available in the Services tool window, either [add them](services-tool-window.html#run-configs) or use the Run or Debug tool window.
Procedure: Configure the application update policy
1. In the main menu, go to `Run | Edit Configurations`.
2. Select the necessary Spring Boot run configuration to open its settings. Click Modify options.
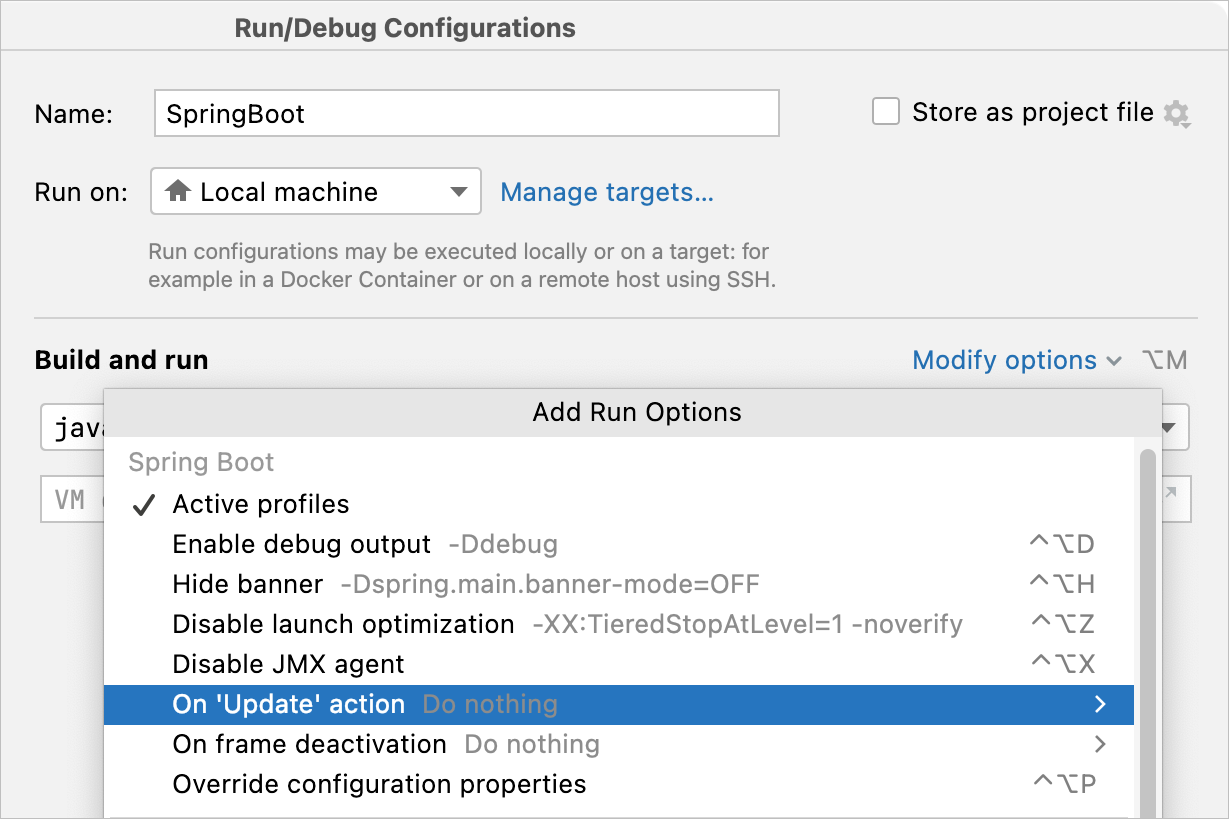
3. In the list that opens, point to On 'Update' action. You can choose to update only the resources, update both the classes and the resources (build your application), update the trigger file (which will trigger a restart), or try to perform a class hot swap, and if it fails, update the trigger file.
> **Note:**
> For the Update trigger file and the Hot swap classes and update trigger file if failed policies, the IDE sets a trigger file when you start the application.
4. In the Modify options list, point to On frame deactivation and select an action that the IDE will do after you switch to another application: update the resources, or build your application.
> **Tip:**
> You can create several Spring Boot run/debug configurations with different update policies and switch between them.
## See also
### Reference
[Spring Boot run configuration](run-debug-configuration-spring-boot.html)
### External Links
[Spring Boot Developer Tools](https://docs.spring.io/spring-boot/docs/current/reference/html/using-boot-devtools.html)