# Liquibase
> **TL;DR**
> Required plugin: [Liquibase](https://plugins.jetbrains.com/plugin/23741-liquibase) (bundled)
Prior to IntelliJ IDEA version 2024.1, some Liquibase features were only available with the [JPA Buddy plugin](jpa-buddy.html). The following video demonstrates these features, which are now available with the Liquibase plugin.
[Video](https://www.youtube.com/v/26qri-FIwWo)
To enable corresponding features, make sure that the project contains the Liquibase dependency. It also provides a number of actions to quickly generate changelogs, run them, preview SQL statements, and so on.
Procedure: Add Liquibase to an existing project
1. Open the build file in the editor (`pom.xml` or `build.gradle` depending on the [build tool](build-tools.html) used in your project).
2. Add the Liquibase library, and make sure its version matches the rest of your project:
Maven:
```XML
org.liquibase
liquibase-core
4.32.0
```
Gradle (Groovy):
```GROOVY
implementation 'org.liquibase:liquibase-core:4.32.0'
```
Gradle (Kotlin):
```KOTLIN
implementation("org.liquibase:liquibase-core:4.32.0")
```
3. Press `Ctrl+Shift+O` (Windows), `Ctrl+Shift+O` (macOS), `Ctrl+Shift+O` (IntelliJ IDEA Classic (macOS)), `Ctrl+Shift+O` (macOS System Shortcuts), `Ctrl+Shift+O` (XWin), `Ctrl+Shift+O` (GNOME), `Ctrl+Shift+O` (KDE), `Ctrl+Shift+O` (Emacs), `Ctrl+Shift+O` (Sublime Text), `Ctrl+Shift+O` (Sublime Text (macOS)), `Ctrl+Shift+O` (NetBeans), `Ctrl+Shift+O` (Visual Studio), `Ctrl+Shift+O` (Visual Studio (macOS)), `Ctrl+Shift+O` (Eclipse), `Ctrl+Shift+O` (Eclipse (macOS)) to import the changes.
For more information about working with build tools, refer to [Maven](maven-support.html) or [Gradle](gradle.html).
Procedure: Generate an init changelog
With IntelliJ IDEA, you can initialize your database schema based on the mappings provided in your entity classes. It will generate a set of DDL commands for your current entities in the form of a Liquibase changelog.
1. Open the [Persistence](persistence-tool-window.html) tool window.
2. Right-click a persistence unit, mapping context, or entity, and select ` New |  Liquibase Init Changelog`.
3. In the Init Schema Changelog dialog that opens, select which data model the migration should be based on:
* Model: entity mappings from one of the following: * [persistence unit](persistence-tool-window.html#create-persistence-unit) (in JPA and Spring Data JPA projects) * [mapping context](persistence-tool-window.html#create-mapping-context) (in Spring Data JDBC projects)
* DB: schema from a [connected database](connecting-to-a-database.html)
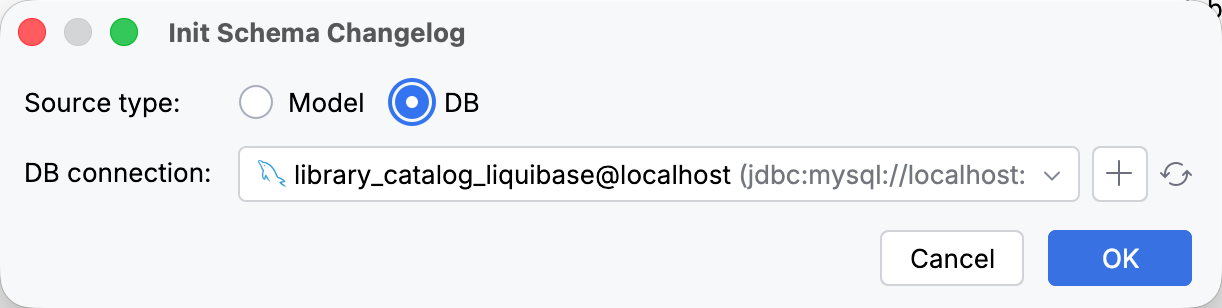
Based on your selection, IntelliJ IDEA automatically fills in the persistence unit, mapping context, or database connection, which you can change if needed.
4. Click OK.
5. In the [Changelog Preview dialog](#changelog-preview-window) that opens, configure the changelog and click Save.
## Changelog Preview Window
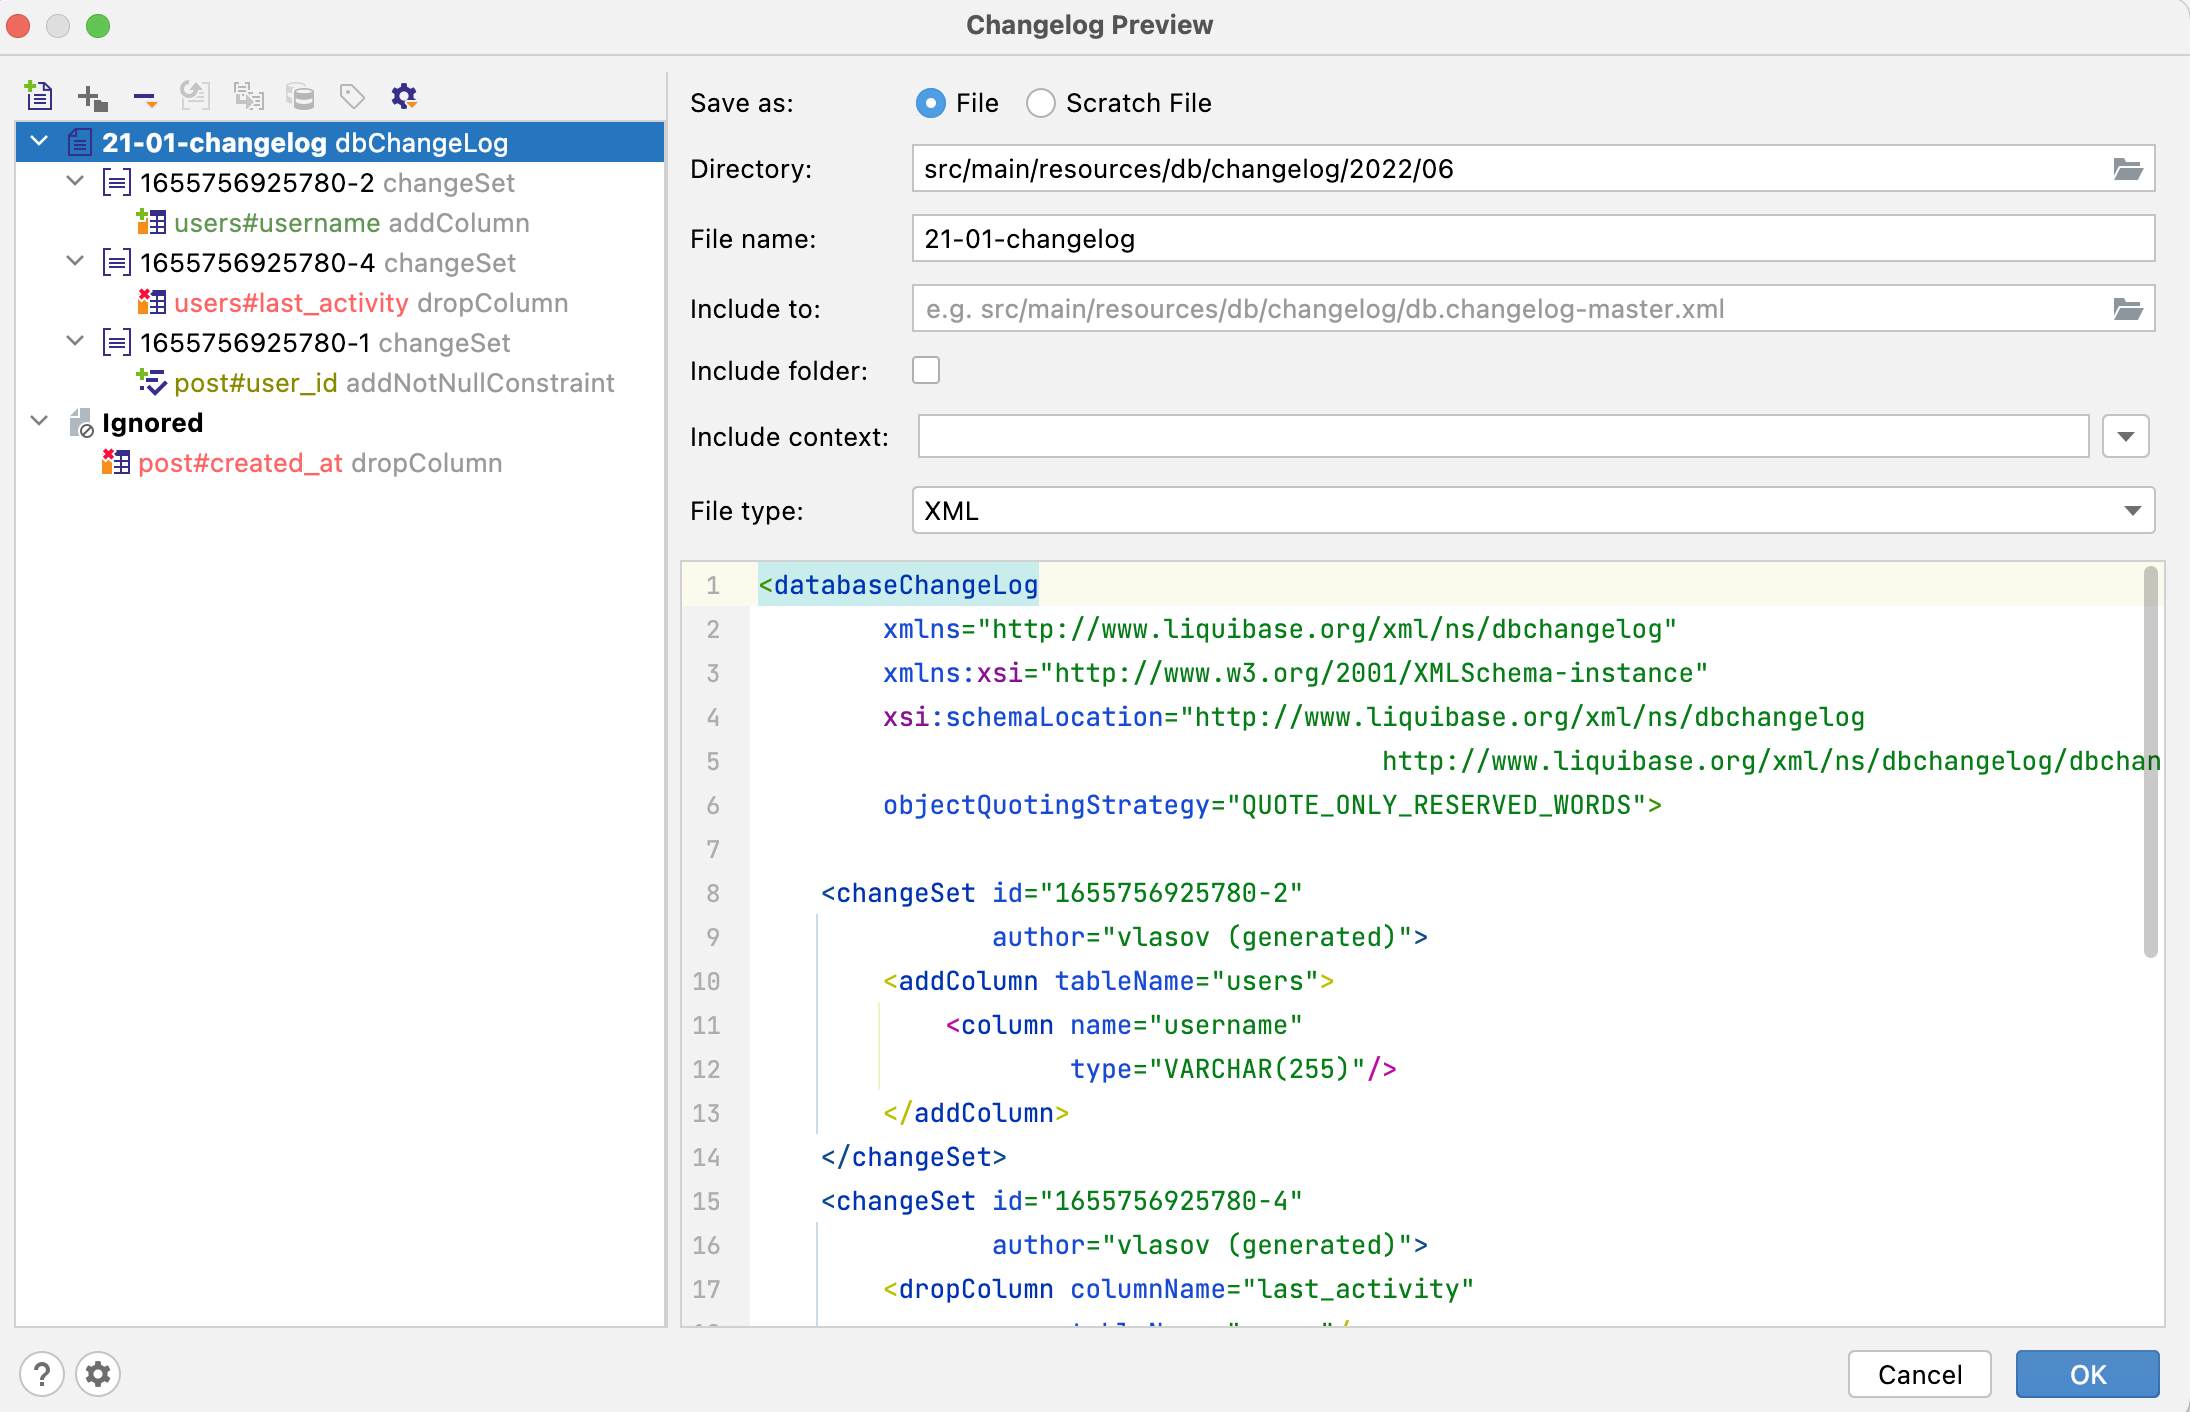
If you want to save the changelog as a regular file, then the following configuration options will be available:
* Directory and File name fields are responsible for configuring the location of the generated changelog. If a changelog with the specified name already exists, you will be prompted with a warning, after which the changes will be appended to that changelog.
* You can use Include to , Include folder , and Include context to specify whether a changelog should be included in another changelog. If you check the Include folder box, it generates the include statement for the entire folder, not just the current changelog.
* From the File type drop-down list, you can choose one of the four file types (YAML, JSON, SQL, XML) supported by Liquibase, in which IntelliJ IDEA will generate the changelog.
If you want to save the changelog as a scratch file, then you can configure only its name and type.
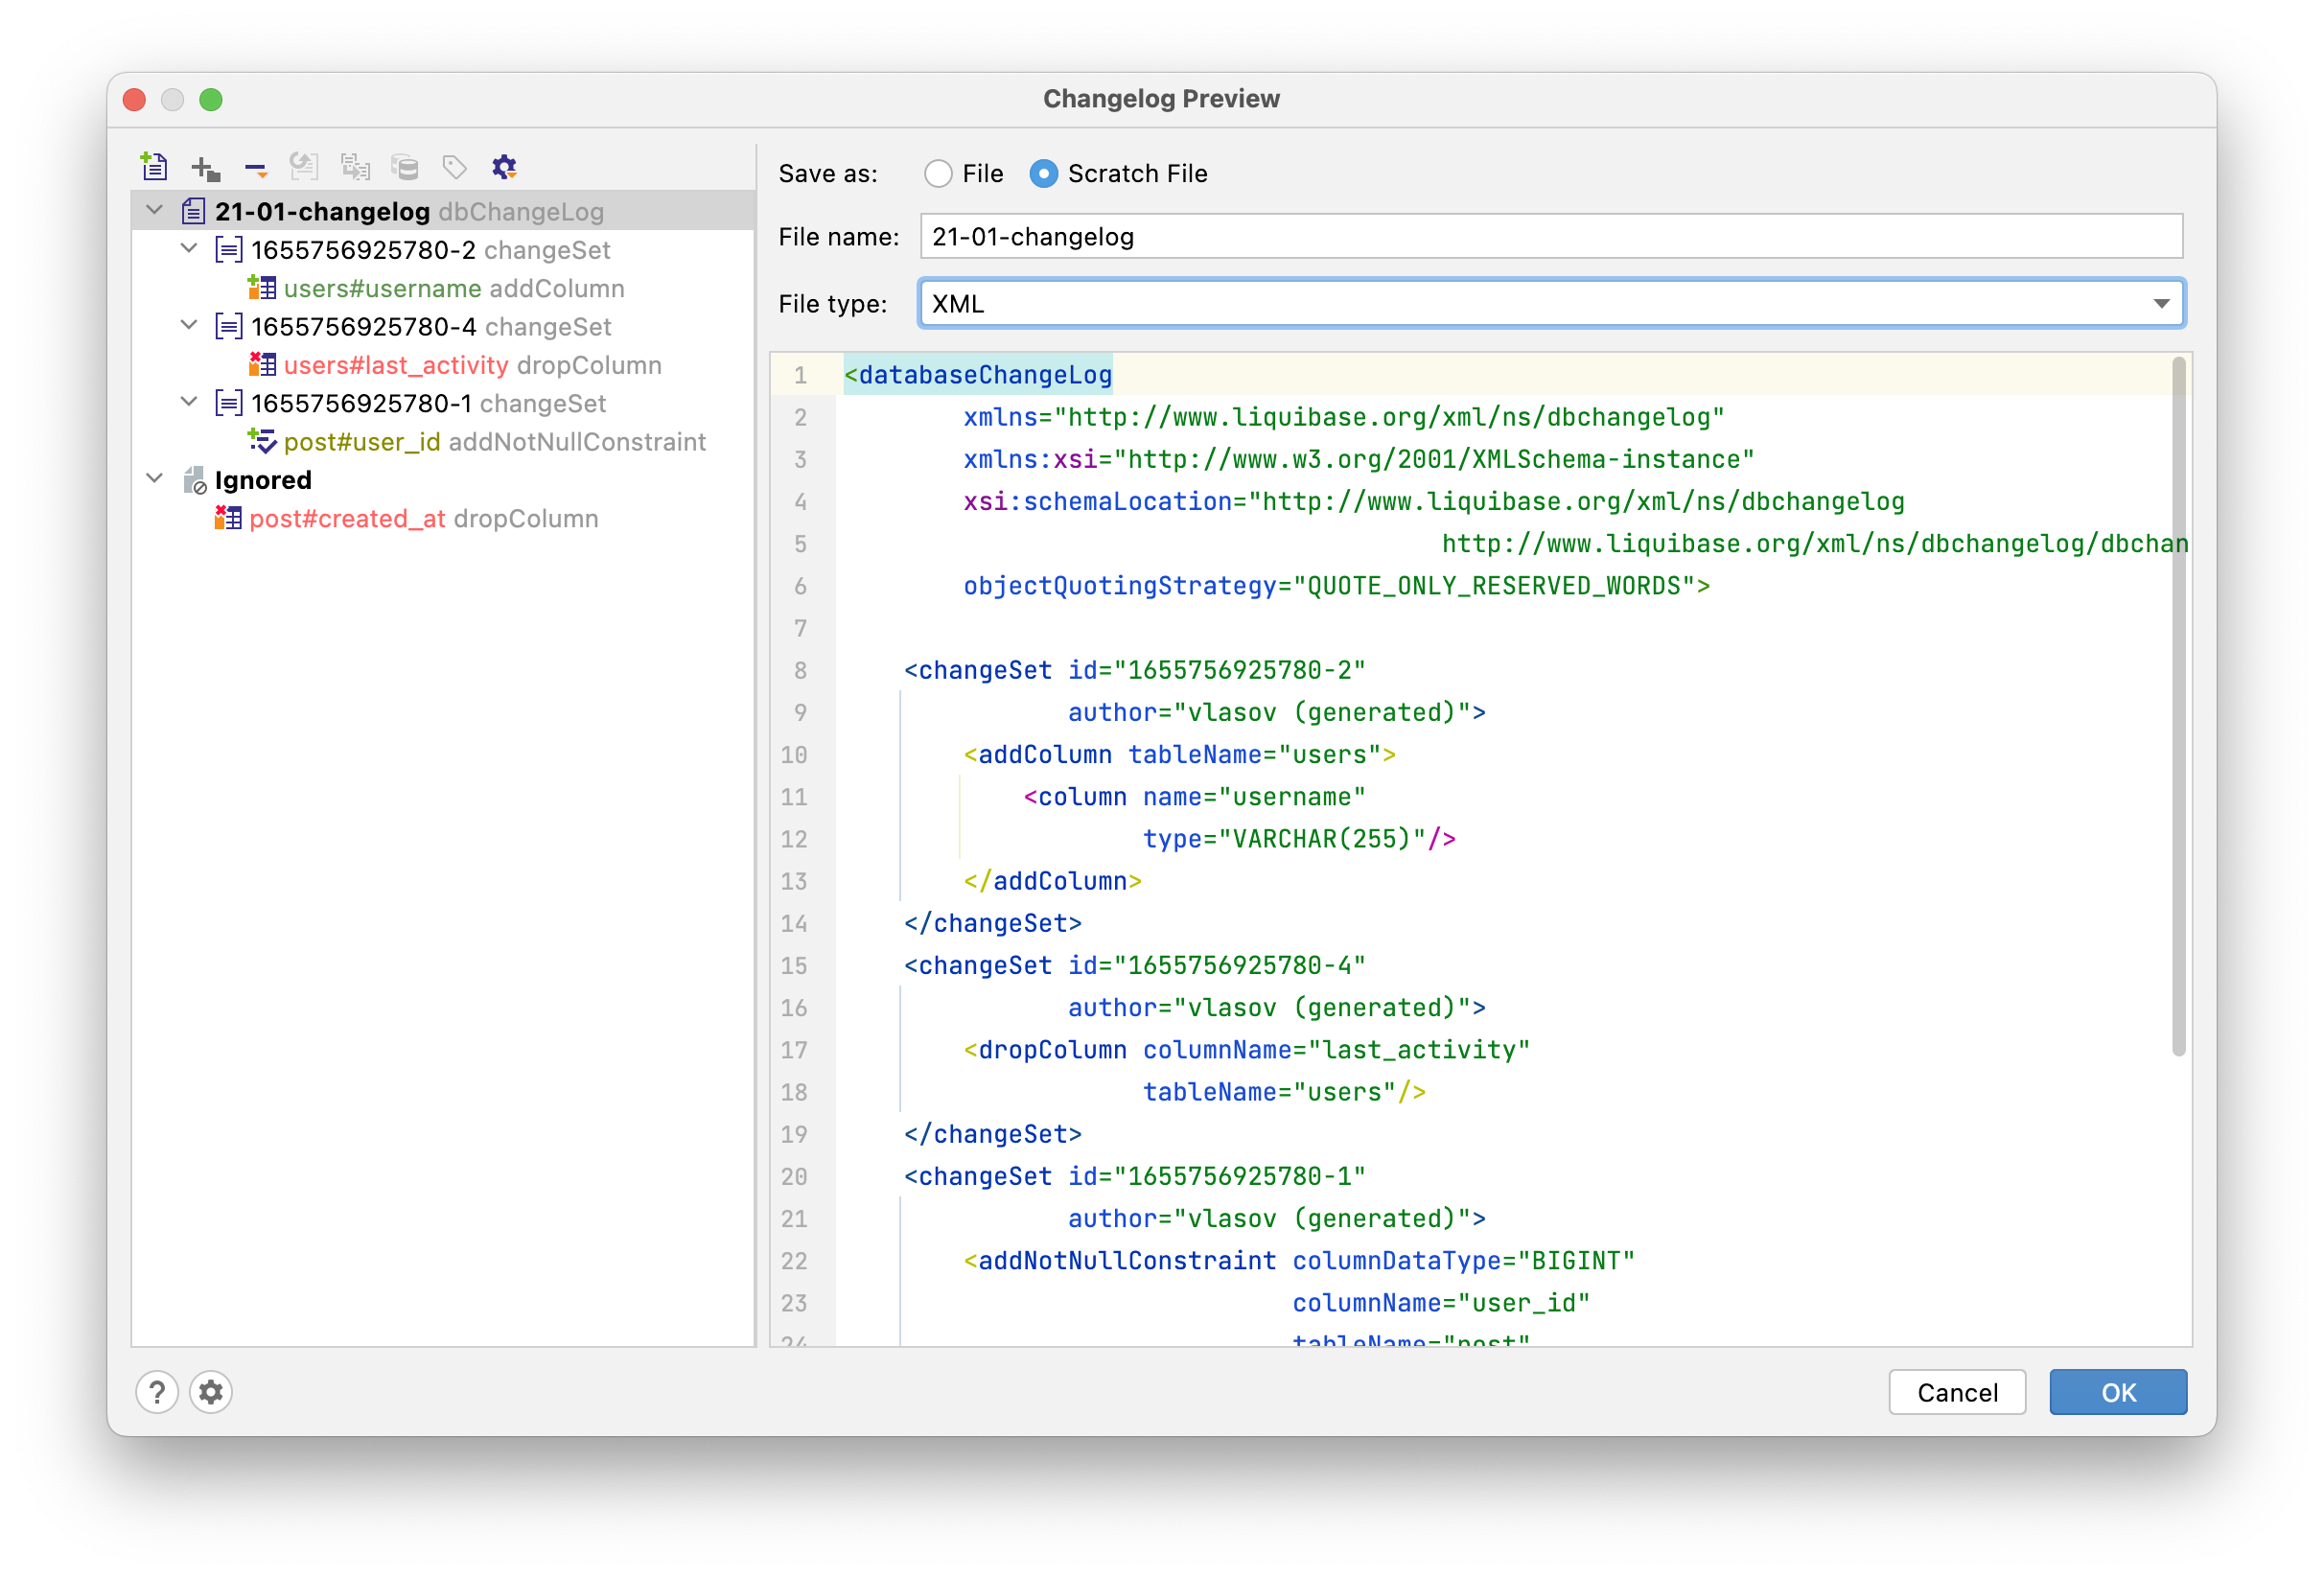
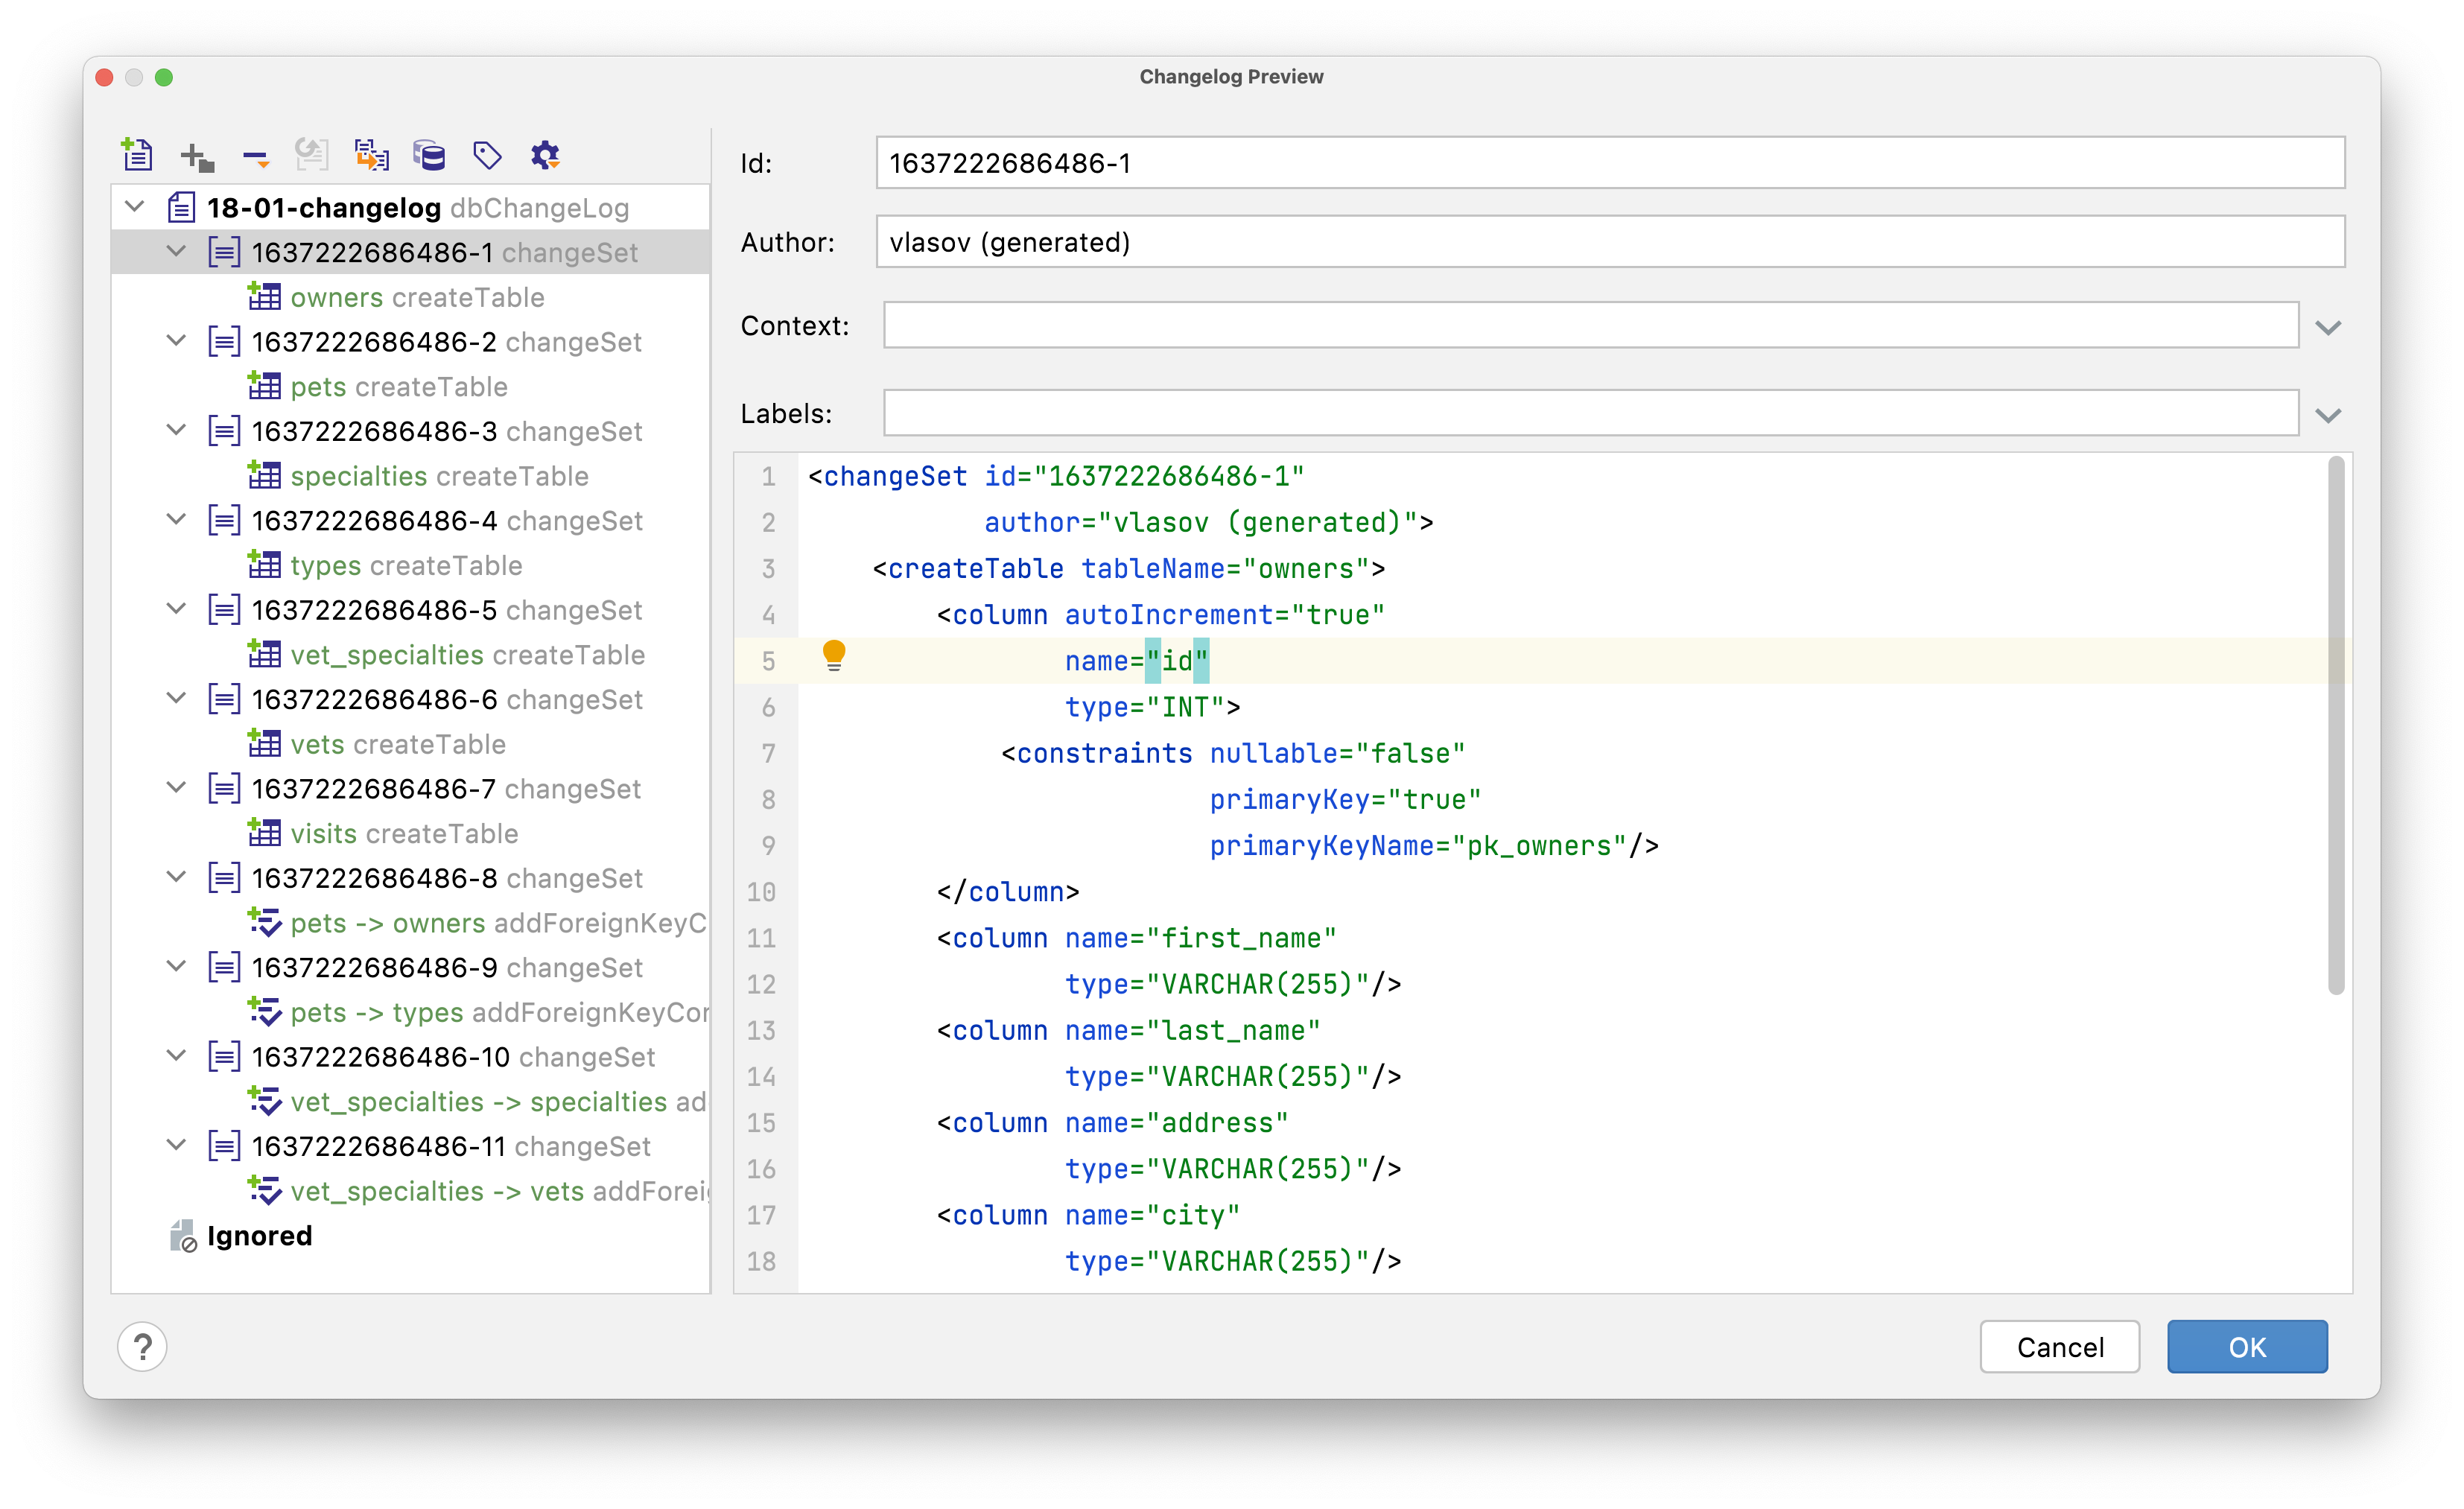
The left side of the window shows a preview of the changesets that will be generated. You can click on each change to see what it will look like. To combine several changes into one changeset or to ignore them, simply drag and drop them. The top left corner of the preview window contains various actions to modify the resulting changelog:
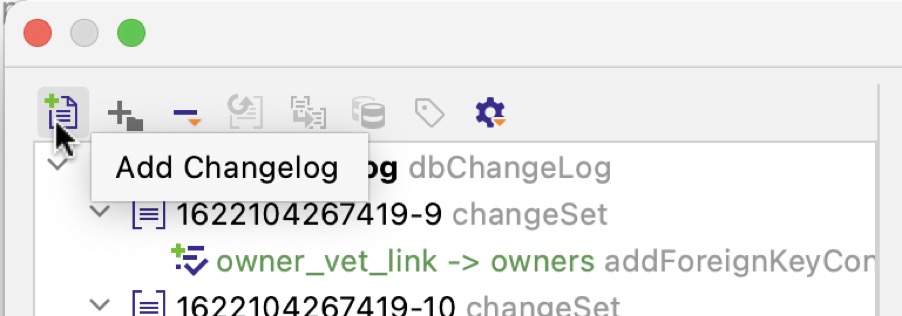
The following actions are provided:
* Add Changelog — create a secondary changelog
* Add Change Set — create a new changeset in the selected changelog
* Remove from Changelog with options: * Remove from Changelog — simply remove the changes from the current changelog * Remove and Ignore — remove the changes and add them to Ignored , so they are excluded from future changesets too * Restore from Ignored — move the changes from Ignored to the changelog
* Set Context (for changesets)
* Set Labels (for changesets)
* Show Other Actions — select all changes based on the danger level, expand/collapse all changes
Procedure: Create empty changelog
1. In the Project tool window, right-click the `db/changelog` directory.
2. Select New (or press `Alt+Insert` (Windows), `⌘ N` (macOS), `⌃ N` (IntelliJ IDEA Classic (macOS)), `⌘ N` (macOS System Shortcuts), `Alt+Insert` (XWin), `Alt+Insert` (GNOME), `Alt+Insert` (KDE), `Alt+Insert` (Emacs), `Alt+Insert` (Sublime Text), `⌘ N` (Sublime Text (macOS)), `Alt+Insert` (NetBeans), `Alt+Insert` (Visual Studio), `⌘ ⌃ N` (Visual Studio (macOS)), `Alt+Insert` (Eclipse), `⌘ N` (Eclipse (macOS))) and select Liquibase Empty Changelog.
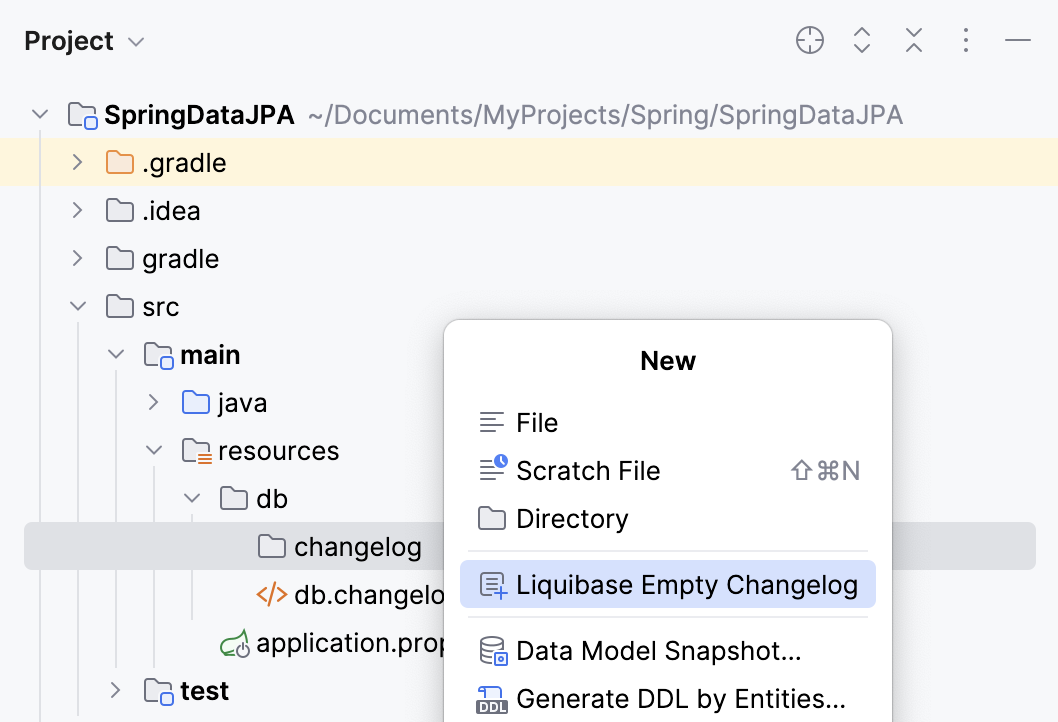
3. In the New Liquibase Changelog dialog that opens, select an XML or YAML format for the changelog file.
This will create a new file based on the Liquibase file template. You can check all available file templates in the IDE settings (`Ctrl+Alt+S` (Windows), `⌘ Comma` (macOS), `⌘ Comma` (IntelliJ IDEA Classic (macOS)), `⌘ Comma` (macOS System Shortcuts), `Ctrl+Alt+S` (XWin), `Ctrl+Alt+S` (GNOME), `Ctrl+Alt+S` (KDE), `Ctrl+Alt+S` (Emacs), `Ctrl+Alt+S` (Sublime Text), `⌘ Comma` (Sublime Text (macOS)), `Ctrl+Alt+S` (NetBeans), `Ctrl+Alt+S` (Visual Studio), `⌘ Comma` (Visual Studio (macOS)), `Ctrl+Alt+S` (Eclipse), `⌘ Comma` (Eclipse (macOS))), under `Editor | File and Code Templates`.
IntelliJ IDEA provides you with coding assistance in XML and YAML Liquibase changelog files, including validation against the Liquibase schema, suggestion for known parameters, and navigation to property declarations and to [included files](https://docs.liquibase.com/change-types/include.html).
## Primary and Secondary Changelogs
IntelliJ IDEA lets you put the changes into two types of changelogs: Primary and Secondary. One use case for this is separating safe changes that can be run automatically and changes that require your attention and need to be run manually.
The changes can be separated automatically by their type (in `Tools | Database Versioning | Diff Changes` ). Alternatively, you can create a secondary changelog manually in the Preview window using the Add Changelog action. Then you can simply drag the desired changesets into the new changelog.
By default, Primary and Secondary changelogs are generated in separate directories, which can be customized in the plugin settings. Read more in the IDE settings in the `Tools | Database Versioning | Liquibase` section.
Procedure: Generate a diff changelog
1. Make sure IntelliJ IDEA is [connected
to your database](managing-data-sources.html#create_a_data_source).
> **Tip:**
> If your project uses [Spring](spring-support.html), [Micronaut](micronaut.html), or [Quarkus](quarkus.html), you can quickly create a database connection right from your configuration file (`application.properties` or `application.yml`).
>
>
>
> To do so, open the file in the editor and click  Create new datasource from existing properties in the editor gutter.
2. Open the [Database](database-tool-window.html) tool window, right-click a database or table, and select  Create Liquibase Changelog… .
* Alternatively, open the [Persistence](persistence-tool-window.html) tool window, right-click a persistence unit, mapping context, or entity, and select ` New |  Liquibase Changelog…`.
3. In the Diff Database Changelog dialog that opens, select which data models to compare:
* Source (referenceURL) (current data model): * DB: schema from a [connected database](connecting-to-a-database.html) * Model: entity mappings from one of the following: * [persistence unit](persistence-tool-window.html#create-persistence-unit) (in JPA and Spring Data JPA projects) * [mapping context](persistence-tool-window.html#create-mapping-context) (in Spring Data JDBC projects)
* Target (URL) (previous data model): * DB: schema from a connected database * Snapshot: schema from a [data model snapshot](database-versioning.html#generate-data-model-snapshot)
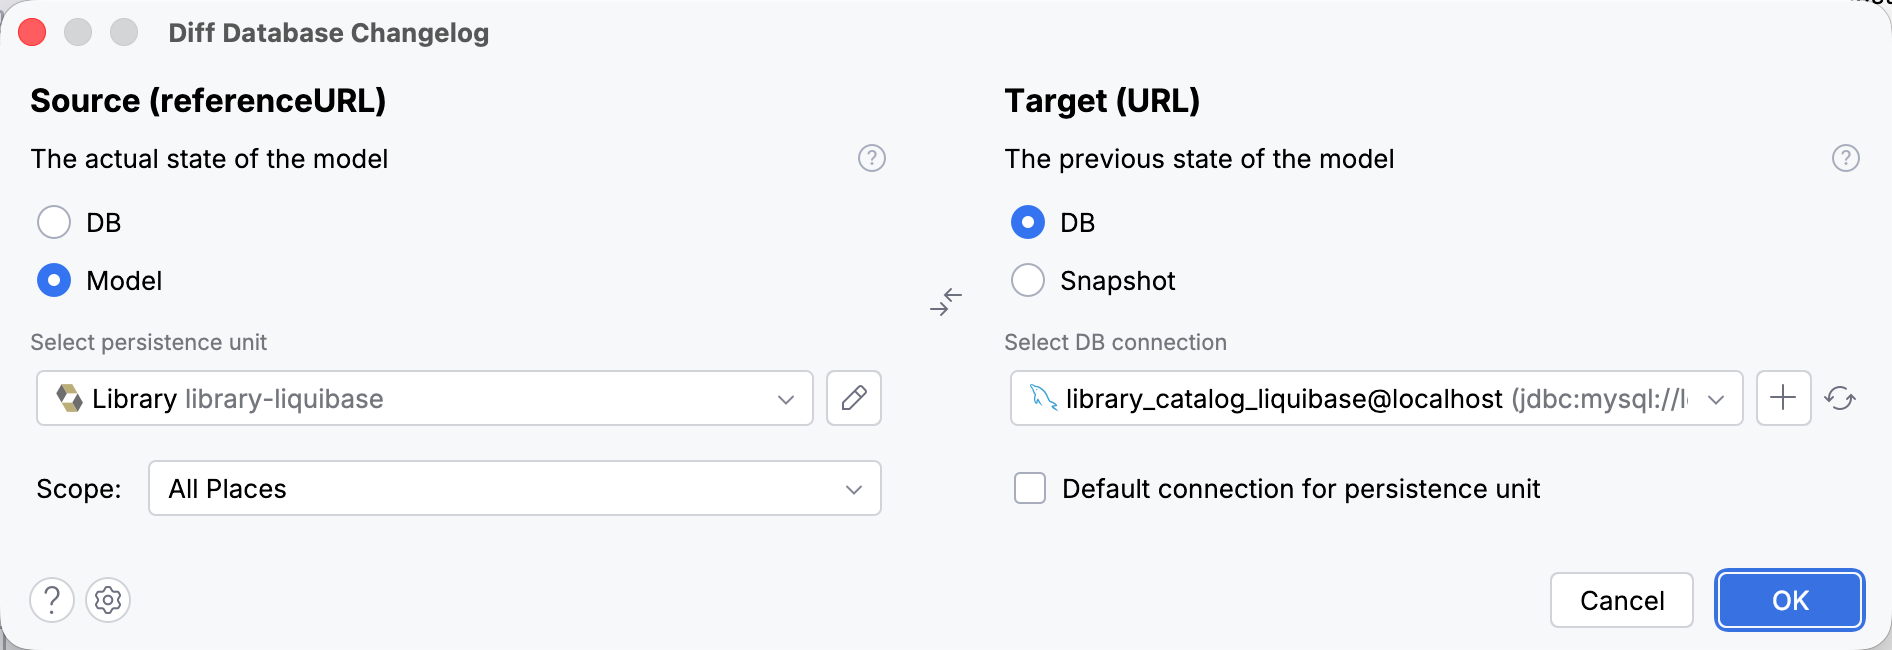
If you select DB or Model, IntelliJ IDEA automatically fills in the persistence unit, mapping context, or database connection, which you can change if needed.
> **Tip:**
> If you frequently generate diff migrations between the same database connection and persistence unit or mapping context, you can select Default connection for persistence unit so IntelliJ IDEA remembers this association in the future.
4. Click OK.
5. In the [Changelog Preview dialog](#changelog-preview-window) that opens, configure the changelog and click Save.
Procedure: Navigate through changelog using the Structure tool window
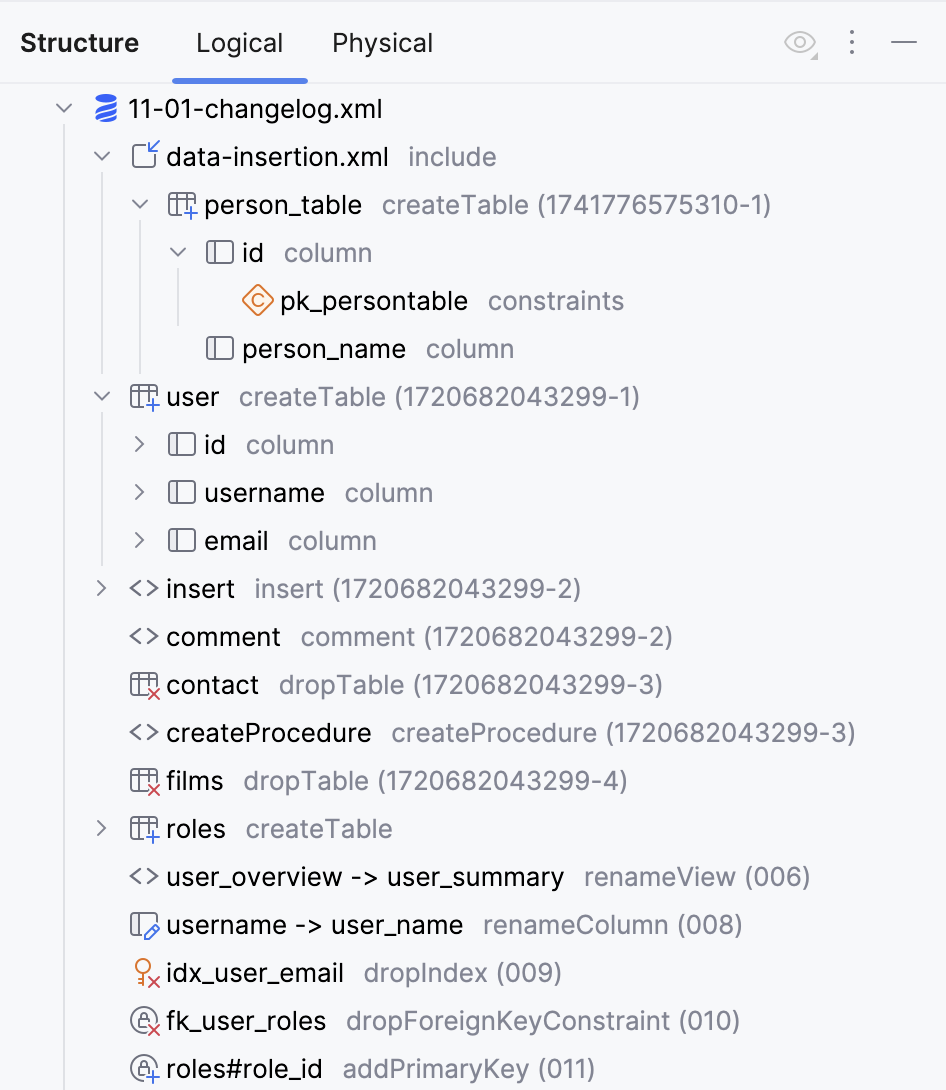
If you have a lot of changesets in your Liquibase changelog file, the [logical view](viewing-structure-of-a-source-file.html#logical-structure) of the Structure tool window can be useful to quickly preview the file and navigate through it. It shows change types as separate nodes, which you can expand to access more details.
The logical view is available for XML and YAML changelog files.
1. With your changelog file opened in the editor, open the Structure tool window: `View | Tools Windows | Structure`.
Alternatively, press `Alt+7` (Windows), `⌘ 7` (macOS), `⌘ 7` (IntelliJ IDEA Classic (macOS)), `⌘ 7` (macOS System Shortcuts), `Alt+7` (XWin), `Alt+7` (GNOME), `Alt+7` (KDE), `Alt+7` (Emacs), `Alt+7` (Sublime Text), `⌘ 7` (Sublime Text (macOS)), `Ctrl+7` (NetBeans), `Ctrl+Alt+F` (Visual Studio), `⌃ ⌥ F` (Visual Studio (macOS)), `Alt+7` (Eclipse), `⌘ 7` (Eclipse (macOS)).
2. In the Structure tool window, open the Logical tab.
Click any change to navigate to its definition in the changelog file. For `include` and `includeAll` tags, you will be redirected to the changeset in the included file.
## Deploy the changes
Once your changelogs are ready, you can use a dedicated [Liquibase run configuration](#liquibase-run-configuration) to trigger the update and synchronize your database with your code. You can launch this run configuration from the [run widget](guided-tour-around-the-user-interface.html#toolbar) and from selected tool windows.
Procedure: Run the update from the run widget
> **Note:**
> To use this feature, you need to [create a Liquibase run configuration](#create-liquibase-run-configuration) first.
* If the Liquibase run configuration is already selected in the widget, click  Run.
* Alternatively, press `Shift+F10` (Windows), `⌃ R` (macOS), `⇧ F10` (IntelliJ IDEA Classic (macOS)), `⌥ ⇧ R` (macOS System Shortcuts), `Shift+F10` (XWin), `Shift+F10` (GNOME), `Shift+F10` (KDE), `Shift+F10` (Emacs), `Shift+F10` (Sublime Text), `Shift+F10` (Sublime Text (macOS)), `F6` (NetBeans), `Ctrl+F5` (Visual Studio), `⌃ F5` (Visual Studio (macOS)), `Alt+Shift+X` (Eclipse), `⌘ ⇧ F11` (Eclipse (macOS)).
* If another configuration is selected in the widget, click its name. In the popup that opens, find the Liquibase run configuration and click  Run next to it.
* Alternatively, press `Alt+Shift+F10` (Windows), `⌃ ⌥ R` (macOS), `⌥ ⇧ F10` (IntelliJ IDEA Classic (macOS)), `⌃ ⌥ R` (macOS System Shortcuts), `Alt+Shift+F10` (XWin), `Alt+Shift+F10` (GNOME), `Alt+Shift+F10` (KDE), `Alt+Shift+F10` (Emacs), `Alt+Shift+F10` (Sublime Text), `⌃ ⌥ R` (Sublime Text (macOS)), `Alt+Shift+F10` (NetBeans), `Ctrl+Alt+Shift+R` (Visual Studio), `⌘ ⌥ ⇧ R` (Visual Studio (macOS)), `Alt+Shift+F10` (Eclipse), `⌃ ⌥ R` (Eclipse (macOS)). In the popup that opens, select the Liquibase run configuration.
IntelliJ IDEA launches the Liquibase run configuration in the [Run tool window](run-tool-window.html).
Procedure: Run the update from a tool window
> **Note:**
> If there are no existing Liquibase run configurations when you use this feature, you will be prompted to [create
> one](#create-liquibase-run-configuration).
>
>
>
>  In [Spring](spring-support.html) projects, if there are no existing Liquibase run configurations when you use this feature, the IDE will try to create one based on your Spring Boot configuration file.
You can launch the Liquibase run configuration from the following tool windows:
* [Persistence](persistence-tool-window.html) tool window:
* Right-click anywhere in the tool window and select  Run Liquibase Update….
* [Database](database-tool-window.html) tool window:
* Go to the toolbar and select  Run Liquibase Update….
* Right-click a database, schema, or table, and select  Run Liquibase Update….
IntelliJ IDEA launches the Liquibase run configuration in the [Run tool window](run-tool-window.html).
Procedure: Run the update from the root changelog
> **Note:**
>  This feature is only available in [Spring](spring-support.html) projects.
>
>
>
> If there are no existing Liquibase run configurations when you use this feature, the IDE will try to create one based on your Spring Boot configuration file.
You can launch the Liquibase run configuration directly from your [root changelog](https://docs.liquibase.com/community/implementation-guide-5-0/set-up-your-changelog-structure) file if the `spring.liquibase.change-log` property in your configuration file points to it.
1. Open your root changelog file in the editor.
2. In the [gutter](editor-gutter.html), click  Run Liquibase Update….
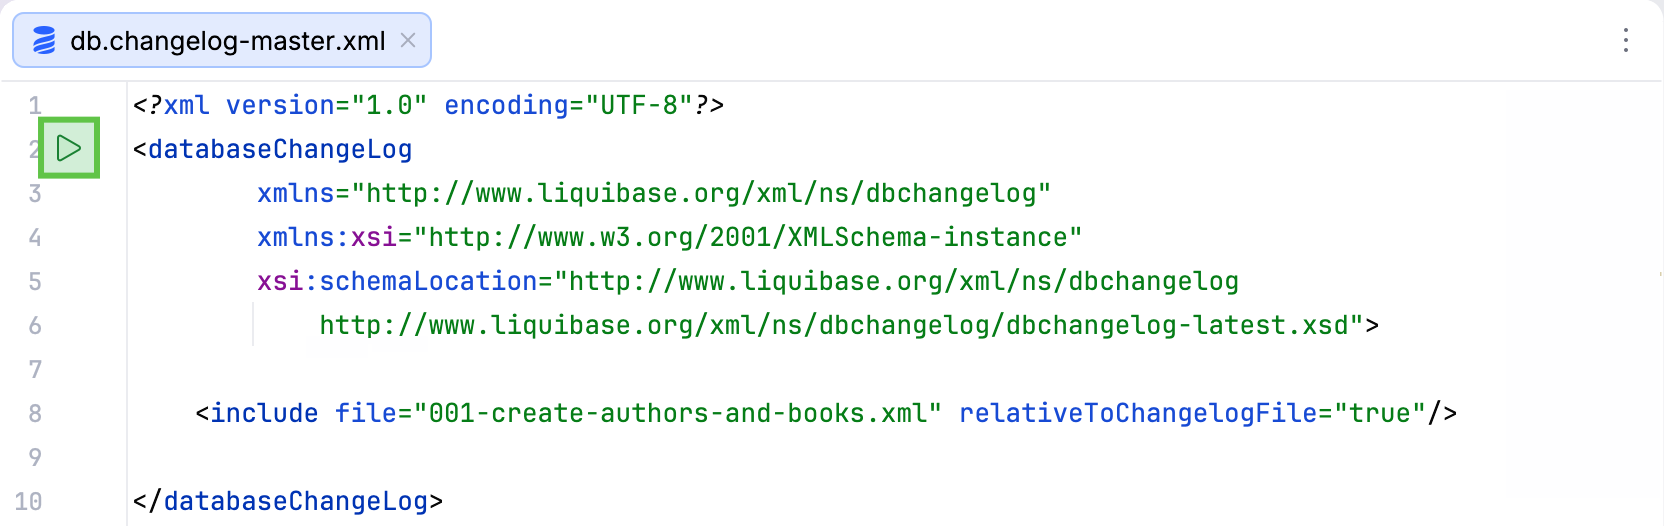
IntelliJ IDEA launches the Liquibase run configuration in the [Run tool window](run-tool-window.html).
Procedure: Run the update from the configuration file
You can launch the Liquibase run configuration from the following files:
* Liquibase configuration file (`liquibase.properties`)
* [Spring Boot](spring-boot.html) configuration file (`application.properties` or `application.yml`)
1. Open the configuration file in the editor.
2. In the [gutter](editor-gutter.html), click  Run Liquibase Update… .
> **Note:**
> If this icon is not displayed in your configuration file, refer to [the
> troubleshooting guide](#cannot-run-migrations-from-config-file).
IntelliJ IDEA launches the Liquibase run configuration in the [Run tool window](run-tool-window.html).
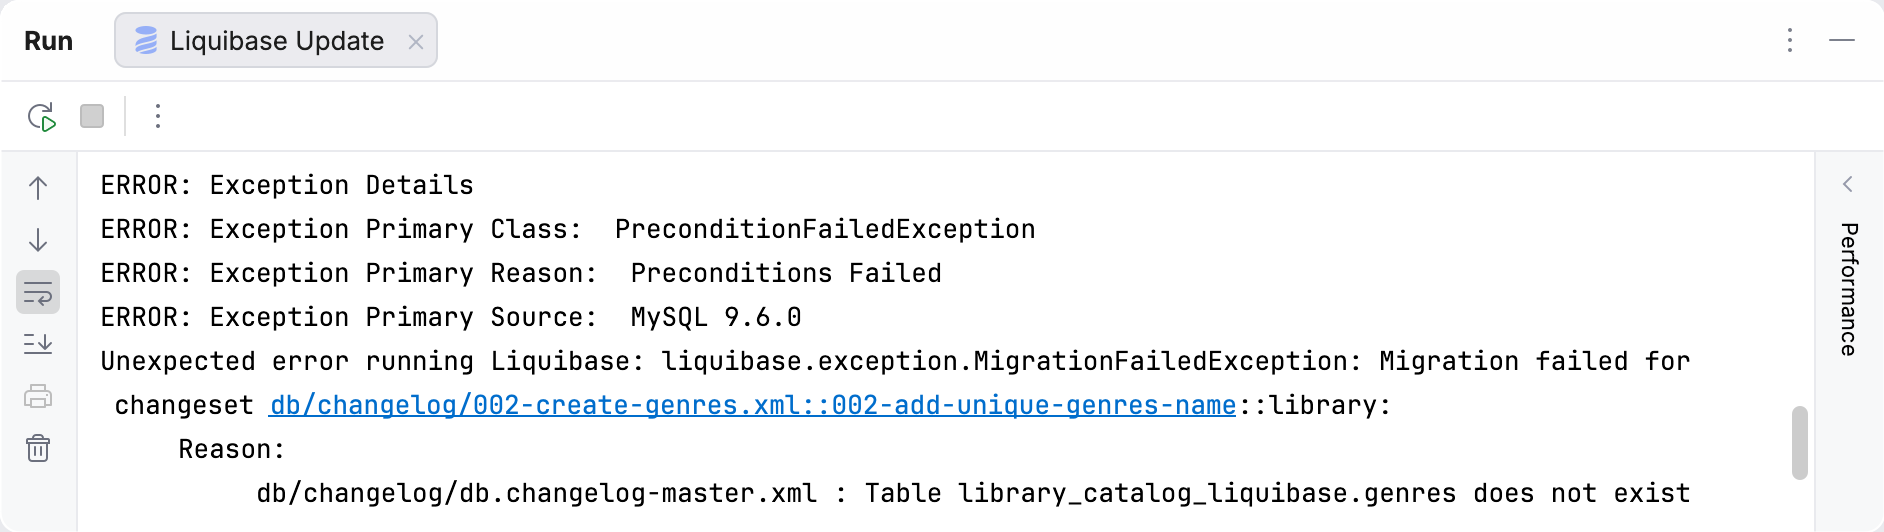
> **Tip:**
> If the update fails, the Run tool window provides a link to the changelog where the error occurred.
>
>
>
> 
>
> If you click the link, the IDE opens the changelog in the editor and places the caret at the changeset that caused the error.
### Statuses of changelogs and changesets
> **Note:**
> This feature is only available for changelogs written in YAML or XML.
Typically, if you want to check which changelogs were already applied, you need to either run Liquibase's [change tracking commands](https://docs.liquibase.com/secure/reference-guide-5-2/database-inspection-change-tracking-and-utility-commands/what-are-change-tracking-commands) or inspect its [changelog table](https://docs.liquibase.com/secure/user-guide-5-2/what-is-the-databasechangelog-table) in your database. IntelliJ IDEA provides a faster alternative by displaying the statuses of your changes directly in the IDE.
Statuses of whole changelog files are displayed in the Project tool window (`Alt+1` (Windows), `⌘ 1` (macOS), `⌘ 1` (IntelliJ IDEA Classic (macOS)), `⌘ 1` (macOS System Shortcuts), `Alt+1` (XWin), `Alt+1` (GNOME), `Alt+1` (KDE), `Alt+1` (Emacs), `Alt+1` (Sublime Text), `⌘ 1` (Sublime Text (macOS)), `Ctrl+1` (NetBeans), `Ctrl+Alt+L` (Visual Studio), `⌘ ⌥ L` (Visual Studio (macOS)), `Alt+1` (Eclipse), `Alt+1` (Eclipse (macOS))).
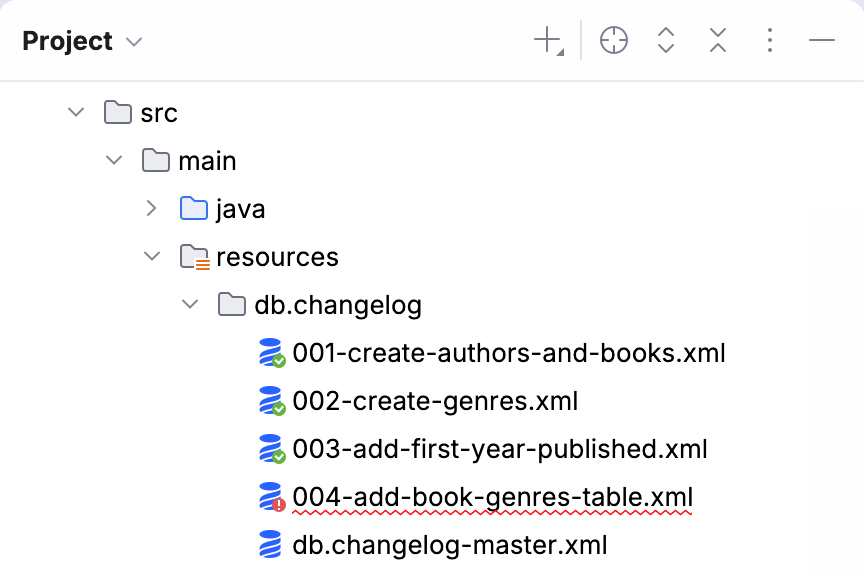
Each changelog is represented by the Liquibase logo (), and its status is reflected by a small icon in the logo's lower-right corner:
| Icon | Status |
| --- | --- |
|  | All changesets in the changelog were successfully applied to the database. |
|  | The changelog was run, but one of its changesets failed. You can find out more about the error by hovering over the file name. 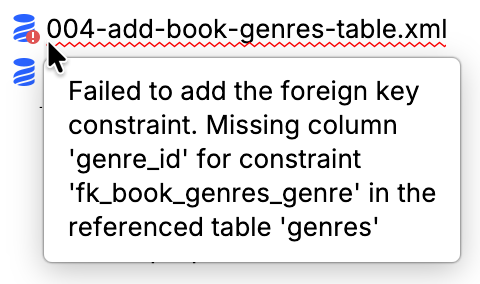 To check which changeset caused the error, open the underlined changelog in the editor and look for a red exclamation mark in the gutter. 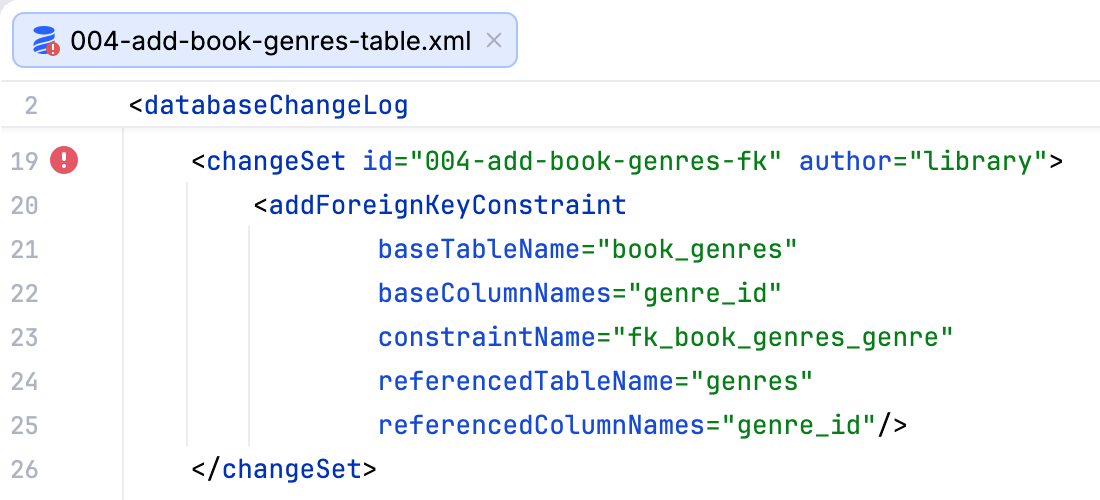 > **Note:** > The icon and the error details can only appear when you run the update from the IDE by doing one of the following: > > > > * [Launching a Liquibase run configuration](#deploy-changes) > > * [Launching a Spring Boot application](spring-boot.html#run-a-spring-boot-application) > > * [Running a liquibase:update Maven goal](work-with-maven-goals.html#run_goal) > > * [Running an update Gradle task](work-with-gradle-tasks.html#gradle_tasks) > > > > When you restart the IDE, both the icon and the error details are cleared. |
| (None) | Status icons are not displayed in the following cases: * The changelog has not been run yet. * The changelog was run before, but one of the changesets failed. > **Note:** > If status icons are not displayed for any changelogs, refer to [the troubleshooting guide](#changelogs-no-status-icons). |
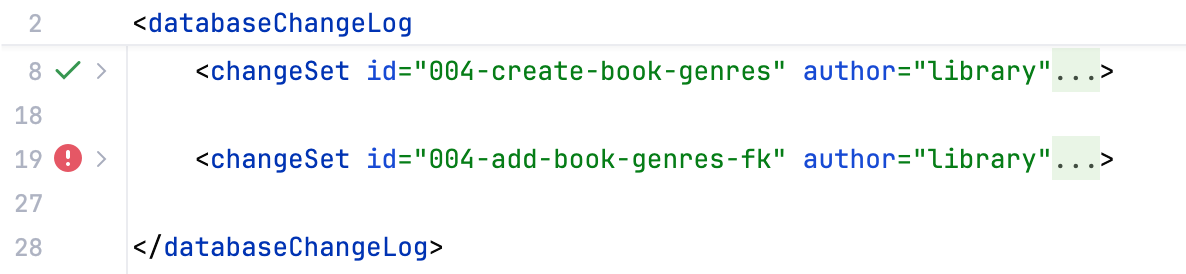
Statuses of particular changesets are displayed in the editor gutter when you open a changelog file.
## Liquibase run configuration
The Liquibase [run
configuration](run-debug-configuration.html) lets you deploy your changes to a connected database without having to run the whole application or use the terminal. Under the hood, this configuration runs the [Liquibase update command](https://docs.liquibase.com/secure/reference-guide-5-2/init-update-and-rollback-commands/update).
Procedure: Create a Liquibase run configuration
1. Open the Run/Debug Configurations dialog:
* In the main toolbar, click the [run widget](guided-tour-around-the-user-interface.html#toolbar) and select Edit Configurations….
* Alternatively, go to `Run | Edit Configurations…`.
2. On the left side of the dialog, select ` Add New Configuration |  Liquibase`.
3. Set up the [run configuration options.](#run-configuration-options)
 file. |
| DB connection | Select which database Liquibase should target when running the changelogs. You need to select an existing [data source](managing-data-sources.html) from the Database tool window or create a new one by clicking . |
#### Additional options
To add these options to your run configuration, select Modify options on the right side of the dialog and then select the relevant options from the list.
| Item | Description |
| --- | --- |
| Context | Specify [context filters](https://docs.liquibase.com/secure/reference-guide-5-2/changelog-attributes/what-are-contexts) to narrow down which changesets Liquibase will run during the update. In case of multiple values, separate them with commas. |
| Labels | Specify [label filters](https://docs.liquibase.com/secure/reference-guide-5-2/changelog-attributes/what-are-labels) to narrow down which changesets Liquibase will run during the update. In case of multiple values, separate them with commas. |
| Default schema | Specify the schema that Liquibase should manage. Learn more about this setting from [Liquibase's official documentation](https://docs.liquibase.com/secure/reference-guide-5-1-1/parameters/default-schema-name). |
| Liquibase schema | Specify the schema where Liquibase should create its [tracking tables](https://docs.liquibase.com/secure/user-guide-5-2/what-is-the-databasechangelog-table). Learn more about this setting from [Liquibase's official documentation](https://docs.liquibase.com/secure/reference-guide-5-2-1/parameters/liquibase-schema-name). |
| Log level | Select the minimum severity level that should be logged during the update. Learn more about this setting from [Liquibase's official documentation](https://docs.liquibase.com/secure/reference-guide-5-2/parameters/log-level). |
## Liquibase Settings
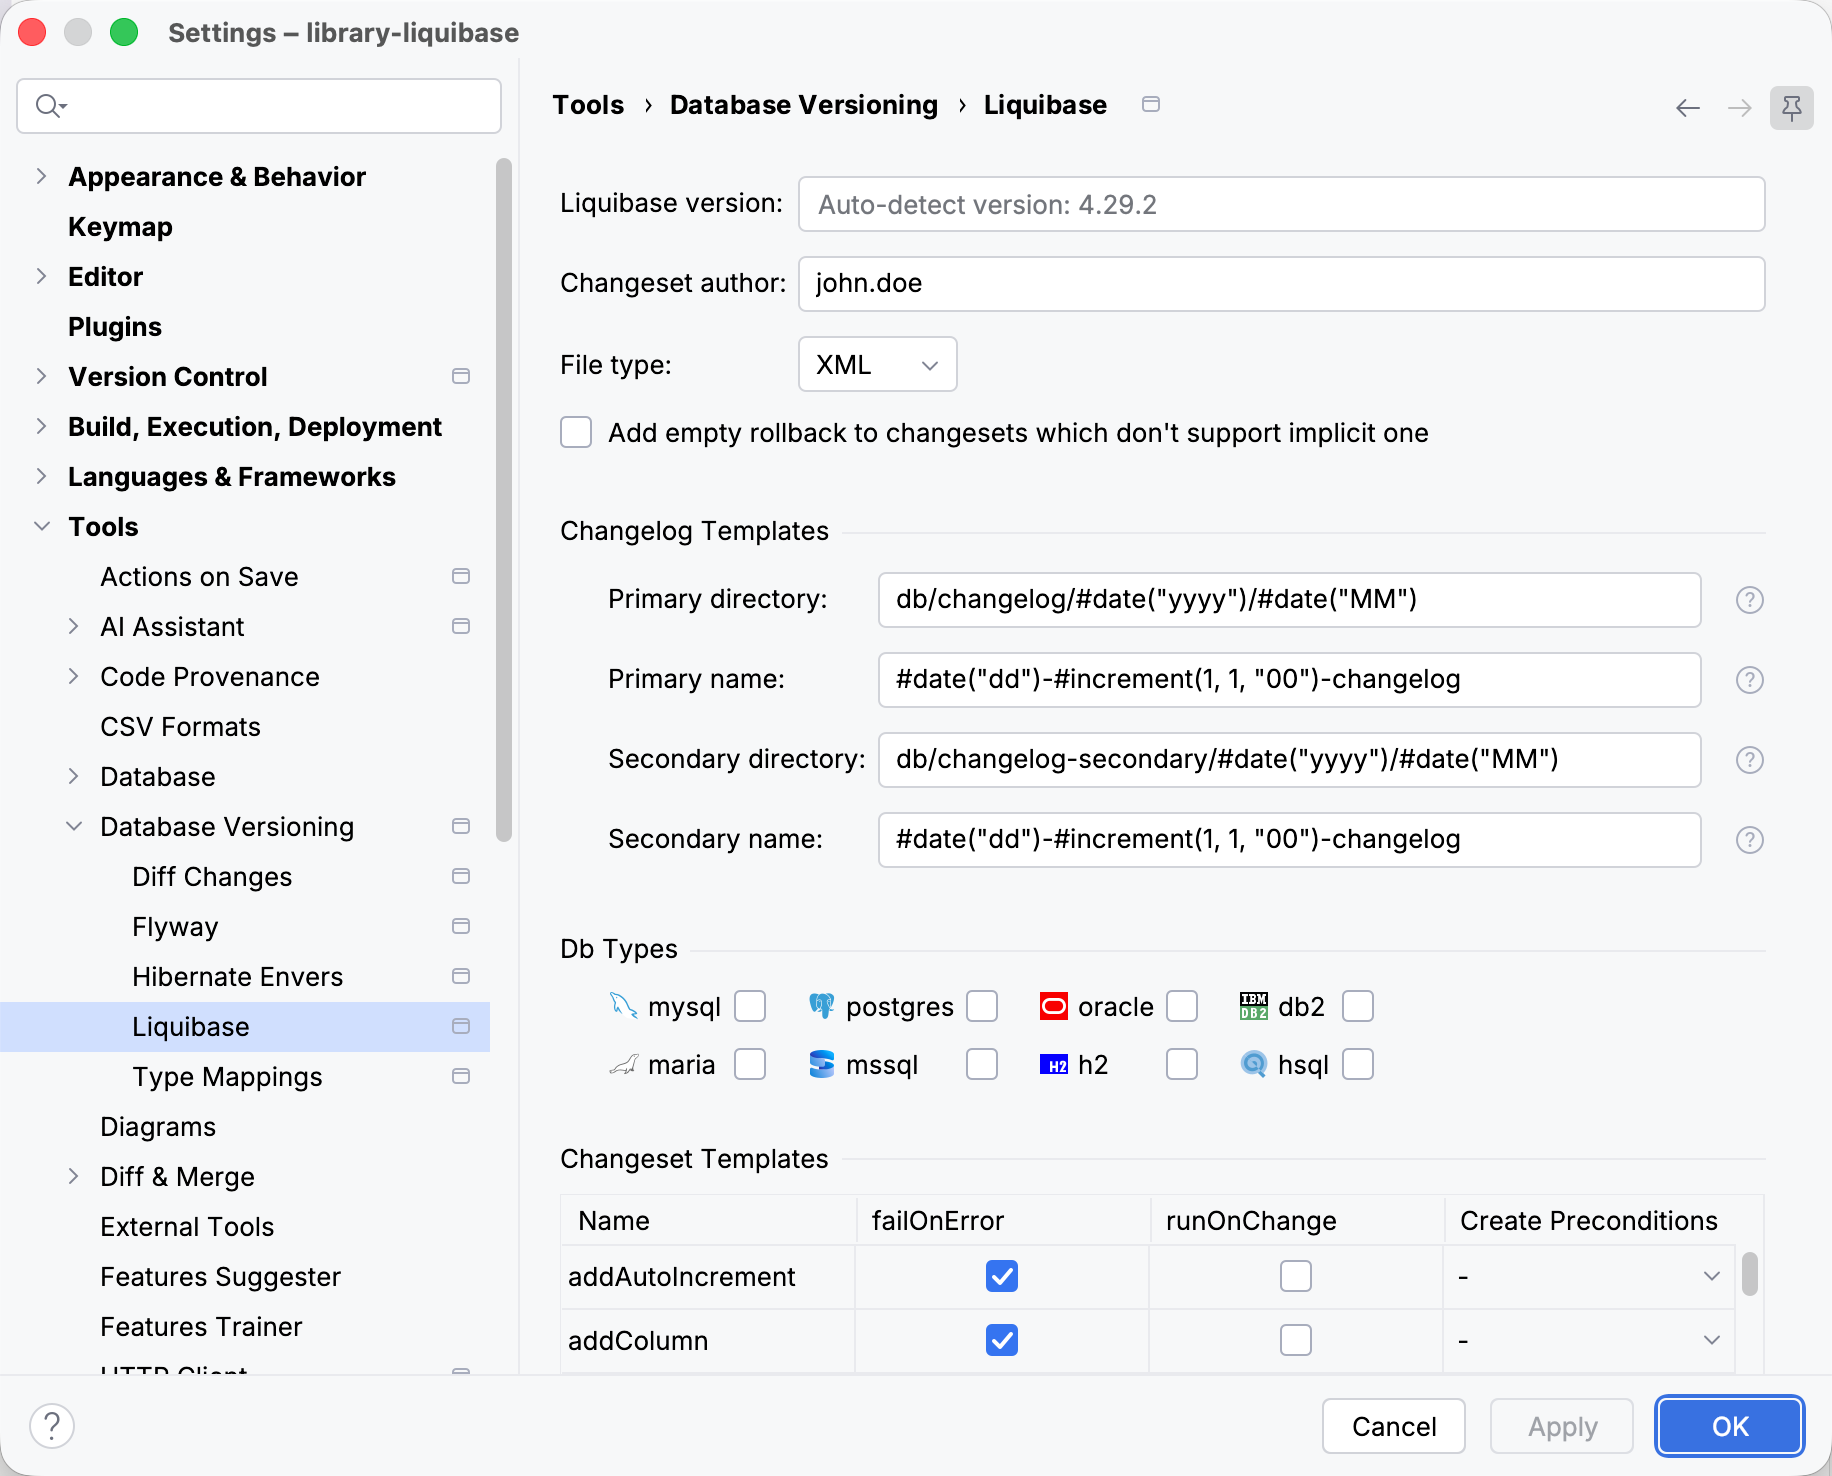
### Base settings
| Item | Description |
| --- | --- |
| Liquibase version | Specify which Liquibase version you want to use in the project. If you leave this field empty, the IDE will use the version from your build file. |
| Changeset author | Specify the value for the `author` attribute in generated changesets. If you leave this field empty, the IDE will use the username from your operating system. |
| File type | Select which language to use when generating changelogs: * XML * YAML * JSON * SQL |
| Add empty rollback to changesets which don't support implicit one | Automatically add an empty `rollback` tag to any changeset whose change type does not support [automatic rollbacks](https://docs.liquibase.com/community/user-guide-5-0-3/what-automatic-rollbacks-does-liquibase-support). To learn how to write rollback statements, refer to the [official Liquibase documentation](https://docs.liquibase.com/community/user-guide-5-0-3/create-custom-rollback-statements-in-liquibase). |
### Changelog Templates
Whenever an empty or differential Liquibase changelog is created, IntelliJ IDEA generates the file name based on the templates. You can configure primary/secondary directory and name of the changelogs.
The following variables and macros are available for the precise configuration:
* `#increment(, , )`: generate versions using a numeric sequence. * `start`: version number for the first migration * `step`: value to increase each version number by * `decimalFormat`: [DecimalFormat](https://docs.oracle.com/en/java/javase/26/docs/api/java.base/java/text/DecimalFormat.html) pattern used to format the version number
* `#date()`: generate versions using the current system date. * `simpleDateFormat`: [SimpleDateFormat](https://docs.oracle.com/en/java/javase/26/docs/api/java.base/java/text/SimpleDateFormat.html) pattern used to format the date
* `${semVer.}`: generate versions using the [semantic version](https://en.wikipedia.org/wiki/Software_versioning#Semantic_versioning) from the project's build file. * `getterMethod`: method that extracts a specific segment of the semantic version. Here are examples for a `1.2.3-SNAPSHOT+build4` version: * `${semVer.getRawVersion()}`: 1.2.3-SNAPSHOT+build4 * `${semVer.getMajor()}`: 1 * `${semVer.getMinor()}`: 2 * `${semVer.getPatch()}`: 3 * `${semVer.getPreRelease()}`: SNAPSHOT
### DB Types
Sometimes software must provide support for a few DBMS types. In this case, Liquibase is the best choice, as it offers a cross-DB solution to declare DDL modifications. IntelliJ IDEA supports this solution as well. When generating cross-DB changelogs, it uses Liquibase properties to specify correct data types for each DBMS:
```XML
```
Therefore, there is no need to create separate changelogs for different DBMSes.
### Changeset Templates
The Changeset Templates settings let you preconfigure commonly used changeset attributes for each [change type](https://docs.liquibase.com/community/reference-guide-5-0-3/change-types/what-is-a-change-type). IntelliJ IDEA will automatically insert them into the relevant changesets every time you [generate a changelog](#generate-migration-script).
| Item | Description |
| --- | --- |
| [failOnError](https://docs.liquibase.com/community/reference-guide-5-0-3/changelog-attributes/failonerror) | Select what Liquibase should do if it encounters an error while executing the changeset: * If you select this option, Liquibase stops the update process. * If you clear this option, Liquibase suppresses the error and executes subsequent changesets. |
| [runOnChange](https://docs.liquibase.com/community/reference-guide-5-0-3/changelog-attributes/runonchange) | Select what Liquibase should do if it detects that an already executed changeset has been modified: * If you select this option, Liquibase reruns the changeset. * If you clear this option, Liquibase throws an exception and stops the update process. |
| Create Preconditions | Automatically add relevant [preconditions](https://docs.liquibase.com/community/user-guide-5-0-3/what-are-preconditions) to the changeset and select what Liquibase should do if they are not met: * HALT: stop the update process. * CONTINUE: skip the changeset and execute subsequent changesets. On the next update, try to execute the skipped changeset again. * MARK_RAN: skip the changeset, mark it as executed, and execute subsequent changesets. * WARN: log a warning and execute the changeset regardless. |
## JPA Buddy features
You can install the JPA Buddy plugin to get even more support for Liquibase:
* [JPA Designer](#jpa-designer)
* [Editor toolbar](#editor-toolbar)
### JPA Designer
The JPA Designer tool window lets you generate and modify code.
> **Note:**
> JPA Designer can also be shown as a tab in the JPA Buddy tool window depending on the [visual designer settings](jpa-buddy-entity-designer.html#designer-settings).
In the upper part of the tool window (JPA Palette), select an action for example, Create, and then double-click an element, for example, Table.
The lower part of the tool window (JPA Inspector) adapts to the selected element of the changelog, for example, a changeSet, and allows you to modify its attributes.
To learn more about JPA Designer, refer to [Entity Designer](jpa-buddy-entity-designer.html).
### Editor toolbar
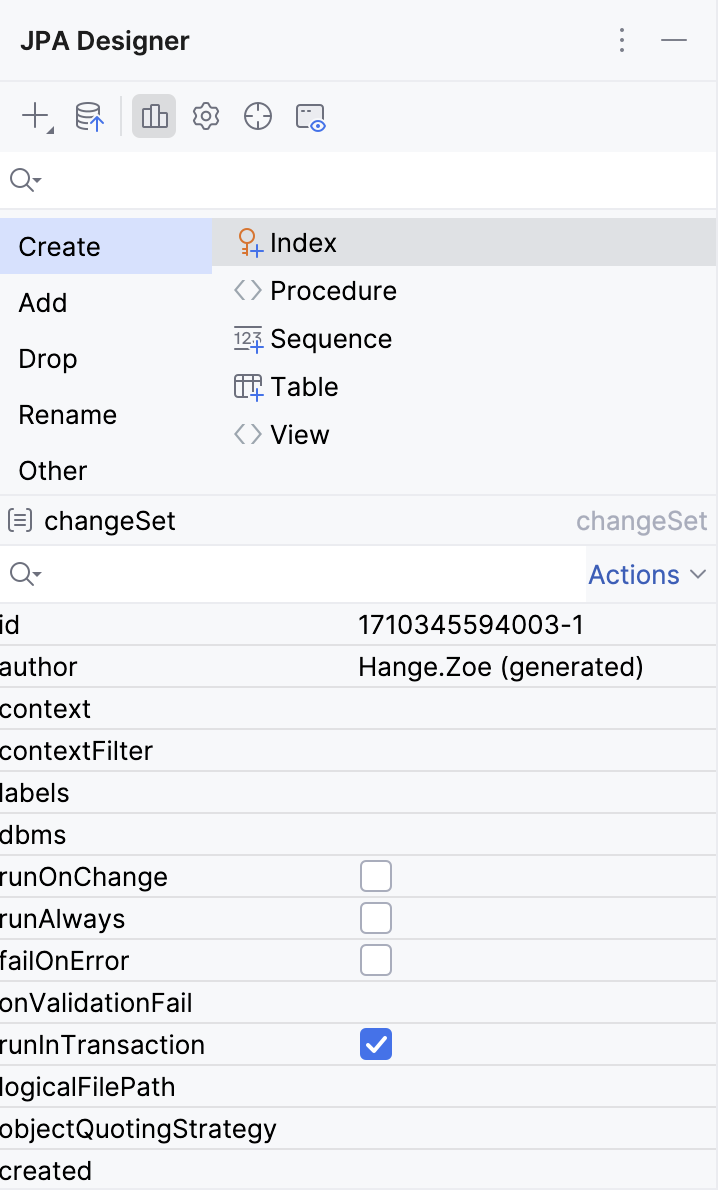
The Editor Toolbar provides fast access to relevant actions. It includes:
1. An action to select the opened file in JPA Structure
2. All actions from JPA Palette
3. Init Schema Changelog action
4. Diff Changelog action
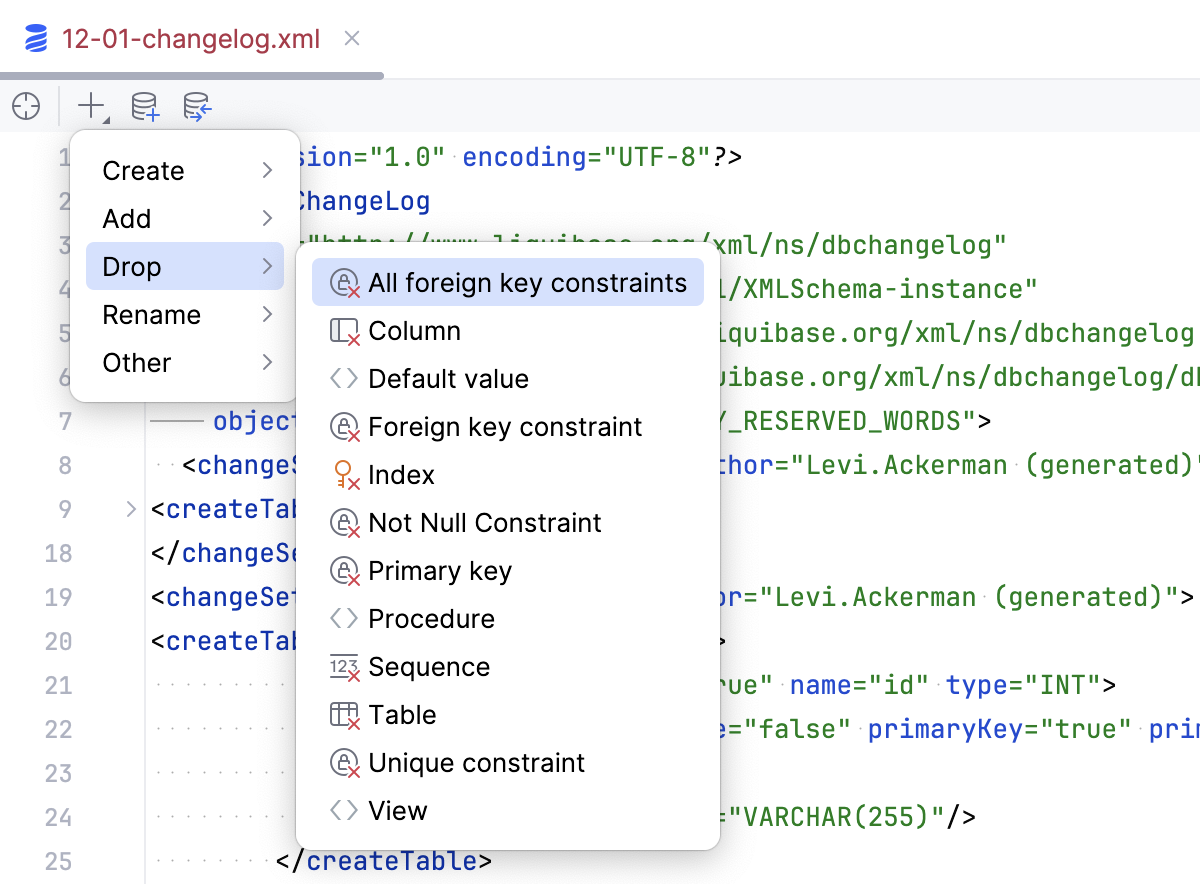
JPA Buddy understands your data model and prefills the changesets as much as possible. And with the help of JPA Inspector you can explore the attributes of each changelog element:
[Video](https://www.youtube.com/v/zZhOW5hvlK8)
## Troubleshooting
Spring projects:
Cannot run the migration process from the configuration file
: Make sure that:
:
:
:
: * You [added the Liquibase dependency](#add-to-existing-project) to your project's build file.
:
: * You [connected to the corresponding database](connecting-to-a-database.html), and the connection is active in the Database tool window.
:
: * Your configuration file (`application.properties` or `application.yml`) meets the following criteria: * `spring.liquibase.change-log` points to your root changelog file. * `spring.liquibase.url` or `spring.datasource.url` matches the URL you used to connect to the database.
Changelogs or changesets are displayed without status icons
: Make sure that:
:
:
:
: * You [added the Liquibase dependency](#add-to-existing-project) to your project's build file.
:
: * You [connected to the corresponding database](connecting-to-a-database.html), and the connection is active in the Database tool window.
:
: * Your configuration file (`application.properties` or `application.yml`) meets the following criteria: * `spring.liquibase.change-log` points to your root changelog file. * `spring.liquibase.url` or `spring.datasource.url` matches the URL you used to connect to the database. * `spring.liquibase.default-schema` matches the database schema you updated.
:
: * You already [ran a Liquibase update](#deploy-changes), and its results were recorded in the [database changelog table](https://docs.liquibase.com/secure/user-guide-5-2/what-is-the-databasechangelog-table).
Non-Spring projects:
Cannot run the migration process from the configuration file
: Make sure that:
:
:
:
: * You [added the Liquibase dependency](#add-to-existing-project) to your project's build file.
:
: * You [connected to the corresponding database](connecting-to-a-database.html), and the connection is active in the Database tool window.
:
: * Your configuration file (`liquibase.properties`) meets the following criteria: * `changeLogFile` points to your root changelog file. * `url` matches the URL you used to connect to the database.
Migrations are displayed without status icons
: Make sure that:
:
:
:
:
:
: * You [added the Liquibase dependency](#add-to-existing-project) to your project's build file.
:
: * You [connected to the corresponding database](connecting-to-a-database.html), and the connection is active in the Database tool window.
:
: * Your configuration file (`liquibase.properties`) meets the following criteria: * `changeLogFile` points to your root changelog file. * `url` matches the URL you used to connect to the database. * `defaultSchemaName` matches the database schema you updated.
:
: * You already [ran a Liquibase update](#deploy-changes), and its results were recorded in the [database changelog table](https://docs.liquibase.com/secure/user-guide-5-2/what-is-the-databasechangelog-table).