Code Style. Java
Use this page to configure formatting options for Java files. When you change these settings, the Preview pane shows how this will affect your code.
Tabs and Indents
Item | Description |
|---|---|
Use tab character | Use the Tab key for indentation. When the checkbox is cleared, IntelliJ IDEA uses spaces instead of tabs. |
Smart tabs |
The Smart tabs checkbox is available if the Use tab character option is enabled. |
Tab size | In this field, specify the number of spaces included in a tab. |
Indent | In this field, specify the number of spaces to be inserted for each indent level. |
Continuation indent | Specify the indentation for lines that continue from the previous line, making it clear that they are part of the same statement or block of code. Continuation indents are used when a single statement is too long to fit on one line. |
Keep indents on empty lines | If this checkbox is selected, IntelliJ IDEA will keep indents on the empty lines as if they contained some code. If this checkbox is cleared, IntelliJ IDEA will delete the tab characters and spaces. |
Label indent | In this field, specify the number of spaces to be inserted at the next line before a label statement. |
Absolute label indent | If this checkbox is selected, label indentation is counted as an absolute number of spaces. Otherwise, label indentation is counted relative to previous indent levels. |
Do not indent top level class members | Select this checkbox to have top level class members located at the class declaration indentation level. |
Use indents relative to expression start | Use this checkbox to switch between the two possible indentation behaviors:
|
Spaces
Select or clear the checkboxes to insert, not to insert, or remove spaces in various contexts.
Before parenthesis
Item | Example |
|---|---|
Method declaration parentheses | If selected, a space is inserted before the opening parenthesis in method declarations. Otherwise, no space is inserted.
public void foo (int x, int y) {}
public void foo(int x, int y) {}
|
Method call parentheses | If selected, a space is inserted before the opening parenthesis in method calls. Otherwise, no space is inserted.
System.out.print (a);
System.out.print(a);
|
'if' parentheses | If selected, a space is inserted before the opening parenthesis in
if (0 < x && x < 10) {}
if(0 < x && x < 10) {}
|
'for' parentheses | If selected, a space is inserted before the opening parenthesis in
for (int i = 0; i < x; i++) {}
for(int i = 0; i < x; i++) {}
|
'while' parentheses | If selected, a space is inserted before the opening parenthesis in
while (x != y) {}
while(x != y) {}
|
'switch' parentheses | If selected, a space is inserted before the opening parenthesis in
switch (e.getCode()) {}
switch(e.getCode()) {}
|
'try' parentheses | If selected, a space is inserted before the opening parenthesis in
try (Res r1 = getResource(); Res r2 = null) {}
try(Res r1 = getResource(); Res r2 = null) {}
|
'catch' parentheses | If selected, a space is inserted before the opening parenthesis in
catch (MyException e) {}
catch(MyException e) {}
|
'synchronized' parentheses | If selected, a space is inserted before the opening parenthesis in
synchronized (this) {}
synchronized(this) {}
|
Annotation parameters | If selected, a space is inserted before the opening parenthesis of annotation parameters. Otherwise, no space is inserted.
@SuppressWarnings ({"ALL"})
@SuppressWarnings({"ALL"})
|
Deconstruction list | If selected, a space is inserted before the opening parenthesis in deconstruction patterns. Otherwise, no space is inserted.
case Rec (String s, int i) r -> {}
case Rec(String s, int i) r -> {}
|
Around operators
Item | Example |
|---|---|
Assignment operators (=, +=, ...) | If selected, spaces are inserted around assignment operators in assignment expressions. Otherwise, no spaces are inserted.
int[] empty = new int[]{};
int[] empty=new int[]{};
|
Logical operators (&&, ||) | If selected, spaces are inserted around logical operators in logical expressions. Otherwise, no spaces are inserted.
public void checkValue() {
if (0 < x && x < 10) {
}
}
public void checkValue() {
if (0 < x && x < 10) {
}
}
|
Equality operators (==, !=) | If selected, spaces are inserted around equality operators in comparison expressions. Otherwise, no spaces are inserted.
while (x != y) {}
while (x!=y) {}
|
Relational operators (<,>,<=,>=) | If selected, spaces are inserted around relational operators in comparison expressions. Otherwise, no spaces are inserted.
if (0 < x && x < 10) {}
if (0<x &&x< 10) {}
|
Bitwise operators (&, |, ^) | If selected, spaces are inserted around bitwise operators. Otherwise, no spaces are inserted.
y += (y ^ 0x123) << 2;
y += (y^0x123) << 2;
|
Additive operators (+, -) | If selected, spaces are inserted around additive operators. Otherwise, no spaces are inserted.
x = f(x * 3 + 5);
x = f(x * 3+5);
|
Multiplicative operators (*, /, %) | If selected, spaces are inserted around multiplicative operators. Otherwise, no spaces are inserted.
x = f(x * 3 + 5);
x = f(x*3 + 5);
|
Shift operators (<<, >>, >>>) | If selected, spaces are inserted around bit shifting operators. Otherwise, no spaces are inserted.
y += (y ^ 0x123) << 2;
y += (y ^ 0x123)<<2;
|
Unary operators (!,-,+,++,--) | If selected, spaces are inserted around unary operators. Otherwise, no spaces are inserted.
x = y >= 0 ? arr[y] : - 1;
x = y >= 0 ? arr[y] : -1;
|
Lambda arrow | If selected, spaces are inserted around lambda arrows. Otherwise, no spaces are inserted.
Runnable r = () -> {};
Runnable r = ()->{};
|
Method reference double colon | If selected, a space is inserted around method reference double colons. Otherwise, no space is inserted.
Runnable r1 = this :: bar;
Runnable r1 = this::bar;
|
Before left brace
Item | Example |
|---|---|
Class left brace | If selected, a space is inserted between the class name and the opening brace in class declarations. Otherwise, no space is inserted.
public class Main {
}
public class Main{
}
Selecting or clearing the checkbox is relevant only when Braces placement for In class declaration is set to End of line on the Wrapping and Braces tab. |
Method left brace | If selected, a space is inserted between the method parameters' list closing parenthesis and the opening brace in method declarations. Otherwise, no space is inserted.
public int add(int a, int b) {
}
public int add(int a, int b){
}
Selecting or clearing the checkbox is relevant only when Braces placement for In method declaration is set to End of line on the Wrapping and Braces tab. |
'if' left brace | If selected, a space is inserted between the conditional expression's closing parenthesis and the opening brace in
if (0 < x && x < 10) {
}
if (0 < x && x < 10){
}
Selecting or clearing the checkbox is relevant only when Braces placement for Other is set to End of line on the Wrapping and Braces tab. |
'else' left brace | If selected, a space is inserted between the
if (x) {
System.out.println("Hello from x!");
} else {
System.out.println(y);
}
if (x) {
System.out.println("Hello from x!");
} else{
System.out.println(y);
}
Selecting or clearing the checkbox is relevant only when Braces placement for Other is set to End of line on the Wrapping and Braces tab. |
'for' left brace | If selected, a space is inserted between the conditional expression's closing parenthesis and the opening brace in
for (int a : X) {
System.out.print(a);
}
for (int a : X){
System.out.print(a);
}
Selecting or clearing the checkbox is relevant only when Braces placement for Other is set to End of line on the Wrapping and Braces tab. |
'while' left brace | If selected, a space is inserted between the conditional expression's closing parenthesis and the opening brace in
while (x != y) {
x = f(x * 3 + 5);
}
while (x != y){
x = f(x * 3 + 5);
}
Selecting or clearing the checkbox is relevant only when Braces placement for Other is set to End of line on the Wrapping and Braces tab. |
'do' left brace | If selected, a space is inserted between the
do {
System.out.println("Count is: " + count);
count++;
} while (count <= 3);
do{
System.out.println("Count is: " + count);
count++;
} while (count <= 3);
Selecting or clearing the checkbox is relevant only when Braces placement for Other is set to End of line on the Wrapping and Braces tab. |
'switch' left brace | If selected, a space is inserted between the conditional expression's closing parenthesis and the opening brace in
switch (e.getCode()) {
}
switch (e.getCode()){
}
Selecting or clearing the checkbox is relevant only when Braces placement for Other is set to End of line on the Wrapping and Braces tab. |
'try' left brace | If selected, a space is inserted between the
try {
get("x");
} catch (Exception e) {
}
try{
get("x");
} catch (Exception e) {
}
Selecting or clearing the checkbox is relevant only when Braces placement for Other is set to End of line on the Wrapping and Braces tab. |
'catch' left brace | If selected, a space is inserted between the
try {
get("x");
} catch (Exception e) {
}
try {
get("x");
} catch (Exception e){
}
Selecting or clearing the checkbox is relevant only when Braces placement for Other is set to End of line on the Wrapping and Braces tab. |
'finally' left brace | If selected, a space is inserted between the
try {
get("x");
} catch (Exception e) {
} finally {
}
try {
get("x");
} catch (Exception e) {
} finally{
}
Selecting or clearing the checkbox is relevant only when Braces placement for Other is set to End of line on the Wrapping and Braces tab. |
'synchronized' left brace | If selected, a space is inserted between the
synchronized (this) {
switch (e.getCode()) {
}
synchronized (this){
switch (e.getCode()) {
}
Selecting or clearing the checkbox is relevant only when Braces placement for Other is set to End of line on the Wrapping and Braces tab. |
Array initializer left brace | If selected, a space is inserted before the left brace of an array initializer. Otherwise, no space is inserted.
int[] empty = new int[] {};
int[] empty = new int[]{};
Selecting or clearing the checkbox is relevant only when Braces placement for Other is set to End of line on the Wrapping and Braces tab. |
Annotation array initializer left brace | If selected, a space is inserted before the left brace of an array initializer. Otherwise, no space is inserted.
@SuppressWarnings( {"ALL"})
@SuppressWarnings({"ALL"})
Selecting or clearing the checkbox is relevant only when Braces placement for Other is set to End of line on the Wrapping and Braces tab. |
Before keywords
Item | Description |
|---|---|
'else' keyword | If selected, a space is inserted between the closing brace of an
if (x) {
System.out.println("Hello from x!");
} else {
System.out.println(y);
}
if (x) {
System.out.println("Hello from x!");
}else {
System.out.println(y);
}
|
'while' keyword | If selected, a space is inserted between the closing brace of a
do {
System.out.println("Count is: " + count);
count++;
} while (count <= 3);
do {
System.out.println("Count is: " + count);
count++;
}while (count <= 3);
|
'catch' keyword | If selected, a space is inserted between the closing brace of a
try {
get("x");
} catch (Exception e) {
}
try {
get("x");
}catch (Exception e) {
}
|
'finally' keyword | If selected, a space is inserted between the closing brace of a
try {
get("x");
} catch (Exception e) {
} finally {
}
try {
get("x");
} catch (Exception e) {
}finally {
}
|
Within
Item | Description |
|---|---|
Code braces | If selected, spaces within code braces are always inserted. Otherwise, spaces are never inserted. |
Brackets | If selected, spaces within brackets are always inserted. Otherwise, spaces are never inserted.
x = y >= 0 ? arr[ y ] : -1;
x = y >= 0 ? arr[y] : -1;
|
Array initializer braces | If selected, spaces inside parentheses in array initializer expressions are always inserted. Otherwise, no spaces are inserted.
int[] numbers = { 1, 2, 3, 4, 5 };
int[] numbers = {1, 2, 3, 4, 5};
|
Empty array initializer braces | If selected, spaces are inserted within the braces of an empty array initializer
int[] empty = new int[]{ };
int[] empty = new int[]{};
|
Grouping parentheses | If selected, spaces inside grouping parentheses in complex expressions are always inserted. Otherwise, no spaces are inserted.
y += ( y ^ 0x123 ) << 2;
y += (y ^ 0x123) << 2;
|
Method declaration parentheses | If selected, spaces are inserted within method declaration parentheses. Otherwise, no spaces are inserted.
public void foo( int x, int y ){
}
public void foo(int x, int y){
}
|
Empty method declaration parentheses | If selected, spaces are inserted within the empty method declaration parentheses. Otherwise, no spaces are inserted.
Runnable r = ( ) -> {
};
Runnable r = () -> {
};
|
Method call parentheses | If selected, spaces are inserted within method call parentheses. Otherwise, no spaces are inserted.
System.out.println( "Hello, World!" );
System.out.println("Hello, World!");
|
Empty method call parentheses | If selected, spaces are inserted within the empty method call parentheses. Otherwise, no spaces are inserted.
switch (e.getCode( )) {
}
switch (e.getCode()) {
}
|
'if' parentheses | If selected, spaces inside parentheses in
for (int num : numbers) {
if ( x ) {
System.out.println("Hello from x!");
} else {
System.out.println(y);
}
}
for (int num : numbers) {
if (x) {
System.out.println("Hello from x!");
} else {
System.out.println(y);
}
}
|
'for' parentheses | If selected, spaces inside parentheses in
for ( int a : X ) {
System.out.print(a);
}
for (int a : X) {
System.out.print(a);
}
|
'while' parentheses | If selected, spaces inside parentheses in
while ( x != y ) {
x = f(x * 3 + 5);
}
while (x != y){
x = f(x * 3 + 5);
}
|
'switch' parentheses | If selected, spaces inside parentheses in
switch ( e.getCode() ) {
}
switch (e.getCode()){
}
|
'try' parentheses | If selected, spaces inside parentheses in
try ( MyRes r1 = getRes(); MyRes r2 = null ) {
}
try (MyRes r1 = getRes(); MyRes r2 = null) {
}
|
'catch' parentheses | If selected, spaces inside parentheses in
try {
get("x");
} catch ( Exception e ) {
}
try{
get("x");
} catch (Exception e) {
}
|
'synchronized' parentheses | If selected, spaces inside parentheses in
synchronized ( this ) {
switch ( e.getCode() ) {
}
synchronized (this) {
switch ( e.getCode() ) {
}
|
Type cast parentheses | If selected, spaces inside type cast parentheses are always inserted. Otherwise, no spaces are inserted.
int[] arr = ( int[] )g(y);
int[] arr = (int[])g(y);
|
Annotation parentheses | If selected, spaces inside annotation parentheses are always inserted. Otherwise, no spaces are inserted.
@SuppressWarnings( {"ALL"} )
@SuppressWarnings({"ALL"})
|
Angle brackets | If selected, spaces inside angle brackets are always inserted. Otherwise, no spaces are inserted.
class Bar{
static < U, T > U mess(T t){
return null;
}
}
class Bar{
static <U, T> U mess(T t){
return null;
}
}
|
Record header | If selected, spaces inside record headers are always inserted. Otherwise, no spaces are inserted.
record Rec( String s, int i ){
}
record Rec(String s, int i){
}
|
Deconstruction list | If selected, spaces inside deconstruction lists are always inserted. Otherwise, no spaces are inserted.
switch ( o ) {
case Rec( String s, int i ) r -> {
}
}
switch ( o ) {
case Rec(String s, int i) r -> {
}
}
|
Inside block braces when body is present | If selected, spaces inside deconstruction lists are always inserted. Otherwise, no spaces are inserted.
if (true) {
System.out.println( "Condition is true" );
}
if (true){
System.out.println( "Condition is true" );
}
|
In ternary operator (?:)
Item | Description |
|---|---|
Before '?' After '?' Before ':' After ':' Between '?' and ':' | Select the checkboxes in this section to have spaces automatically inserted around For example, if Before '?' and After ':' are selected, IntelliJ IDEA automatically inserts spaces before
x=y>=0 ?arr[y]: -1;
x=y>=0?arr[y]:-1;
|
Type arguments
Item | Description |
|---|---|
After comma | If selected, spaces are inserted after commas in type arguments with multiple types. Otherwise, no spaces are inserted.
Bar.<String, Integer>mess(null);
Bar.<String,Integer>mess(null);
|
Before opening angle bracket | If selected, spaces are inserted before opening angle brackets in type arguments. Otherwise, no spaces are inserted.
Bar. <String,Integer>mess(null);
Bar.<String,Integer>mess(null);
|
After closing angle bracket | If selected, spaces are inserted after closing angle brackets in type arguments. Otherwise, no spaces are inserted.
Bar.<String,Integer>mess(null);
Bar.<String,Integer> mess(null);
|
Other
Item | Description |
|---|---|
Before comma | If selected, spaces are automatically inserted before commas in parameter lists, argument lists, array declarations, and so on. Otherwise, no spaces are inserted.
public void foo(int x ,int y){
}
public void foo(int x,int y){
}
|
After comma | If selected, spaces are automatically inserted after commas in parameter lists, argument lists, array declarations, and so on. Otherwise, no spaces are inserted.
public void foo(int x,int y){
}
public void foo(int x, int y){
}
|
Before 'for' semicolon | If selected, spaces are automatically inserted before semicolons in
for(int i=0 ;i<x ;i++){
y+=(y^0x123)<<2;
}
for(int i=0;i<x;i++){
y+=(y^0x123)<<2;
}
|
After 'for' semicolon | If selected, spaces are automatically inserted after semicolons in
for(int i=0; i<x; i++){
y+=(y^0x123)<<2;
}
for(int i=0;i<x;i++){
y+=(y^0x123)<<2;
}
|
After type cast | If selected, a space is automatically inserted after the closing parenthesis of a cast. Otherwise, no space is inserted and the casted variable sticks to the cast.
int[] arr=(int[]) g(y);
int[] arr=(int[])g(y);
|
Around '=' in annotation value pair | If selected, spaces are automatically inserted around the
@Annotation(param1 = "value1", param2 = "value2")
@Annotation(param1="value1", param2="value2")
|
Before colon in foreach | If selected, a space is automatically inserted before a colon in
for(int a : X){
System.out.print(a);
}
for(int a: X){
System.out.print(a);
}
|
Inside one line enum braces | If selected, spaces are automatically inserted inside the braces of one-line enums around the list of constants. Otherwise, no spaces are inserted.
public enum Day{ MONDAY,TUESDAY,WEDNESDAY }
public enum Day{MONDAY,TUESDAY,WEDNESDAY}
|
Type parameters
Item | Description |
|---|---|
Before opening angle bracket | If selected, a space is automatically inserted before an opening angle bracket of a type parameter. Otherwise, no space is inserted.
public class Foo <T extends Bar&Abba,U>{
public class Foo<T extends Bar&Abba,U>{
|
Around type bounds | If selected, spaces are automatically inserted around type bounds of a type parameter. Otherwise, no space is inserted.
public class Foo <T extends Bar&Abba,U>{
public class Foo<T extends Bar&Abba,U>{
|
Wrapping and Braces
In this tab, customize the code style options, which IntelliJ IDEA will apply on reformatting the source code. The left-hand pane contains the list of exceptions (Keep when reformatting), and placement and alignment options for the various code constructs (lists, statements, operations, annotations, and so on). The right-hand pane shows the preview.
Hard wrap at
Use the Hard wrap at field to specify a margin space required on the right side of an element. If you select the Default option, then a value of the right margin from the global settings is used.
Wrap on typing
Use the Wrap on typing settings to specify how the edited text is fitted in the specified Hard wrap at:
Default: in this case IntelliJ IDEA uses the Wrap on typing option that is specified in the global settings.
Yes: in this case IntelliJ IDEA uses the value specified in the Right Margin field.
No: in this case this option is switched off and a line can exceed the value specified in the right margin.
Visual guides
Use the Visual guides field to specify multiple right margins. You can leave a default value or enter the number of spaces for your margin. If you want to specify several margins, enter numbers separated by comma.
Keep when reformatting
Use the checkboxes to configure exceptions that IntelliJ IDEA will make when reformatting the source code. For example, by default, the Line breaks checkbox is selected. If your code contains lines that are shorter than a standard convention, you can convert them by disabling the Line breaks checkbox before you reformat the source code.
Wrapping options
The wrapping style applies to the various code constructs, specified in the left-hand pane (for example, method call arguments, method declaration parameters, or assignment statements).
Item | Description |
|---|---|
Wrapping style | From this list, select the desired wrapping style:
|
Alignment options
Item | Description |
|---|---|
Align when multiline | If this checkbox is selected, a code construct starts at the same column on each next line. Otherwise, the position of a code construct is determined by the current indentation level. |
| Select this checkbox to have the specified character or characters moved to the next line when the lines are wrapped. |
'else' on new line | Use this checkbox to have the corresponding statements or characters moved to the next line. |
New line after | Select this checkbox to have the code after the specified character moved to a new line. |
Special 'else if' treatment | If this checkbox is selected, Otherwise, |
Indent 'case' branches | If this checkbox is selected, the |
Braces placement options
Item | Description |
|---|---|
Braces placement style | Use this list to specify the position of the opening brace in class declarations, method declarations, and other types of declarations. The available options are:
|
Force braces | From this list, choose the braces introduction method for
|
Chained method calls
Use the following options to format chained method calls and make them easier to read. Note that builder method calls are always wrapped regardless of the settings for chained calls.
Item | Description |
|---|---|
Wrap first call | Allow wrapping the first method call in chained methods. |
Align when multiline | Align several method calls. |
Builder methods | Specify comma-separated names (identifiers) of methods that you want to be treated as builder methods. For example: |
Keep builder methods indents | Keep additional indents that you insert manually intact as you reformat code. |
Blank lines
Use this tab to define where and how many blank lines you want IntelliJ IDEA to retain and insert in your code after reformatting. For each type of location, specify the number of blank lines to be inserted. The results are displayed in the preview pane.
Item | Description |
|---|---|
Keep maximum blank lines | In this area, specify the number of blank lines to keep after reformatting in the specified locations. |
Minimum blank lines | In this area, specify the minimum number of blank lines to be present in the specified locations. |
JavaDoc
Item | Description |
|---|---|
Alignment | Define the way Javadoc comments should be aligned.
|
Blank lines | Define where blank lines should be inserted in Javadoc comments.
|
Invalid tags | In this area, define whether invalid tags should be preserved or not.
|
Other | In this area, specify additional formatting options for Javadoc comments.
|
Arrangement
This tab lets you define a set of rules that rearranges your code according to your preferences.
Item | Description |
|---|---|
Grouping Rules | Use this area to set the grouping rules.
|
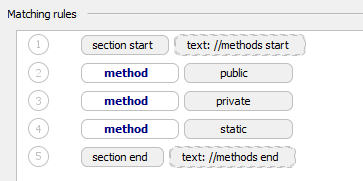
Matching rules | Use this area to define elements order as a list of rules, where every rule has a set of matches such as modifier or type.
|
Empty rule | Use this area to create a new matching rule or edit an existing one. You can select from the following filters:
|
| This icon appears when you select Order by Name from the Order list. The icon indicates that the items in this rule are sorted alphabetically. |
 : use this button to add a rule. The
 : use this button to add a section rule. The section rule lets you move methods or variables into sections that you have defined.
 : use this button to remove the rule from the list.
 : use this button to edit an existing rule. To see this button, navigate to the rule that you want to edit and click the button. In popup that opens, modify the rule fields.

 : use these buttons to move the selected rule up or down.
 : use this button to configure an alias for the matching rule. In this case, when you create an arrangement rule, you can define a custom rule (alias) that includes a sequence of different rules and apply the alias to your current rule.

Imports
Use this tab to configure how IntelliJ IDEA should add and organize import statements in your files. IntelliJ IDEA uses these settings when it adds an import statement automatically, when you optimize imports, and when you reformat code.
General
Use these settings to configure how IntelliJ IDEA should handle imports from other packages.
Item | Description |
|---|---|
Use single class import | When you use a class from another package, import only the class instead of its whole package.
import java.time.*;
import java.time.Duration;
import java.time.LocalDate;
import java.time.LocalTime;
|
Use fully qualified class names | When you use a class from another package, insert the fully qualified class name inline instead of adding an import statement.
import java.time.LocalDate;
LocalDate date = LocalDate.now();
java.time.LocalDate date = java.time.LocalDate.now();
|
Insert imports for inner classes | When you use an inner class, import the inner class instead of its outer class and refer to it by its simple name.
import com.shop.Order;
Order.Item item;
import com.shop.Order.Item;
Item item;
You can keep the outer class name for specific inner classes by adding their simple names to the Exclude inner classes by short name list. |
Do not separate module imports into single or package imports | When you optimize imports, keep module imports instead of replacing them with single-type or wildcard package imports.
import java.time.LocalDate;
import java.util.List;
import module java.base;
|
Delete unused module imports | When you optimize imports, delete module imports that are not used by your code. |
Use fully qualified class names in JavaDoc | When you refer to a class from another package in a Javadoc comment, format the class name according to the selected option:
|
Class count to use import with '*' | Specify the limit for single-type imports from the same package. When a file reaches this limit, the IDE replaces these imports with a wildcard package import.
import java.time.Duration;
import java.time.Instant;
import java.time.LocalDate;
import java.time.LocalTime;
import java.time.*;
|
Names count to use static import with '*' | Specify the limit for static imports from the same class. When a file reaches this limit, the IDE replaces these imports with a wildcard import of all static members.
import static java.lang.Math.abs;
import static java.lang.Math.max;
import static java.lang.Math.*;
|
Packages to Use Import with '*'
Use this table to specify packages and classes for which the IDE should always use a wildcard import (ending with *). You can use it in two ways:
To import a whole package whenever you use one of its classes (instead of only that class), add the package name. To apply this rule to its subpackages too, select With Subpackages. Here is an example where
java.timeis added to the table:import java.time.*; import java.time.format.DateTimeFormatter;import java.time.*; import java.time.format.*;To import all static members of a class whenever you use one of its static members (instead of only that member), add the class name and select Static. Here is an example where
java.util.Collectionsis added to the table:import static java.util.Collections.emptyList;import static java.util.Collections.*;
To add and remove rows, use the icons in the table toolbar.
Import layout
Use these settings to configure the order, grouping, and line spacing of import statements.
Item | Description |
|---|---|
Place on-demand import before single-class imports from the same package | When a file includes a wildcard package import and single-type imports from the same package, place the wildcard import first instead of last.
import java.awt.*;
import java.util.List;
import java.util.*;
import java.awt.*;
import java.util.*;
import java.util.List;
|
Keep blank lines between imports | When you optimize imports or reformat code, keep the existing blank lines between import statements instead of using only the blank lines from the Import layout table.
import javax.sql.DataSource;
import java.time.LocalDate;
import java.util.List;
import javax.sql.DataSource;
import java.time.LocalDate;
import java.util.List;
|
Layout static imports separately | When you optimize imports, place static imports in their own groups instead of sorting them with other imports from the same package.
import java.time.Duration;
import static java.time.Duration.ofSeconds;
import java.time.LocalDate;
import java.time.Duration;
import java.time.LocalDate;
import static java.time.Duration.ofSeconds;
|
Import layout | Configure the order of import statements in your files and organize them into groups. The layout is defined at the package level. By default, the position of a package applies to both its wildcard imports and single-type imports. You can change this scope with the following options:
To add packages and blank lines, remove them, or change their order, use the icons in the table toolbar. |
Code Generation
Item | Description |
|---|---|
Naming |
|
Default Visibility | Select the default access level for generated fields and methods. You can either specify it explicitly, or select Escalate to automatically raise it to a necessary level. |
Variable declaration | Specify whether you want to generate local variables and parameters with the |
Comment Code | Use this area to configure code style for generated comments (line Ctrl+/ and block Ctrl+Shift+/):
|
Override Method Signature |
|
Lambda Body | If a lambda expression calls an existing method, it is preferable to refer to the method by name using a method reference. These checkboxes affect the Lambda can be replaced with method reference inspection. If enabled, the corresponding lambda expressions will be highlighted as warnings with a relevant quick-fix. If disabled, the code will not be highlighted, but an intention to replace the lambda expression with a method reference will still be available.
|