Examine suspended program
After the debugger session has started, the Debug tool window appears, and the program runs normally until one of the following happens:
a breakpoint is hit
you manually pause the program
After that, the program is suspended, allowing you to examine its current state, control its further execution, and test various scenarios at runtime.
Examine frames
The state of the program is represented by frames. When the program is suspended, the current frame stack is displayed on the Frames tab of the Debug tool window.
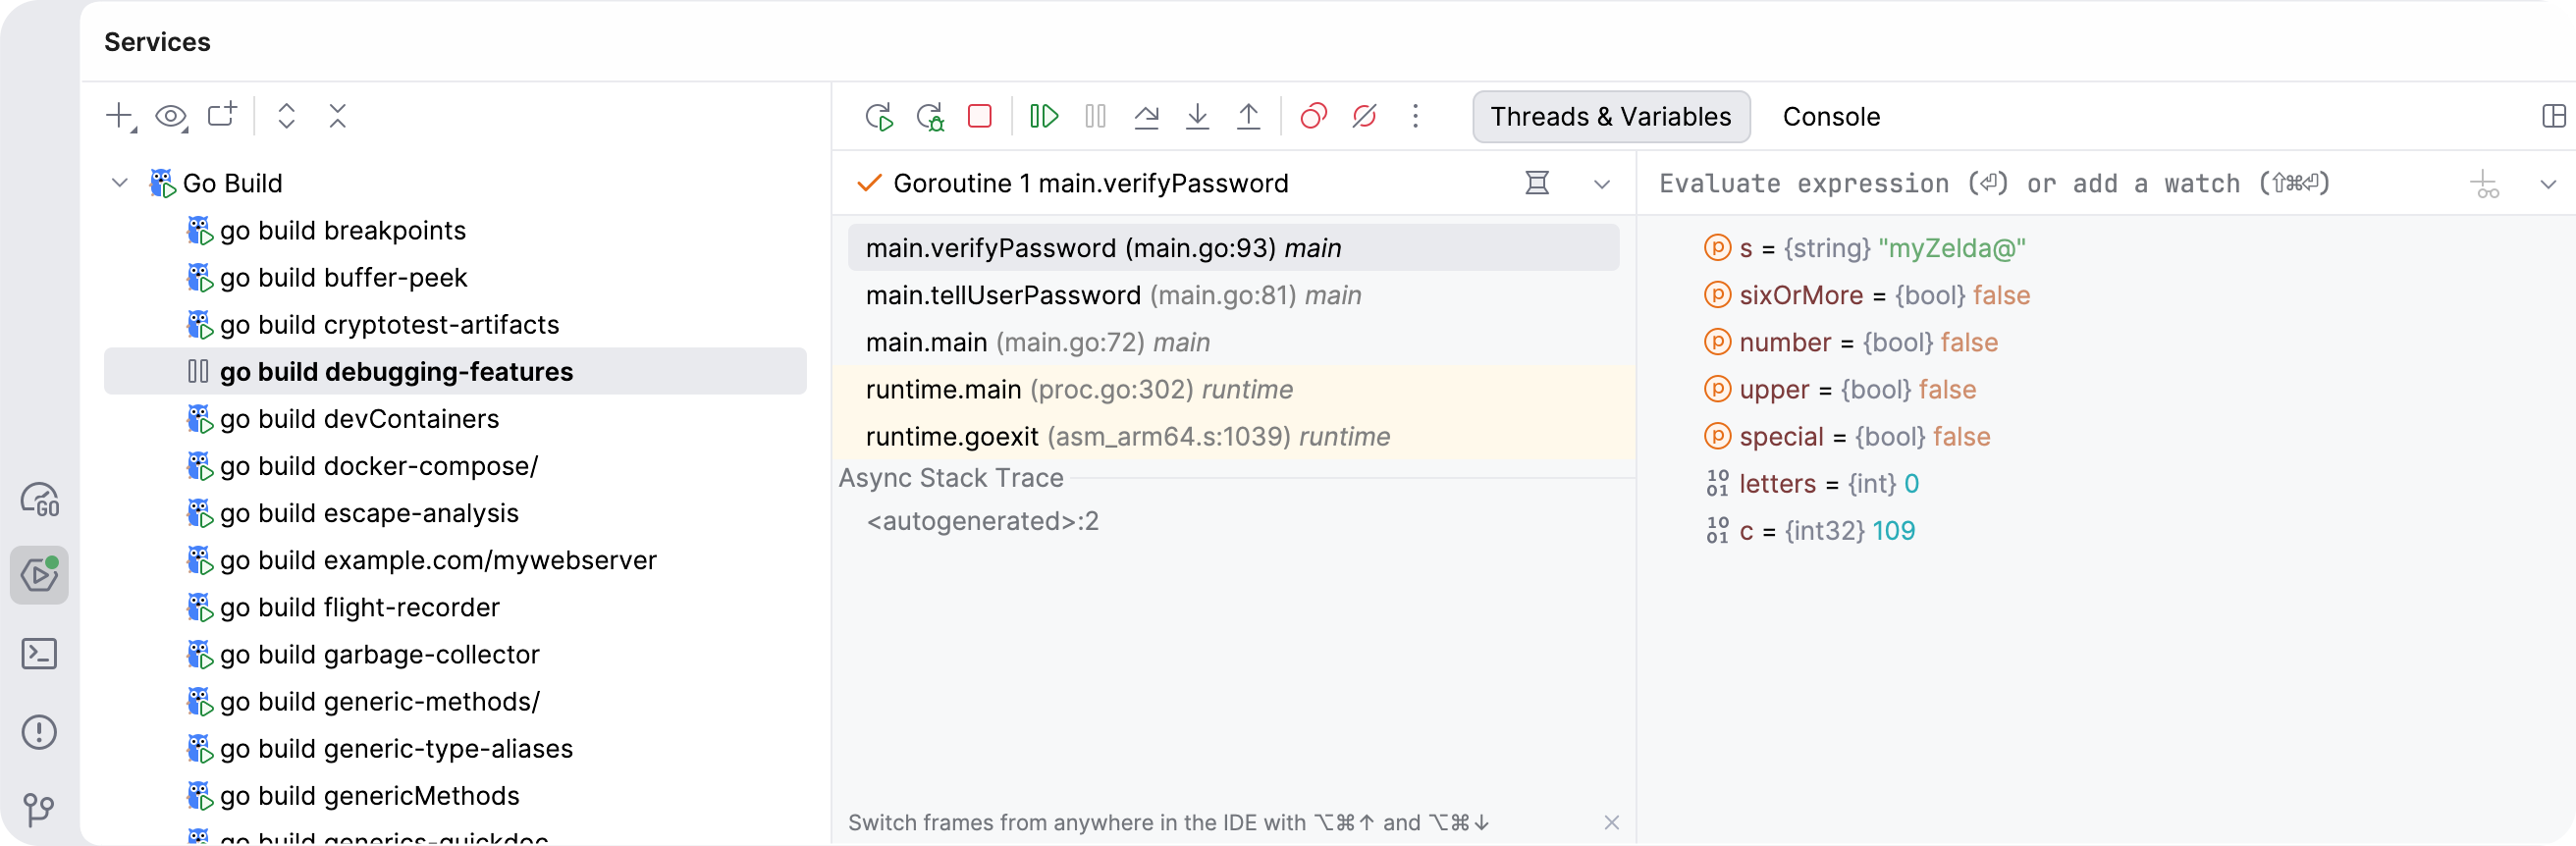
A frame corresponds to an active method or function call. It stores the local variables of the called method or function, its arguments, and the code context that enables expression evaluation.
The main function can call other functions, which can make further calls. Each active call has a frame containing its local variables and arguments.
Each time a method is called, a new frame is added to the top of the stack. When the execution of a method is complete, the corresponding frame is removed from the stack (in the last in, first out fashion).
Examining frames helps you understand why particular parameters were passed to a function or method and what the state of the caller was at the time of calling.
Copy stack to clipboard
To copy the call stack for the selected goroutine or thread, right-click anywhere on the Frames tab and select Copy Stack.
Switch between goroutines and threads
A goroutine is a function running concurrently with other goroutines. The Go runtime schedules goroutines on operating-system threads. By default, the debugger lists goroutines.
To inspect operating-system threads, click Show Threads (
 ) on the Frames toolbar.
To return to goroutines, click Show Goroutines.
When Delve reports where a goroutine started, the Async Stack Trace section shows the go statement that started it. You cannot evaluate expressions in that frame.
Preview frames in one tab successively
The preview tab allows you to open files successively in one tab. This way you avoid cluttering the editor with multiple open files in separate tabs.
To enable the preview mode for files that are opened during debugging, open settings by pressing Ctrl+Alt+S, navigate to and select the Enable preview tab checkbox.
Hide object types
If object types take up too much space in the Debug tool window, right-click a variable and clear the Show Types option in the list that appears.
Filter a list of goroutines in the dump tab
You can create a dump of all the goroutines that your program uses, apply a filter that searches for a specific goroutine, and study the filtered results. This procedure can help you to better understand how your program or its part works.
The following example shows the call stack of Goroutine 1 main.main. Each entry shows the goroutine ID and the last function on its stack outside the runtime package.
Dump goroutines
During the debugging session, click
 More and navigate to Dump Goroutines.
A dump of available goroutines and their stacks opens in a separate tab.
Filter the dump results
Click the Filter icon (
 ). In the Filter field, type a string that you want to search for.
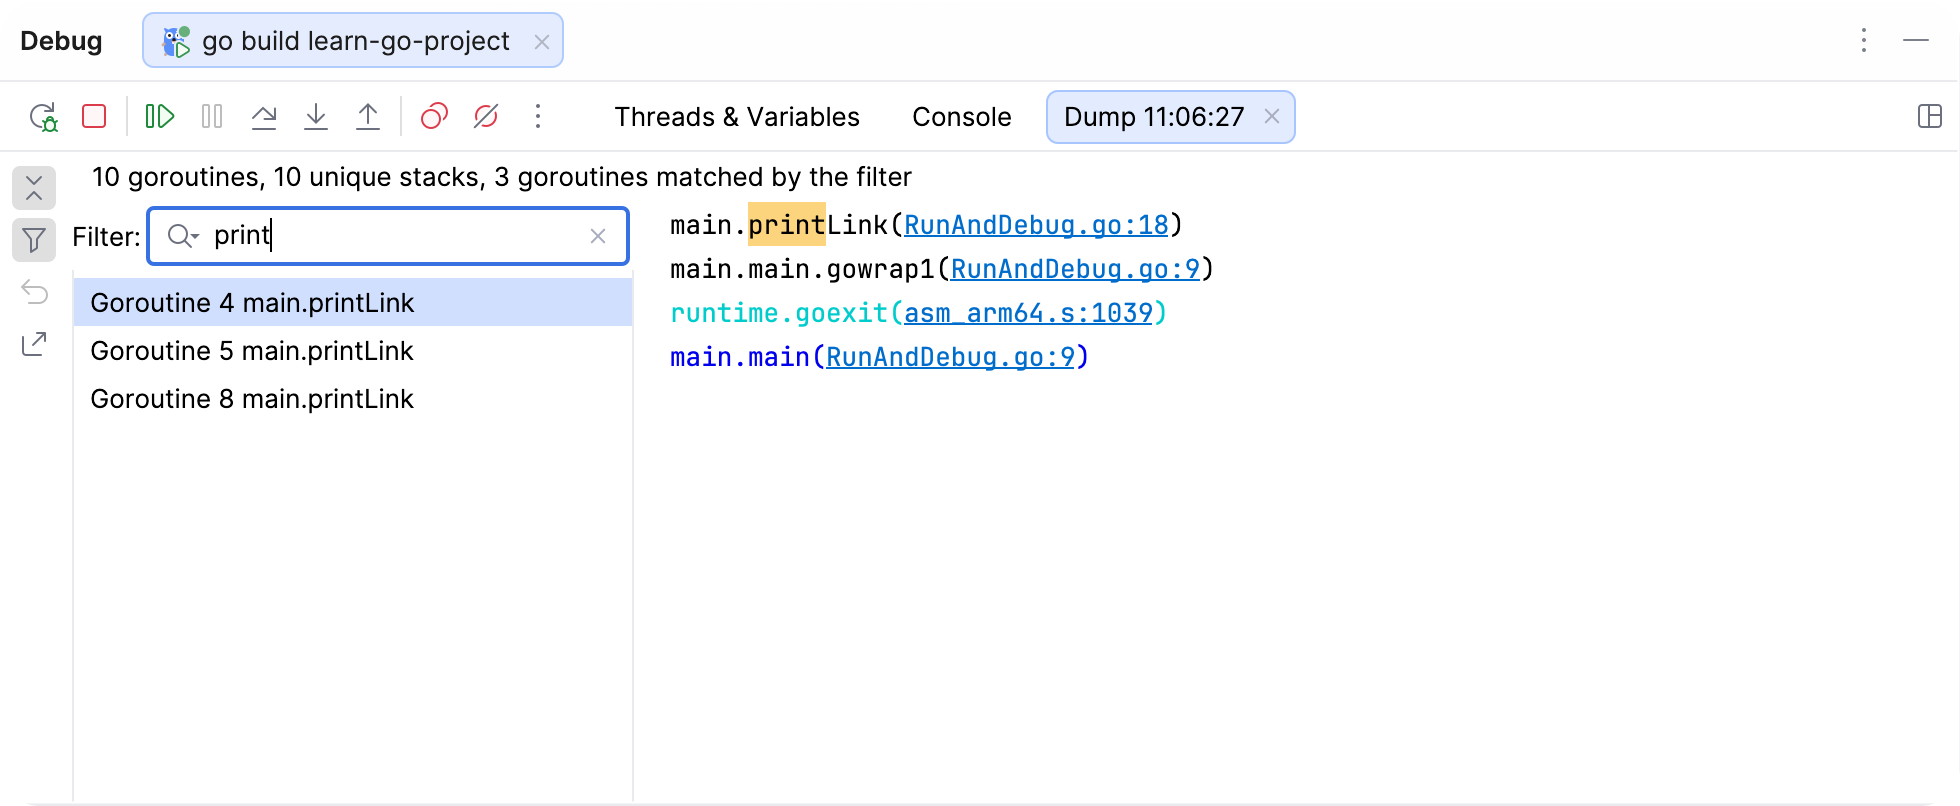
Right-click a goroutine that you want to exclude from the list and select Hide goroutine. To hide all the goroutines that have the same stack as the selected goroutine, select Hide goroutines with the same stack from the context menu.
You can view hidden goroutines under the Hidden list.
To reset the state of the list and make all the hidden goroutines in the visible list again, click the Reset Hidden Goroutines button (
 ).
Export dump results into a text file
Click the Export to Text File icon (
 ).
In the Export to file field, select a storage path and click Save.
Examine/update variables
The Threads & Variables tab shows the list of the variables in the selected frame/thread. Examining the variables can help you understand why the program operates in a certain way.
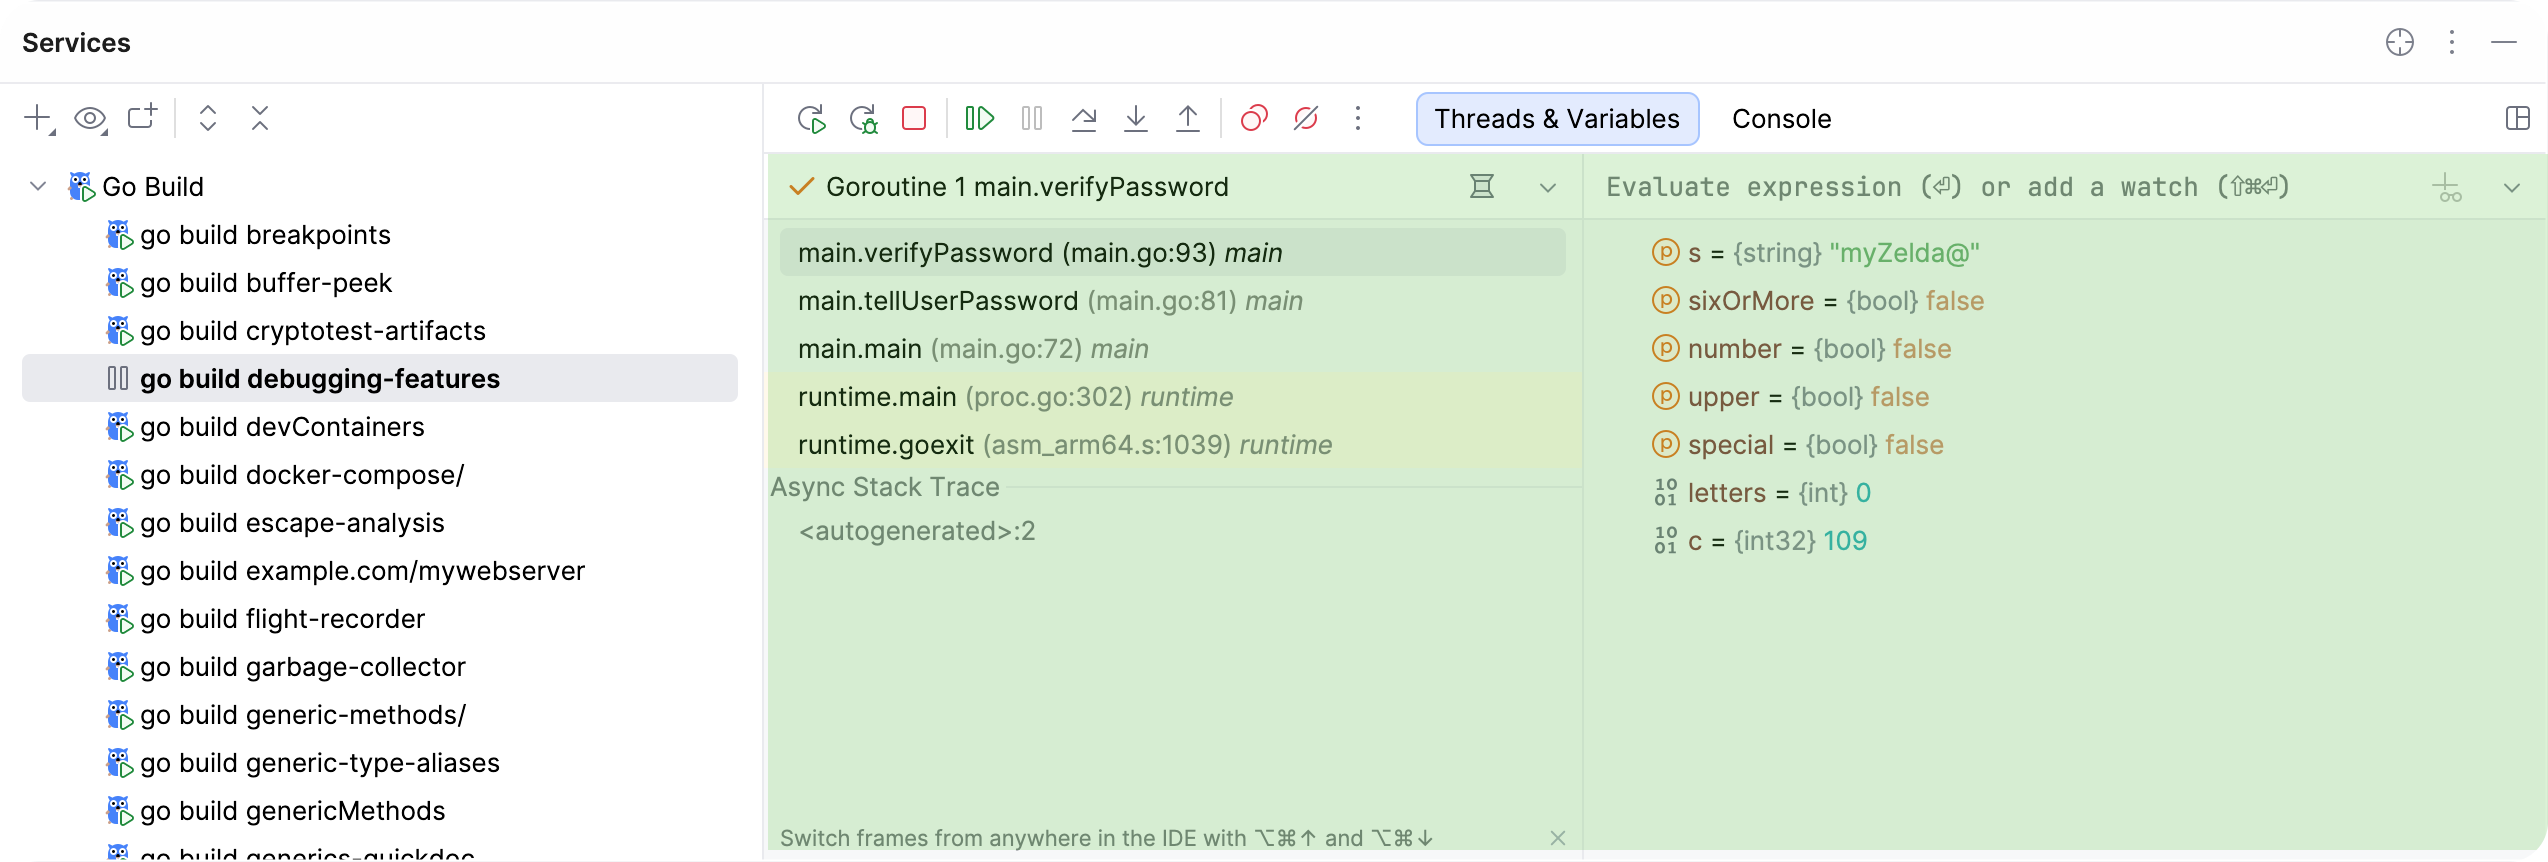
The icon on the left of each variable indicates its type.
Copy variables
When examining variables, you may need to copy a variable name or value to paste it somewhere else or compare it with another variable.
To copy the name of a variable, right-click the variable and select Copy Name.
To copy the value that a variable holds, right-click the variable and select Copy Value Ctrl+C.
Compare variables with clipboard
To compare a variable value with some other value, use the Compare Value with Clipboard option. This is helpful, for example, when a variable holds a long string, and you need to compare it with another long string.
Copy the content you want to compare, for example, from a text file.
In the Variables tab, right-click a variable and select Compare Value with Clipboard.
Examine the differences in the Diff Viewer that opens. For more information about Diff Viewer, refer to Comparing Files and Folders.
View variables in a dedicated dialog
GoLand allows you to inspect variables in a dedicated dialog. This is useful when you need to keep track of some variable (or the object whose reference it holds) and at the same time be able to navigate between frames and goroutines.
Right-click a variable or a watch and select Inspect.
Set variable values
If you want to test how the program would behave with certain data or change its flow at runtime, you can achieve that by changing the variable values.
Select a variable and press F2. Alternatively, select Set Value from the context menu.
Enter the value for the variable and press Enter.
Navigate to source code
You can navigate to declarations from the Variables pane.
To navigate to the code where the variable is declared, right-click the variable and select Jump to Source F4.
To navigate to the type declaration of the variable type, right-click the variable and select Jump to Type Source Shift+F4.
Evaluate expressions
GoLand lets you evaluate expressions during a debugging session to obtain additional details about the program state or test various execution scenarios at runtime.
Suspend the program at a breakpoint or pause it, then select the goroutine and stack frame whose variables you want to use. Expressions are evaluated in the selected frame.
If there are breakpoints inside methods called within the expression, they will be ignored.
Evaluate a simple expression in the editor
To quickly evaluate an expression, point at it in the editor. Note that method calls cannot be evaluated this way.
Point at the expression you want to evaluate. The result of the expression appears in a tooltip.
To view child elements of the resulting object, click
 or press Ctrl+F1.
If you find value tooltips distracting, you can increase the delay or disable them altogether. To do this, in the Settings dialog (Ctrl+Alt+S) , go to and set the Show value tooltip and Value tooltip delay options according to your preference.
Evaluate a complex expression in the editor
If you want to evaluate an expression in the code that involves a method call or indicate a specific portion of the expression to evaluate, use the Quick Evaluate Expression option.
Select the expression and press Ctrl+Alt+F8 or select Evaluate Expression from the floating toolbar that appears .
Alternatively, go to or hold Alt and click the selection .
You can configure Quick Evaluate Expression to work for a piece of code on just selecting it (without using the menu/shortcut). Use this option carefully, as you can accidentally call methods when it is enabled.
Evaluate expressions on selecting code
Go to and set the Show value tooltip on code selection option.
Evaluate arbitrary expressions
You can evaluate Go expressions such as len(items), items[0].Name, or count > 10. Delve supports a subset of Go expressions, not arbitrary code blocks with declarations or loops. For supported syntax, refer to the Delve expression documentation.
If you see Cannot evaluate the call: non-top frame is selected, select the first frame in the goroutine's call stack and evaluate the expression again.
To evaluate an arbitrary expression, enter it in the Evaluate expression field in the Variables pane and press Enter
The result is displayed right below. You can also add the expression to watches by clicking
 in the right-hand part of the expression field.
You can also enter an expression in a separate dialog:
Evaluate expressions in a dedicated dialog
If you want to start with some expression or a variable, which is currently in front of you (for example, in the editor or on the Variables pane), select it.
Go to Alt+F8 or select Evaluate Expression from the context menu. The shortcut may not work on Ubuntu (for correct operation, adjust the shortcut configuration).
In the Evaluate dialog, modify the selected expression or enter a new one in the Expression field.
Click Evaluate. The expression result appears in the Result field.
If the expression cannot be evaluated, the Result field shows the reason.
The Evaluate dialog is non-modal, so you can switch the focus back to the editor to copy other variables and expressions. You can also open multiple Evaluate dialogs.
View values inline
GoLand shows the values of the variables right next to their usage.
Once the variable value has changed, the inline view is updated with the new value and changes its color.
The inline view is enabled by default. To turn it off, in the Settings dialog (Ctrl+Alt+S) , go to and disable the Show values inline option.
Add an Inline Watch
If you want the result of some expression to appear on a particular line, you can set up an inline watch for that. Inline watches are persistent and remain active after session restart.
Click the inline hint referring to the object whose field you want to track.
In the popup, select the field and click Add as Inline Watch.
Fine-tune the watch if needed. You can use any valid expression as a watch.
To remove an inline watch, hover over the watch and click the cross near it.
Visualize JSON and XML
When you expand an inline value or evaluate a string expression that contains JSON or XML, GoLand gives you a structured and formatted view of the data.
This lets you use editor features like code folding and extend or shrink selection for working with subtrees and convenient navigation in big objects.
Use the tabs in the preview popup to switch between the structured and raw view:
Watches
If you want to keep track of some variable or the result of a more complex expression, set up a watch for this variable or expression. This is useful when you need to evaluate something that is not regularly displayed on the list of variables, or to pin some instance variable thus eliminating the need to expand the tree after each step.
Suspend the program at a breakpoint or pause it, then select the goroutine and stack frame whose variables you want to use. Expressions are evaluated in the selected frame.
Watches are evaluated in the context of the selected frame. Watches cannot be evaluated when they are out of context or when they fail to compile. If this is the case, the watch is marked with the error icon  .
By default, watches are shown together with variables in the Variables pane. To hide/reveal the Watches pane, use the Separate watches option in the Layout Settings menu.
Add a watch
Click New Watch
on the Variables tab.Enter a variable or expression that is available in the selected frame, such as
len(items). Function calls have the same restrictions and side effects as other expression evaluations.
After you have added a variable/expression to Watches, it stays there and is evaluated for each step, providing you with the result in the current context.
Edit a watch
Right-click the desired watch and select Edit.
Copy a watch
Select the watch you want to copy.
Click Duplicate Watch
 on the Variables/Watches tab or press Ctrl+D.
Change the order of watches
For convenience, you can change the order in which the watches appear on the Variables/Watches pane.
Use the Move Watch Up/Move Watch Down buttons on the Variables/Watches pane or Ctrl+Up and Ctrl+Down keyboard shortcuts.
Delete a watch
To remove a single watch, right-click it and select Remove Watch. Alternatively, select the watch and press Delete on the Variables/Watches pane.
To remove all watches, right-click anywhere on the Variables/Watches pane and select Remove All Watches.
Watches allow for the same actions as variables do. For example, you can view them in a dedicated dialog or use them to navigate to the source code.
Watches are a part of your project. This means you can stop and rerun the debugging session without risk of losing them.
Pause and resume watches
Sometimes, a watch may rely on local context or involve heavy computations, making its evaluation impractical for some steps. In such cases, you can pause the watch and evaluate it on demand.
To pause a watch, right-click it and select Pause Watch.
To resume a watch, right-click it and select Resume Watch.
Execution point
Return to the current execution point
Examining the program state involves navigating in code, and you often need to return to the place where your program is suspended.
Do one of the following:
In the main menu, go to .
Press Alt+F10.
Click
 on the stepping toolbar of the Debug tool window and select
 Show Execution Point from the context menu that opens.
The current execution point is indicated with a blue line. The code at this line has not been executed yet.